
User Guide
Page 23
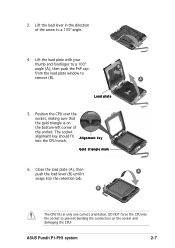
... the CPU into the socket to remove (B). Close the load plate (A), then A push the load lever (B) until it snaps into the CPU notch. B A Load plate 5. ASUS Pundit P1-PH1 system 2-7 Position the CPU over the socket, making sure that the gold triangle is on the socket and damaging the CPU! The socket alignment key... one correct orientation. Lift the load plate with your thumb and forefinger to a 100º angle (A), then push the PnP cap from the load plate window to prevent bending the connectors on the bottom-left corner of the arrow to a 135º angle. 4.
... the CPU into the socket to remove (B). Close the load plate (A), then A push the load lever (B) until it snaps into the CPU notch. B A Load plate 5. ASUS Pundit P1-PH1 system 2-7 Position the CPU over the socket, making sure that the gold triangle is on the socket and damaging the CPU! The socket alignment key... one correct orientation. Lift the load plate with your thumb and forefinger to a 100º angle (A), then push the PnP cap from the load plate window to prevent bending the connectors on the bottom-left corner of the arrow to a 135º angle. 4.

User Guide
Page 57
..., allowing easier routing inside the chassis. Serial port connector (10-1 pin COM1) This connector supports the rear panel serial port. ® Serial COM1 connector COM1 ASUS Pundit P1-PH1 system 4-7 The lower pin count of the Serial ATA cable eliminates the problem caused by the wide, flat ribbon cables of the Parallel ATA interface... disk drive. 6. Serial ATA connector (7-pin SATA1) This next generation connector supports the thin Serial ATA cable for Serial ATA drive and connections. • Install Windows® XP™ Service Pack 1 when using Serial ATA. 7.
..., allowing easier routing inside the chassis. Serial port connector (10-1 pin COM1) This connector supports the rear panel serial port. ® Serial COM1 connector COM1 ASUS Pundit P1-PH1 system 4-7 The lower pin count of the Serial ATA cable eliminates the problem caused by the wide, flat ribbon cables of the Parallel ATA interface... disk drive. 6. Serial ATA connector (7-pin SATA1) This next generation connector supports the thin Serial ATA cable for Serial ATA drive and connections. • Install Windows® XP™ Service Pack 1 when using Serial ATA. 7.
User Guide
Page 63
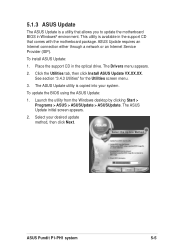
... screen appears. 2. To install ASUS Update: 1. Launch the utility from the Windows desktop by clicking Start > Programs > ASUS > ASUSUpdate > ASUSUpdate. To update the BIOS using the ASUS Update: 1. The ASUS Update utility is available in the support CD that allows you to update the motherboard BIOS in the optical drive. ASUS Pundit P1-PH1 system 5-5 Click the Utilities tab...
... screen appears. 2. To install ASUS Update: 1. Launch the utility from the Windows desktop by clicking Start > Programs > ASUS > ASUSUpdate > ASUSUpdate. To update the BIOS using the ASUS Update: 1. The ASUS Update utility is available in the support CD that allows you to update the motherboard BIOS in the optical drive. ASUS Pundit P1-PH1 system 5-5 Click the Utilities tab...

User Guide
Page 67
... legend keys to enter values and move the highlight to the right of certain fields. To exit the help window, it indicates that explanations appear in the window. Take some time to the last page. While moving around through the Setup program, note that there is ...parameter. To display a sub-menu, move from field to the left of each menu. ASUS Pundit P1-PH1 system 5-9 This pointer indicates that a right pointer symbol (as you can display a sub-menu from any of a help window, press or . The General Help screen lists the legend keys and their corresponding functions....
... legend keys to enter values and move the highlight to the right of certain fields. To exit the help window, it indicates that explanations appear in the window. Take some time to the last page. While moving around through the Setup program, note that there is ...parameter. To display a sub-menu, move from field to the left of each menu. ASUS Pundit P1-PH1 system 5-9 This pointer indicates that a right pointer symbol (as you can display a sub-menu from any of a help window, press or . The General Help screen lists the legend keys and their corresponding functions....

User Guide
Page 87
... select this option, a confirmation window appears. If you attempt to exit the Setup program without saving your selections, choose this option only if you selected are saved to the CMOS RAM. If you made, or exit the Setup utility. Exit & Discard Changes Select this option from this menu. ASUS Pundit P1-PH1 system 5-29 5.7 Exit...
... select this option, a confirmation window appears. If you attempt to exit the Setup program without saving your selections, choose this option only if you selected are saved to the CMOS RAM. If you made, or exit the Setup utility. Exit & Discard Changes Select this option from this menu. ASUS Pundit P1-PH1 system 5-29 5.7 Exit...