
User Guide
Page 21
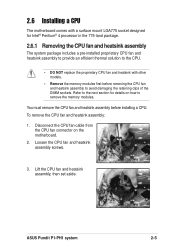
... with other models. • Remove the memory modules first before installing a CPU. Lift the CPU fan and heatsink assembly, then set aside. 2.6 Installing a CPU The motherboard comes with a surface mount LGA775 socket designed for details on the motherboard. 2. ASUS Pundit P1-PH1 system 2-5 To remove the CPU fan and heatsink assembly: 1.
... with other models. • Remove the memory modules first before installing a CPU. Lift the CPU fan and heatsink assembly, then set aside. 2.6 Installing a CPU The motherboard comes with a surface mount LGA775 socket designed for details on the motherboard. 2. ASUS Pundit P1-PH1 system 2-5 To remove the CPU fan and heatsink assembly: 1.
User Guide
Page 25
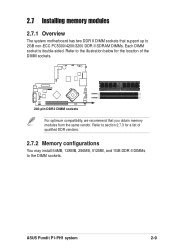
.../4200/3200 DDR II SDRAM DIMMs. Each DIMM socket is double-sided. 2.7 Installing memory modules 2.7.1 Overview The system motherboard has two DDR II DIMM sockets that you obtain memory modules from the same vendor. ASUS Pundit P1-PH1 system 2-9 Refer to the illustration below for a list of the DIMM sockets. ® DIMMA1 DIMMB1 240-pin...
.../4200/3200 DDR II SDRAM DIMMs. Each DIMM socket is double-sided. 2.7 Installing memory modules 2.7.1 Overview The system motherboard has two DDR II DIMM sockets that you obtain memory modules from the same vendor. ASUS Pundit P1-PH1 system 2-9 Refer to the illustration below for a list of the DIMM sockets. ® DIMMA1 DIMMB1 240-pin...
User Guide
Page 27
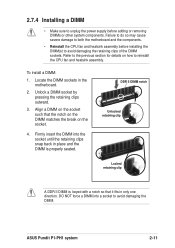
...retaining clip Locked retaining clip A DDR II DIMM is properly seated. Failure to do so may cause severe damage to both the motherboard and the components. • Reinstall the CPU fan and heatsink assembly before installing the DIMM(s) to unplug the power supply before ...the socket. 4. Align a DIMM on the socket such that it fits in the motherboard. 2. 2.7.4 Installing a DIMM • Make sure to avoid damaging the retaining clips of the DIMM sockets. To install a DIMM: 1. ASUS Pundit P1-PH1 system 2-11 Refer to reinstall the CPU fan and heatsink assembly. Unlock a DIMM...
...retaining clip Locked retaining clip A DDR II DIMM is properly seated. Failure to do so may cause severe damage to both the motherboard and the components. • Reinstall the CPU fan and heatsink assembly before installing the DIMM(s) to unplug the power supply before ...the socket. 4. Align a DIMM on the socket such that it fits in the motherboard. 2. 2.7.4 Installing a DIMM • Make sure to avoid damaging the retaining clips of the DIMM sockets. To install a DIMM: 1. ASUS Pundit P1-PH1 system 2-11 Refer to reinstall the CPU fan and heatsink assembly. Unlock a DIMM...
User Guide
Page 29
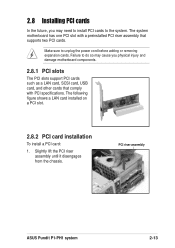
... slot. 2.8.2 PCI card installation To install a PCI card: 1. The system motherboard has one PCI slot with a preinstalled PCI riser assembly that comply with PCI specifications. Slightly lift the PCI riser assembly until it disengages from the chassis. PCI riser assembly ASUS Pundit P1-PH1 system 2-13 Failure to unplug the power cord before adding or...
... slot. 2.8.2 PCI card installation To install a PCI card: 1. The system motherboard has one PCI slot with a preinstalled PCI riser assembly that comply with PCI specifications. Slightly lift the PCI riser assembly until it disengages from the chassis. PCI riser assembly ASUS Pundit P1-PH1 system 2-13 Failure to unplug the power cord before adding or...
User Guide
Page 31
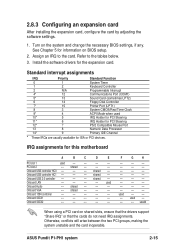
... Processor 14* 9 Primary IDE Channel * These IRQs are usually available for this motherboard A B C D E PCI slot 1 used -- -- -- Onboard VGA -- shared -- Onboard LAN -- -- -- -- shared -- -- -- F G H -- -- -- -- -- -- -- -- -- -- -- -- -- -- -- -- -- -- -- -- -- -- -- -- Otherwise, conflicts will arise between the two PCI groups, making the system unstable and the card inoperable. ASUS Pundit P1-PH1 system 2-15 Assign an IRQ to the tables below. 3. Standard interrupt assignments...
... Processor 14* 9 Primary IDE Channel * These IRQs are usually available for this motherboard A B C D E PCI slot 1 used -- -- -- Onboard VGA -- shared -- Onboard LAN -- -- -- -- shared -- -- -- F G H -- -- -- -- -- -- -- -- -- -- -- -- -- -- -- -- -- -- -- -- -- -- -- -- Otherwise, conflicts will arise between the two PCI groups, making the system unstable and the card inoperable. ASUS Pundit P1-PH1 system 2-15 Assign an IRQ to the tables below. 3. Standard interrupt assignments...
User Guide
Page 33
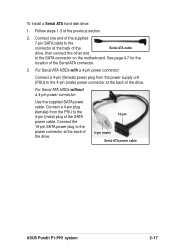
... a 4-pin plug (female) from the power supply unit (PSU) to the 4-pin (male) plug of the drive. 15-pin 4-pin (male) Serial ATA power cable ASUS Pundit P1-PH1 system 2-17 Connect the 15-pin SATA power plug to the power connector at the back of the Serial ATA cable drive, then connect the... of the drive. To install a Serial ATA hard disk drive: 1. Connect one end of the supplied 7-pin SATA cable to the SATA connector on the motherboard.
... a 4-pin plug (female) from the power supply unit (PSU) to the 4-pin (male) plug of the drive. 15-pin 4-pin (male) Serial ATA power cable ASUS Pundit P1-PH1 system 2-17 Connect the 15-pin SATA power plug to the power connector at the back of the Serial ATA cable drive, then connect the... of the drive. To install a Serial ATA hard disk drive: 1. Connect one end of the supplied 7-pin SATA cable to the SATA connector on the motherboard.
User Guide
Page 47
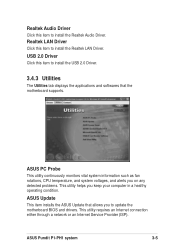
... through a network or an Internet Service Provider (ISP). Realtek Audio Driver Click this item to install the Realtek LAN Driver. ASUS Pundit P1-PH1 system 3-5 Realtek LAN Driver Click this item to update the motherboard BIOS and drivers. USB 2.0 Driver Click this item to install the USB 2.0 Driver. 3.4.3 Utilities The Utilities tab displays the applications...
... through a network or an Internet Service Provider (ISP). Realtek Audio Driver Click this item to install the Realtek LAN Driver. ASUS Pundit P1-PH1 system 3-5 Realtek LAN Driver Click this item to update the motherboard BIOS and drivers. USB 2.0 Driver Click this item to install the USB 2.0 Driver. 3.4.3 Utilities The Utilities tab displays the applications...

User Guide
Page 49
3.4.5 Other information The icons on the top right side of the screen give additional information on the motherboard and the contents of the motherboard. Browse this CD Displays the support CD contents in graphical format. Click an icon to display the specified information. Motherboard info Displays the general specifications of the support CD. ASUS Pundit P1-PH1 system 3-7
3.4.5 Other information The icons on the top right side of the screen give additional information on the motherboard and the contents of the motherboard. Browse this CD Displays the support CD contents in graphical format. Click an icon to display the specified information. Motherboard info Displays the general specifications of the support CD. ASUS Pundit P1-PH1 system 3-7

User Guide
Page 57
Serial port connector (10-1 pin COM1) This connector supports the rear panel serial port. ® Serial COM1 connector COM1 ASUS Pundit P1-PH1 system 4-7 The current Serial ATA interface allows up to 150 MB/s data transfer rate, faster than the standard parallel ATA with 133 MB/s (Ultra ATA ... lower pin count of the Serial ATA cable eliminates the problem caused by the wide, flat ribbon cables of the Parallel ATA interface. • This motherboard does not support hot plug function for a Serial ATA hard disk drive.
Serial port connector (10-1 pin COM1) This connector supports the rear panel serial port. ® Serial COM1 connector COM1 ASUS Pundit P1-PH1 system 4-7 The current Serial ATA interface allows up to 150 MB/s data transfer rate, faster than the standard parallel ATA with 133 MB/s (Ultra ATA ... lower pin count of the Serial ATA cable eliminates the problem caused by the wide, flat ribbon cables of the Parallel ATA interface. • This motherboard does not support hot plug function for a Serial ATA hard disk drive.
User Guide
Page 61
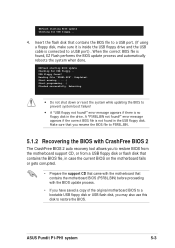
... BIOS update process and automatically reboots the system when done. ASUS Pundit P1-PH1 system 5-3 Make sure that you rename the BIOS file to P5R8L.BIN. 5.1.2 Recovering the BIOS with CrashFree BIOS 2 The CrashFree BIOS 2 auto recovery tool allows you to restore BIOS from the motherboard support CD, or from a USB floppy disk or flash...
... BIOS update process and automatically reboots the system when done. ASUS Pundit P1-PH1 system 5-3 Make sure that you rename the BIOS file to P5R8L.BIN. 5.1.2 Recovering the BIOS with CrashFree BIOS 2 The CrashFree BIOS 2 auto recovery tool allows you to restore BIOS from the motherboard support CD, or from a USB floppy disk or flash...
User Guide
Page 63
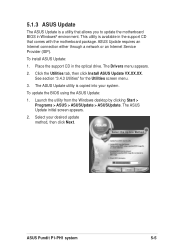
... desired update method, then click Next. ASUS Pundit P1-PH1 system 5-5 The Drivers menu appears. 2. See section "3.4.3 Utilities" for the Utilities screen menu. 3. The ASUS Update initial screen appears. 2. To install ASUS Update: 1. Select your system. Launch the utility from the Windows desktop by clicking Start > Programs > ASUS > ASUSUpdate > ASUSUpdate. ASUS Update requires an Internet connection either through...
... desired update method, then click Next. ASUS Pundit P1-PH1 system 5-5 The Drivers menu appears. 2. See section "3.4.3 Utilities" for the Utilities screen menu. 3. The ASUS Update initial screen appears. 2. To install ASUS Update: 1. Select your system. Launch the utility from the Windows desktop by clicking Start > Programs > ASUS > ASUSUpdate > ASUSUpdate. ASUS Update requires an Internet connection either through...
User Guide
Page 65
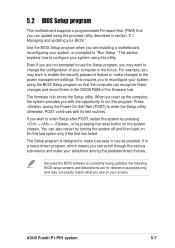
... being updated, the following BIOS setup screens and descriptions are installing a motherboard, reconfiguring your system, or prompted to use the Setup program, you see on your computer in the future. ASUS Pundit P1-PH1 system 5-7 For example, you may not exactly match what you may ... Setup utility, otherwise, POST continues with the opportunity to reconfigure your selections among the predetermined choices. 5.2 BIOS Setup program This motherboard supports a programmable Firmware Hub (FWH) that the computer can recognize these changes and record them in the CMOS RAM of your...
... being updated, the following BIOS setup screens and descriptions are installing a motherboard, reconfiguring your system, or prompted to use the Setup program, you see on your computer in the future. ASUS Pundit P1-PH1 system 5-7 For example, you may not exactly match what you may ... Setup utility, otherwise, POST continues with the opportunity to reconfigure your selections among the predetermined choices. 5.2 BIOS Setup program This motherboard supports a programmable Firmware Hub (FWH) that the computer can recognize these changes and record them in the CMOS RAM of your...