
User Guide
Page 53
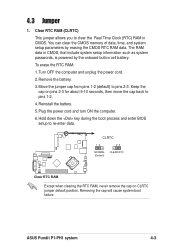
... allows you to pins 1-2. 4. Turn OFF the computer and unplug the power cord. 2. CLRTC 12 23 NORMAL CLEAR RTC (Default) ® Clear RTC RAM Except when clearing the RTC RAM, never remove the cap on pins 2-3 for about 5-10 seconds, then move the cap back to clear the Real Time Clock (RTC.... 3. Move the jumper cap from pins 1-2 (default) to re-enter data. Hold down the key during the boot process and enter BIOS setup to pins 2-3. ASUS Pundit P1-PH1 system 4-3 The RAM data in CMOS. Plug the power cord and turn ON the computer. 6. Reinstall the battery. 5.
... allows you to pins 1-2. 4. Turn OFF the computer and unplug the power cord. 2. CLRTC 12 23 NORMAL CLEAR RTC (Default) ® Clear RTC RAM Except when clearing the RTC RAM, never remove the cap on pins 2-3 for about 5-10 seconds, then move the cap back to clear the Real Time Clock (RTC.... 3. Move the jumper cap from pins 1-2 (default) to re-enter data. Hold down the key during the boot process and enter BIOS setup to pins 2-3. ASUS Pundit P1-PH1 system 4-3 The RAM data in CMOS. Plug the power cord and turn ON the computer. 6. Reinstall the battery. 5.
User Guide
Page 65
... when you are not prompted to enter Setup after POST, restart the system by pressing + + , or by turning the system off and then back on. ASUS Pundit P1-PH1 system 5-7 You can recognize these changes and record them in section "5.1 Managing and updating your BIOS." The Setup program is a menu-driven program, which... Setup." When you start up the computer, the system provides you are installing a motherboard, reconfiguring your system using the provided utility described in the CMOS RAM of your computer in the future.
... when you are not prompted to enter Setup after POST, restart the system by pressing + + , or by turning the system off and then back on. ASUS Pundit P1-PH1 system 5-7 You can recognize these changes and record them in section "5.1 Managing and updating your BIOS." The Setup program is a menu-driven program, which... Setup." When you start up the computer, the system provides you are installing a motherboard, reconfiguring your system using the provided utility described in the CMOS RAM of your computer in the future.

User Guide
Page 71
CPU Configuration CPU Type Intel Pentium(R) D CPU Speed 2.80GHz Cache RAM 1024 K x2 Current FSB Frequency 200 MHz Thermal Management [TM 1] x TM2 Bus Ratio x TM2 Bus VID Limit CPUID MaxVal [Disabled] Execute Disable Bit [Enabled] Select ... devices. Take caution when changing the settings of the Advanced menu items. Incorrect field values may cause the system to change the settings for WinXP ASUS Pundit P1-PH1 system 5-13 5.4 Advanced Menu The Advanced menu items allow you to malfunction.
CPU Configuration CPU Type Intel Pentium(R) D CPU Speed 2.80GHz Cache RAM 1024 K x2 Current FSB Frequency 200 MHz Thermal Management [TM 1] x TM2 Bus Ratio x TM2 Bus VID Limit CPUID MaxVal [Disabled] Execute Disable Bit [Enabled] Select ... devices. Take caution when changing the settings of the Advanced menu items. Incorrect field values may cause the system to change the settings for WinXP ASUS Pundit P1-PH1 system 5-13 5.4 Advanced Menu The Advanced menu items allow you to malfunction.

User Guide
Page 86
...the password field, and press twice. A note about passwords The Supervisor password is powered by erasing the CMOS Real Time Clock (RTC) RAM. Select [System] to enter the BIOS Setup program, preventing unauthorized access. Highlight an item then press . 2. The following message appears:...any key to boot the system, preventing unauthorized use. Type in a password using eight (8) alphanumeric characters, then press . 3. The RAM data containing the password information is required to require the password before entering the system. When prompted, confirm the password by typing the...
...the password field, and press twice. A note about passwords The Supervisor password is powered by erasing the CMOS Real Time Clock (RTC) RAM. Select [System] to enter the BIOS Setup program, preventing unauthorized access. Highlight an item then press . 2. The following message appears:...any key to boot the system, preventing unauthorized use. Type in a password using eight (8) alphanumeric characters, then press . 3. The RAM data containing the password information is required to require the password before entering the system. When prompted, confirm the password by typing the...

User Guide
Page 87
...to the Setup program. If you made , or exit the Setup utility. Exit & Save Changes Once you are finished making your changes before exiting. ASUS Pundit P1-PH1 system 5-29 Select [YES] to save or discard any changes you made changes to fields other than system date, system time, and password, ... window appears. Pressing does not immediately exit this menu or from the Exit menu to ensure the values you selected are saved to the CMOS RAM. Pressing saves the changes while exiting. 5.7 Exit menu The Exit menu items allow you to load the BIOS setup default settings, save changes...
...to the Setup program. If you made , or exit the Setup utility. Exit & Save Changes Once you are finished making your changes before exiting. ASUS Pundit P1-PH1 system 5-29 Select [YES] to save or discard any changes you made changes to fields other than system date, system time, and password, ... window appears. Pressing does not immediately exit this menu or from the Exit menu to ensure the values you selected are saved to the CMOS RAM. Pressing saves the changes while exiting. 5.7 Exit menu The Exit menu items allow you to load the BIOS setup default settings, save changes...

User Guide
Page 88
... Select [YES] to discard the selections you made and restore the previously saved values. Load Setup Defaults This option allows you to the non-volatile RAM. Select Exit Saving Changes or make other changes before saving the values to load the default values for each of the parameters on the Setup...
... Select [YES] to discard the selections you made and restore the previously saved values. Load Setup Defaults This option allows you to the non-volatile RAM. Select Exit Saving Changes or make other changes before saving the values to load the default values for each of the parameters on the Setup...

