
User Guide
Page 4
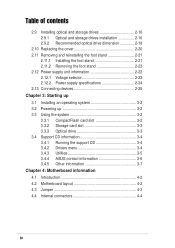
... up 3.1 Installing an operating system 3-2 3.2 Powering up 3-2 3.3 Using the system 3-2 3.3.1 CompactFlash card slot 3-2 3.3.2 Storage card slot 3-3 3.3.3 Optical drive 3-3 3.4 Support CD information 3-4 3.4.1 Running the support CD 3-4 3.4.2 Drivers menu 3-4 3.4.3 Utilities 3-5 3.4.4 ASUS contact information 3-6 3.4.5 Other information 3-7 Chapter 4: Motherboard information 4.1 Introduction 4-2 4.2 Motherboard layout 4-2 4.3 Jumper 4-3 4.4 Internal connectors 4-4 iv
... up 3.1 Installing an operating system 3-2 3.2 Powering up 3-2 3.3 Using the system 3-2 3.3.1 CompactFlash card slot 3-2 3.3.2 Storage card slot 3-3 3.3.3 Optical drive 3-3 3.4 Support CD information 3-4 3.4.1 Running the support CD 3-4 3.4.2 Drivers menu 3-4 3.4.3 Utilities 3-5 3.4.4 ASUS contact information 3-6 3.4.5 Other information 3-7 Chapter 4: Motherboard information 4.1 Introduction 4-2 4.2 Motherboard layout 4-2 4.3 Jumper 4-3 4.4 Internal connectors 4-4 iv
User Guide
Page 8
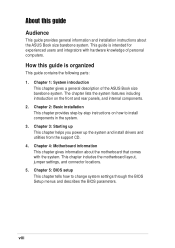
... Audience This guide provides general information and installation instructions about the motherboard that comes with hardware knowledge of the ASUS Book size barebone system. Safeguards About this guide is intended for experienced users and integrators with the system. The...5: BIOS setup This chapter tells how to install components in the system. 3. Chapter 4: Motherboard information This chapter gives information about the ASUS Book size barebone system. Chapter 2: Basic installation This chapter provides step-by-step instructions on the front and rear panels, and internal ...
... Audience This guide provides general information and installation instructions about the motherboard that comes with hardware knowledge of the ASUS Book size barebone system. Safeguards About this guide is intended for experienced users and integrators with the system. The...5: BIOS setup This chapter tells how to install components in the system. 3. Chapter 4: Motherboard information This chapter gives information about the ASUS Book size barebone system. Chapter 2: Basic installation This chapter provides step-by-step instructions on the front and rear panels, and internal ...
User Guide
Page 18
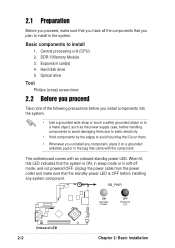
... pad or in the bag that you have all the components that came with an onboard standby power LED. Optical drive Tool Phillips (cross) screw driver 2.2 Before you proceed Take note of the following precautions before you install components into the system. • Use a grounded wrist strap or touch a safely grounded...
... pad or in the bag that you have all the components that came with an onboard standby power LED. Optical drive Tool Phillips (cross) screw driver 2.2 Before you proceed Take note of the following precautions before you install components into the system. • Use a grounded wrist strap or touch a safely grounded...
User Guide
Page 19
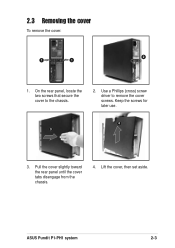
On the rear panel, locate the two screws that secure the cover to remove the cover screws. Pull the cover slightly toward the rear panel until the cover tabs disengage from the chassis. 4. Use a Phillips (cross) screw driver to the chassis. 2. Keep the screws for later use. 4 3 3. ASUS Pundit P1-PH1 system 2-3 2.3 Removing the cover To remove the cover: 2 1 1 1. Lift the cover, then set aside.
On the rear panel, locate the two screws that secure the cover to remove the cover screws. Pull the cover slightly toward the rear panel until the cover tabs disengage from the chassis. 4. Use a Phillips (cross) screw driver to the chassis. 2. Keep the screws for later use. 4 3 3. ASUS Pundit P1-PH1 system 2-3 2.3 Removing the cover To remove the cover: 2 1 1 1. Lift the cover, then set aside.
User Guide
Page 31
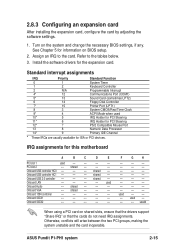
Turn on shared slots, ensure that the drivers support "Share IRQ" or that the cards do not need IRQ assignments. Refer to the card. Standard interrupt assignments ...drivers for information on BIOS setup. 2. PCI slot 2 -- Onboard SATA2 -- -- -- -- -- Onboard USB controller HC0 -- -- -- Otherwise, conflicts will arise between the two PCI groups, making the system unstable and the card inoperable. See Chapter 5 for the expansion card. Onboard USB 2.0 controller -- -- -- shared -- -- -- IRQ assignments for ISA or PCI devices. shared -- used -- -- -- ASUS Pundit P1...
Turn on shared slots, ensure that the drivers support "Share IRQ" or that the cards do not need IRQ assignments. Refer to the card. Standard interrupt assignments ...drivers for information on BIOS setup. 2. PCI slot 2 -- Onboard SATA2 -- -- -- -- -- Onboard USB controller HC0 -- -- -- Otherwise, conflicts will arise between the two PCI groups, making the system unstable and the card inoperable. See Chapter 5 for the expansion card. Onboard USB 2.0 controller -- -- -- shared -- -- -- IRQ assignments for ISA or PCI devices. shared -- used -- -- -- ASUS Pundit P1...
User Guide
Page 43
Starting up and use the system for the first time. Chapter 3 This chapter helps you to install drivers and utilities from the support CD. This part also provides information on how to power up
Starting up and use the system for the first time. Chapter 3 This chapter helps you to install drivers and utilities from the support CD. This part also provides information on how to power up

User Guide
Page 46
... ASUS website for other information If Autorun is enabled in your computer. Click an item to install Click an icon to display other operating system versions. • The contents of the support CD to locate the file ASSETUP.EXE from the BIN folder. ATI All In One Driver Click...optical drive. 3.4 Support CD information The support CD that came with the system contains useful software and several utility drivers that enhance the system features. • Screen display and driver options may not be the same for updates. 3.4.1 Running the support CD To begin using the support CD, ...
... ASUS website for other information If Autorun is enabled in your computer. Click an item to install Click an icon to display other operating system versions. • The contents of the support CD to locate the file ASSETUP.EXE from the BIN folder. ATI All In One Driver Click...optical drive. 3.4 Support CD information The support CD that came with the system contains useful software and several utility drivers that enhance the system features. • Screen display and driver options may not be the same for updates. 3.4.1 Running the support CD To begin using the support CD, ...
User Guide
Page 47
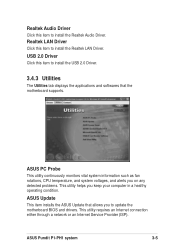
... as fan rotations, CPU temperature, and system voltages, and alerts you on any detected problems. This utility helps you to update the motherboard BIOS and drivers. ASUS Update This item installs the ASUS Update that the motherboard supports. ASUS Pundit P1-PH1 system 3-5 Realtek Audio Driver Click this item to install the Realtek LAN...
... as fan rotations, CPU temperature, and system voltages, and alerts you on any detected problems. This utility helps you to update the motherboard BIOS and drivers. ASUS Update This item installs the ASUS Update that the motherboard supports. ASUS Pundit P1-PH1 system 3-5 Realtek Audio Driver Click this item to install the Realtek LAN...
User Guide
Page 48
The Acrobat® Acrobat Reader® software is for detailed information. 3.4.4 ASUS contact information Click the Contact tab to display the ASUS contact information. 3-6 Chapter 3: Starting up Microsoft DirectX 9.0c Installs the Microsoft® DirectX 9.0c driver. View the online help for viewing files saved in Portable Document Format (PDF). Anti-Virus Utility The...
The Acrobat® Acrobat Reader® software is for detailed information. 3.4.4 ASUS contact information Click the Contact tab to display the ASUS contact information. 3-6 Chapter 3: Starting up Microsoft DirectX 9.0c Installs the Microsoft® DirectX 9.0c driver. View the online help for viewing files saved in Portable Document Format (PDF). Anti-Virus Utility The...
User Guide
Page 63
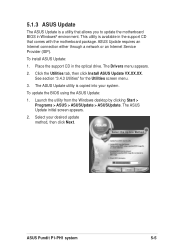
... "3.4.3 Utilities" for the Utilities screen menu. 3. To update the BIOS using the ASUS Update: 1. The ASUS Update initial screen appears. 2. ASUS Pundit P1-PH1 system 5-5 Place the support CD in Windows® environment. The Drivers menu appears. 2. Click the Utilities tab, then click Install ASUS Update VX.XX.XX. Launch the utility from the Windows desktop by...
... "3.4.3 Utilities" for the Utilities screen menu. 3. To update the BIOS using the ASUS Update: 1. The ASUS Update initial screen appears. 2. ASUS Pundit P1-PH1 system 5-5 Place the support CD in Windows® environment. The Drivers menu appears. 2. Click the Utilities tab, then click Install ASUS Update VX.XX.XX. Launch the utility from the Windows desktop by...