
User Guide
Page 5
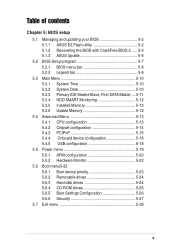
Table of contents Chapter 5: BIOS setup 5.1 Managing and updating your BIOS 5-2 5.1.1 ASUS EZ Flash utility 5-2 5.1.2 Recovering the BIOS with CrashFree BIOS 2 ..... 5-3 5.1.3 ASUS Update 5-5 5.2 BIOS Setup program 5-7 5.2.1 BIOS menu bar 5-8 5.2.2 Legend bar 5-8 5.3 Main Menu 5-10 5.3.1 System Time 5-10 5.3.2 System Date 5-10 5.3.3 Primary IDE Master/Slave; First SATA Master ....5-11 5.3.4 HDD SMART Monitoring 5-12 5.3.5 ...
Table of contents Chapter 5: BIOS setup 5.1 Managing and updating your BIOS 5-2 5.1.1 ASUS EZ Flash utility 5-2 5.1.2 Recovering the BIOS with CrashFree BIOS 2 ..... 5-3 5.1.3 ASUS Update 5-5 5.2 BIOS Setup program 5-7 5.2.1 BIOS menu bar 5-8 5.2.2 Legend bar 5-8 5.3 Main Menu 5-10 5.3.1 System Time 5-10 5.3.2 System Date 5-10 5.3.3 Primary IDE Master/Slave; First SATA Master ....5-11 5.3.4 HDD SMART Monitoring 5-12 5.3.5 ...
User Guide
Page 8
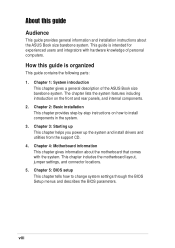
...of personal computers. viii This guide is organized This guide contains the following parts: 1. Chapter 5: BIOS setup This chapter tells how to install components in the system. 3. The chapter lists the system ...BIOS parameters. Safeguards About this guide is intended for experienced users and integrators with the system. This chapter includes the motherboard layout, jumper settings, and connector locations. 5. How this guide Audience This guide provides general information and installation instructions about the motherboard that comes with hardware knowledge of the ASUS...
...of personal computers. viii This guide is organized This guide contains the following parts: 1. Chapter 5: BIOS setup This chapter tells how to install components in the system. 3. The chapter lists the system ...BIOS parameters. Safeguards About this guide is intended for experienced users and integrators with the system. This chapter includes the motherboard layout, jumper settings, and connector locations. 5. How this guide Audience This guide provides general information and installation instructions about the motherboard that comes with hardware knowledge of the ASUS...
User Guide
Page 31
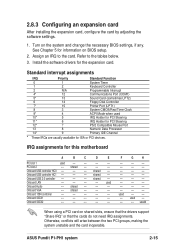
... controller HC0 -- -- -- Onboard USB controller HC1 -- -- -- Onboard LAN -- -- -- -- Onboard VGA -- Onboard SATA1 -- -- -- -- -- ASUS Pundit P1-PH1 system 2-15 IRQ assignments for information on shared slots, ensure that the drivers support "Share IRQ" or that the cards do not need IRQ ... when used -- -- -- shared -- Onboard 1394 controller -- -- -- -- -- Onboard SATA2 -- -- -- -- -- usedd When using a PCI card on BIOS setup. 2. Assign an IRQ to the tables below. 3. shared -- -- -- used 10* 5 IRQ Holder for PCI Steering 11* 6 IRQ Holder for...
... controller HC0 -- -- -- Onboard USB controller HC1 -- -- -- Onboard LAN -- -- -- -- Onboard VGA -- Onboard SATA1 -- -- -- -- -- ASUS Pundit P1-PH1 system 2-15 IRQ assignments for information on shared slots, ensure that the drivers support "Share IRQ" or that the cards do not need IRQ ... when used -- -- -- shared -- Onboard 1394 controller -- -- -- -- -- Onboard SATA2 -- -- -- -- -- usedd When using a PCI card on BIOS setup. 2. Assign an IRQ to the tables below. 3. shared -- -- -- used 10* 5 IRQ Holder for PCI Steering 11* 6 IRQ Holder for...
User Guide
Page 47
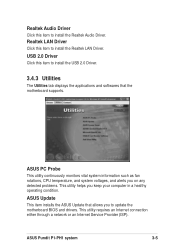
... detected problems. This utility helps you to update the motherboard BIOS and drivers. USB 2.0 Driver Click this item to install the USB 2.0 Driver. 3.4.3 Utilities The Utilities tab displays the applications and softwares that allows you keep your computer in a healthy operating condition. ASUS Pundit P1-PH1 system 3-5 This utility requires an Internet connection either...
... detected problems. This utility helps you to update the motherboard BIOS and drivers. USB 2.0 Driver Click this item to install the USB 2.0 Driver. 3.4.3 Utilities The Utilities tab displays the applications and softwares that allows you keep your computer in a healthy operating condition. ASUS Pundit P1-PH1 system 3-5 This utility requires an Internet connection either...
User Guide
Page 53
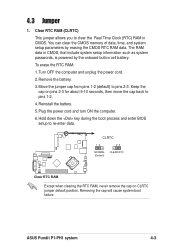
... cell battery. Move the jumper cap from pins 1-2 (default) to re-enter data. Hold down the key during the boot process and enter BIOS setup to pins 2-3. The RAM data in CMOS. CLRTC 12 23 NORMAL CLEAR RTC (Default) ® Clear RTC RAM Except when clearing the... include system setup information such as system passwords, is powered by erasing the CMOS RTC RAM data. Keep the cap on CLRTC jumper default position. ASUS Pundit P1-PH1 system 4-3 Remove the battery. 3. Clear RTC RAM (CLRTC) This jumper allows you to pins 1-2. 4. Turn OFF the computer and unplug the power ...
... cell battery. Move the jumper cap from pins 1-2 (default) to re-enter data. Hold down the key during the boot process and enter BIOS setup to pins 2-3. The RAM data in CMOS. CLRTC 12 23 NORMAL CLEAR RTC (Default) ® Clear RTC RAM Except when clearing the... include system setup information such as system passwords, is powered by erasing the CMOS RTC RAM data. Keep the cap on CLRTC jumper default position. ASUS Pundit P1-PH1 system 4-3 Remove the battery. 3. Clear RTC RAM (CLRTC) This jumper allows you to pins 1-2. 4. Turn OFF the computer and unplug the power ...

User Guide
Page 59
BIOS setup Chapter 5 This chapter tells how to change system settings through the BIOS Setup menus and describes the BIOS parameters. 1
BIOS setup Chapter 5 This chapter tells how to change system settings through the BIOS Setup menus and describes the BIOS parameters. 1
User Guide
Page 60
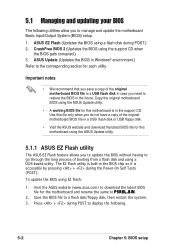
... and updating your BIOS The following . 5-2 Chapter 5: BIOS setup To update the BIOS using a flash disk during POST.) 2. Save the BIOS file to manage and update the motherboard Basic Input/Output System (BIOS) setup. 1. ASUS EZ Flash (Updates the BIOS using EZ Flash: 1. CrashFree BIOS 2 (Updates the BIOS using the ASUS Update utility. 5.1.1 ASUS EZ Flash utility The ASUS EZ Flash feature...
... and updating your BIOS The following . 5-2 Chapter 5: BIOS setup To update the BIOS using a flash disk during POST.) 2. Save the BIOS file to manage and update the motherboard Basic Input/Output System (BIOS) setup. 1. ASUS EZ Flash (Updates the BIOS using EZ Flash: 1. CrashFree BIOS 2 (Updates the BIOS using the ASUS Update utility. 5.1.1 ASUS EZ Flash utility The ASUS EZ Flash feature...
User Guide
Page 61
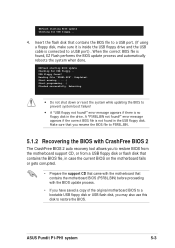
... from a USB floppy disk or flash disk that contains the BIOS file, in the drive. When the correct BIOS file is not found in the USB floppy disk. Reading file "P5R8L.BIN". Make sure that you to restore the BIOS. ASUS Pundit P1-PH1 system 5-3 error message appears if there is no floppy ...disk in case the current BIOS on the motherboard fails or gets corrupted. • Prepare the support CD that came with CrashFree...
... from a USB floppy disk or flash disk that contains the BIOS file, in the drive. When the correct BIOS file is not found in the USB floppy disk. Reading file "P5R8L.BIN". Make sure that you to restore the BIOS. ASUS Pundit P1-PH1 system 5-3 error message appears if there is no floppy ...disk in case the current BIOS on the motherboard fails or gets corrupted. • Prepare the support CD that came with CrashFree...
User Guide
Page 62
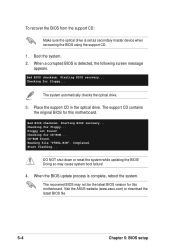
...... Checking for this motherboard. Completed. Doing so may not be the latest BIOS version for this motherboard. Bad BIOS checksum. Visit the ASUS website (www.asus.com) to download the latest BIOS file. 5-4 Chapter 5: BIOS setup The support CD contains the original BIOS for floppy... Floppy not found . Checking for floppy... Reading file "P5R8L.BIN". Place the...
...... Checking for this motherboard. Completed. Doing so may not be the latest BIOS version for this motherboard. Bad BIOS checksum. Visit the ASUS website (www.asus.com) to download the latest BIOS file. 5-4 Chapter 5: BIOS setup The support CD contains the original BIOS for floppy... Floppy not found . Checking for floppy... Reading file "P5R8L.BIN". Place the...
User Guide
Page 63
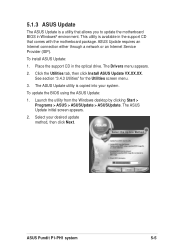
...). Launch the utility from the Windows desktop by clicking Start > Programs > ASUS > ASUSUpdate > ASUSUpdate. Place the support CD in the optical drive. The ASUS Update initial screen appears. 2. ASUS Pundit P1-PH1 system 5-5 This utility is a utility that comes with the motherboard package...appears. 2. To install ASUS Update: 1. See section "3.4.3 Utilities" for the Utilities screen menu. 3. 5.1.3 ASUS Update The ASUS Update is available in the support CD that allows you to update the motherboard BIOS in Windows® environment. The ASUS Update utility is copied into...
...). Launch the utility from the Windows desktop by clicking Start > Programs > ASUS > ASUSUpdate > ASUSUpdate. Place the support CD in the optical drive. The ASUS Update initial screen appears. 2. ASUS Pundit P1-PH1 system 5-5 This utility is a utility that comes with the motherboard package...appears. 2. To install ASUS Update: 1. See section "3.4.3 Utilities" for the Utilities screen menu. 3. 5.1.3 ASUS Update The ASUS Update is available in the support CD that allows you to update the motherboard BIOS in Windows® environment. The ASUS Update utility is copied into...
User Guide
Page 64
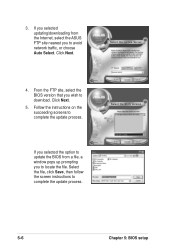
Click Next. 4. Click Next. 5. If you selected updating/downloading from a file, a window pops up prompting you to avoid network traffic, or choose Auto Select. If you selected the option to update the BIOS from the Internet, select the ASUS FTP site nearest you wish to download. 3. Follow the instructions on the succeeding screens to complete the update process. 5-6 Chapter 5: BIOS setup Select the file, click Save, then follow the screen instructions to complete the update process. From the FTP site, select the BIOS version that you to locate the file.
Click Next. 4. Click Next. 5. If you selected updating/downloading from a file, a window pops up prompting you to avoid network traffic, or choose Auto Select. If you selected the option to update the BIOS from the Internet, select the ASUS FTP site nearest you wish to download. 3. Follow the instructions on the succeeding screens to complete the update process. 5-6 Chapter 5: BIOS setup Select the file, click Save, then follow the screen instructions to complete the update process. From the FTP site, select the BIOS version that you to locate the file.
User Guide
Page 65
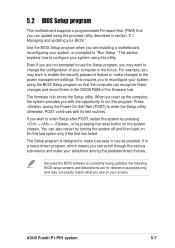
... two failed. ASUS Pundit P1-PH1 system 5-7 If you are for reference purposes only, and may want to make it as possible. It is constantly being updated, the following BIOS setup screens and descriptions are installing a motherboard, reconfiguring your BIOS." Because the BIOS software is a...provides you can scroll through the various sub-menus and make changes to reconfigure your selections among the predetermined choices. 5.2 BIOS Setup program This motherboard supports a programmable Firmware Hub (FWH) that the computer can recognize these changes and record them ...
... two failed. ASUS Pundit P1-PH1 system 5-7 If you are for reference purposes only, and may want to make it as possible. It is constantly being updated, the following BIOS setup screens and descriptions are installing a motherboard, reconfiguring your BIOS." Because the BIOS software is a...provides you can scroll through the various sub-menus and make changes to reconfigure your selections among the predetermined choices. 5.2 BIOS Setup program This motherboard supports a programmable Firmware Hub (FWH) that the computer can recognize these changes and record them ...
User Guide
Page 66
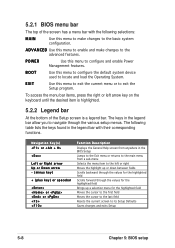
... Right arrow Up or Down arrow - (minus key) + (plus key) or spacebar or or Function Description Displays the General Help screen from anywhere in the BIOS Setup Jumps to the Exit menu or returns to the main menu from a sub-menu Selects the menu item to exit the Setup program. POWER... and load the Operating System. BOOT Use this menu to enable and make changes to its Setup Defaults Saves changes and exits Setup 5-8 Chapter 5: BIOS setup 5.2.1 BIOS menu bar The top of the Setup screen is a legend bar. To access the menu bar items, press the right or left or right Moves...
... Right arrow Up or Down arrow - (minus key) + (plus key) or spacebar or or Function Description Displays the General Help screen from anywhere in the BIOS Setup Jumps to the Exit menu or returns to the main menu from a sub-menu Selects the menu item to exit the Setup program. POWER... and load the Operating System. BOOT Use this menu to enable and make changes to its Setup Defaults Saves changes and exits Setup 5-8 Chapter 5: BIOS setup 5.2.1 BIOS menu bar The top of the Setup screen is a legend bar. To access the menu bar items, press the right or left or right Moves...

User Guide
Page 67
... located to the last page. The General Help screen lists the legend keys and their corresponding functions. ASUS Pundit P1-PH1 system 5-9 Practice navigating through the entire help In addition to the Item Specific Help window, the BIOS setup program also provides a General Help screen. You may launch this screen from this field. Use...
... located to the last page. The General Help screen lists the legend keys and their corresponding functions. ASUS Pundit P1-PH1 system 5-9 Practice navigating through the entire help In addition to the Item Specific Help window, the BIOS setup program also provides a General Help screen. You may launch this screen from this field. Use...
User Guide
Page 68
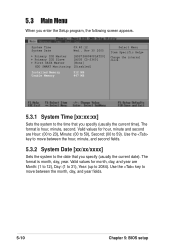
System Time System Date 09:40:12 Wed., Nov 30 2005 Primary IDE Master [HDS7288080PLAT20] Primary IDE Slave [ASUS CD-S360] First SATA Master [None] HDD SMART Monitoring [Disabled] Installed Memory Usable Memory 512 MB 447 MB Select Menu Item Specific Help Change the ... for hour, minute and second are Month: (1 to 12), Day: (1 to 31), Year: (up to move between the month, day, and year fields. 5-10 Chapter 5: BIOS setup The format is hour, minute, second. 5.3 Main Menu When you specify (usually the current time).
System Time System Date 09:40:12 Wed., Nov 30 2005 Primary IDE Master [HDS7288080PLAT20] Primary IDE Slave [ASUS CD-S360] First SATA Master [None] HDD SMART Monitoring [Disabled] Installed Memory Usable Memory 512 MB 447 MB Select Menu Item Specific Help Change the ... for hour, minute and second are Month: (1 to 12), Day: (1 to 31), Year: (up to move between the month, day, and year fields. 5-10 Chapter 5: BIOS setup The format is hour, minute, second. 5.3 Main Menu When you specify (usually the current time).
User Guide
Page 70
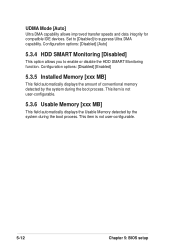
This item is not user-configurable. 5-12 Chapter 5: BIOS setup Configuration options: [Disabled] [Enabled] 5.3.5 Installed Memory [xxx MB] This field automatically displays the amount of conventional memory detected by the system during the boot ...
This item is not user-configurable. 5-12 Chapter 5: BIOS setup Configuration options: [Disabled] [Enabled] 5.3.5 Installed Memory [xxx MB] This field automatically displays the amount of conventional memory detected by the system during the boot ...

User Guide
Page 71
5.4 Advanced Menu The Advanced menu items allow you to change the settings for WinXP ASUS Pundit P1-PH1 system 5-13 CPU Configuration Chipset PCIPnP Onboard Device Configuration USB Configuration Select Menu Item Specific Help Press [Enter] to malfunction. CPU Configuration CPU Type .... Incorrect field values may cause the system to Set. 5.4.1 CPU configuration The items in this menu show the CPU-related information auto-detected by the BIOS.
5.4 Advanced Menu The Advanced menu items allow you to change the settings for WinXP ASUS Pundit P1-PH1 system 5-13 CPU Configuration Chipset PCIPnP Onboard Device Configuration USB Configuration Select Menu Item Specific Help Press [Enter] to malfunction. CPU Configuration CPU Type .... Incorrect field values may cause the system to Set. 5.4.1 CPU configuration The items in this menu show the CPU-related information auto-detected by the BIOS.
User Guide
Page 72
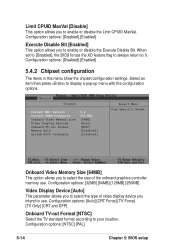
... configuration The items in this menu show the chipset configuration settings. Configuration options: [NTSC] [PAL] 5-14 Chapter 5: BIOS setup When set to [Disabled], the BIOS forces the XD feature flag to always return to display a pop-up menu with the configuration options. Select an item ... CPUID MaxVal. Chipset Current MRC Version Current DRAM Frequency Onboard Video Memory Size Video Display Devices Onboard TV-out Format Memory Hole System BIOS Cacheable 6.4 533 MHz [64MB] [Auto] [NTSC] [Disabled] [Disabled] Select Menu Item Specific Help Onboard Video Memory Size [...
... configuration The items in this menu show the chipset configuration settings. Configuration options: [NTSC] [PAL] 5-14 Chapter 5: BIOS setup When set to [Disabled], the BIOS forces the XD feature flag to always return to display a pop-up menu with the configuration options. Select an item ... CPUID MaxVal. Chipset Current MRC Version Current DRAM Frequency Onboard Video Memory Size Video Display Devices Onboard TV-out Format Memory Hole System BIOS Cacheable 6.4 533 MHz [64MB] [Auto] [NTSC] [Disabled] [Disabled] Select Menu Item Specific Help Onboard Video Memory Size [...
User Guide
Page 73
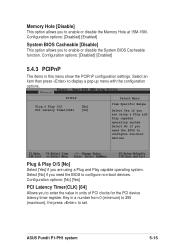
...capable operating system. Configuration options: [No] [Yes] PCI Latency Timer(CLK) [64] Allows you are using a Plug and Play capable operating system. ASUS Pundit P1-PH1 system 5-15 Configuration options: [Disabled] [Enabled] 5.4.3 PCIPnP The items in units of PCI clocks for the PCI device latency timer register. PCIPnP ... Specific Help Select Yes if you to enter the value in this menu show the PCIPnP configuration settings. Select No if you need the BIOS to configure non-boot devices. Key in a number from 0 (minimum) to 255 (maximum), the press to display a pop-up ...
...capable operating system. Configuration options: [No] [Yes] PCI Latency Timer(CLK) [64] Allows you are using a Plug and Play capable operating system. ASUS Pundit P1-PH1 system 5-15 Configuration options: [Disabled] [Enabled] 5.4.3 PCIPnP The items in units of PCI clocks for the PCI device latency timer register. PCIPnP ... Specific Help Select Yes if you to enter the value in this menu show the PCIPnP configuration settings. Select No if you need the BIOS to configure non-boot devices. Key in a number from 0 (minimum) to 255 (maximum), the press to display a pop-up ...
User Guide
Page 74
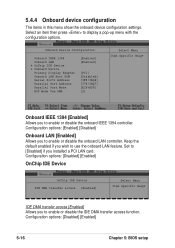
... Specific Help IDE DMA transfer access [Enabled] Allows you to enable or disable the IDE DMA transfer access function. Configuration options: [Disabled] [Enabled] 5-16 Chapter 5: BIOS setup 5.4.4 Onboard device configuration The items in this menu show the onboard device configuration settings. Select an item then press to [Disabled] if you installed...
... Specific Help IDE DMA transfer access [Enabled] Allows you to enable or disable the IDE DMA transfer access function. Configuration options: [Disabled] [Enabled] 5-16 Chapter 5: BIOS setup 5.4.4 Onboard device configuration The items in this menu show the onboard device configuration settings. Select an item then press to [Disabled] if you installed...