
User Guide
Page 13
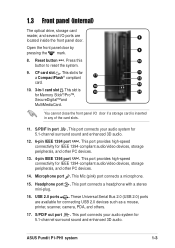
... 1394-compliant audio/video devices, storage peripherals, and other PC devices. 14. This port provides high-speed connectivity for Memory Stick®/Pro™, SecureDigital™and MultiMediaCard. Headphone port . S/PDIF out port . ASUS Pundit P1-PH1 system 1-3 Reset button . Press this 10 button to reset the system. 9. You cannot close the front panel I /O ports...
... 1394-compliant audio/video devices, storage peripherals, and other PC devices. 14. This port provides high-speed connectivity for Memory Stick®/Pro™, SecureDigital™and MultiMediaCard. Headphone port . S/PDIF out port . ASUS Pundit P1-PH1 system 1-3 Reset button . Press this 10 button to reset the system. 9. You cannot close the front panel I /O ports...
User Guide
Page 21
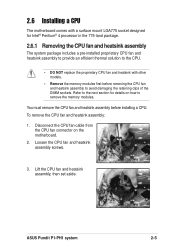
... fan and heatsink assembly to remove the memory modules. Loosen the CPU fan and heatsink assembly screws. 3. Lift the CPU fan and heatsink assembly, then set aside. To remove the CPU fan and heatsink assembly: 1. ASUS Pundit P1-PH1 system 2-5 Disconnect the CPU fan cable ...from the CPU fan connector on how to avoid damaging the retaining clips of the DIMM sockets. 2.6 Installing a CPU The motherboard comes with other models. • Remove the memory modules first before installing a ...
... fan and heatsink assembly to remove the memory modules. Loosen the CPU fan and heatsink assembly screws. 3. Lift the CPU fan and heatsink assembly, then set aside. To remove the CPU fan and heatsink assembly: 1. ASUS Pundit P1-PH1 system 2-5 Disconnect the CPU fan cable ...from the CPU fan connector on how to avoid damaging the retaining clips of the DIMM sockets. 2.6 Installing a CPU The motherboard comes with other models. • Remove the memory modules first before installing a ...
User Guide
Page 25
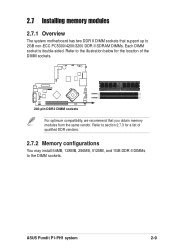
... 2.7.1 Overview The system motherboard has two DDR II DIMM sockets that you obtain memory modules from the same vendor. Refer to the illustration below for a list of the DIMM sockets. ® DIMMA1 DIMMB1 240-pin DDR2 DIMM sockets For ..., we recommend that support up to the DIMM sockets. Refer to section 2.7.3 for the location of qualified DDR vendors. 2.7.2 Memory configurations You may install 64MB, 128MB, 256MB, 512MB, and 1GB DDR II DIMMs to 2GB non-ECC PC5300/4200/3200 DDR II SDRAM DIMMs. Each DIMM socket is double-sided. ASUS Pundit P1-PH1 system 2-9
... 2.7.1 Overview The system motherboard has two DDR II DIMM sockets that you obtain memory modules from the same vendor. Refer to the illustration below for a list of the DIMM sockets. ® DIMMA1 DIMMB1 240-pin DDR2 DIMM sockets For ..., we recommend that support up to the DIMM sockets. Refer to section 2.7.3 for the location of qualified DDR vendors. 2.7.2 Memory configurations You may install 64MB, 128MB, 256MB, 512MB, and 1GB DDR II DIMMs to 2GB non-ECC PC5300/4200/3200 DDR II SDRAM DIMMs. Each DIMM socket is double-sided. ASUS Pundit P1-PH1 system 2-9
User Guide
Page 45
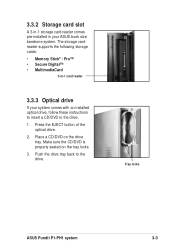
The storage card reader supports the following storage cards: • Memory Stick® / Pro™ • Secure Digital™ • MultimediaCard 3-in your system comes with an installed optical drive, follow these instructions to insert a CD/... of the optical drive. 2. Place a CD/DVD on the tray locks. 3. Make sure the CD/DVD is properly seated on the drive tray. Tray locks ASUS Pundit P1-PH1 system 3-3 Push the drive tray back to the drive. 1. 3.3.2 Storage card slot A 3-in-1 storage card reader comes pre-installed in -1 card reader 3.3.3 Optical drive If...
The storage card reader supports the following storage cards: • Memory Stick® / Pro™ • Secure Digital™ • MultimediaCard 3-in your system comes with an installed optical drive, follow these instructions to insert a CD/... of the optical drive. 2. Place a CD/DVD on the tray locks. 3. Make sure the CD/DVD is properly seated on the drive tray. Tray locks ASUS Pundit P1-PH1 system 3-3 Push the drive tray back to the drive. 1. 3.3.2 Storage card slot A 3-in-1 storage card reader comes pre-installed in -1 card reader 3.3.3 Optical drive If...
User Guide
Page 53
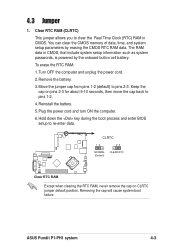
To erase the RTC RAM: 1. Turn OFF the computer and unplug the power cord. 2. You can clear the CMOS memory of date, time, and system setup parameters by the onboard button cell battery. Move the jumper cap from pins 1-2 (default) to re-enter data. ... the boot process and enter BIOS setup to pins 2-3. Reinstall the battery. 5. Remove the battery. 3. Plug the power cord and turn ON the computer. 6. ASUS Pundit P1-PH1 system 4-3 Clear RTC RAM (CLRTC) This jumper allows you to pins 1-2. 4. The RAM data in CMOS. Keep the cap on CLRTC jumper default position. CLRTC...
To erase the RTC RAM: 1. Turn OFF the computer and unplug the power cord. 2. You can clear the CMOS memory of date, time, and system setup parameters by the onboard button cell battery. Move the jumper cap from pins 1-2 (default) to re-enter data. ... the boot process and enter BIOS setup to pins 2-3. Reinstall the battery. 5. Remove the battery. 3. Plug the power cord and turn ON the computer. 6. ASUS Pundit P1-PH1 system 4-3 Clear RTC RAM (CLRTC) This jumper allows you to pins 1-2. 4. The RAM data in CMOS. Keep the cap on CLRTC jumper default position. CLRTC...
User Guide
Page 73
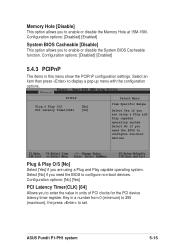
Select No if you need the BIOS to set. ASUS Pundit P1-PH1 system 5-15 Configuration options: [Disabled] [Enabled] System BIOS Cacheable [Disable] This option allows... [Yes] PCI Latency Timer(CLK) [64] Allows you to enable or disable the Memory Hole at 15M-16M. Select an item then press to enter the value in this menu show the PCIPnP ...configuration settings. Memory Hole [Disable] This option allows you to display a pop-up menu with the configuration options. Configuration...
Select No if you need the BIOS to set. ASUS Pundit P1-PH1 system 5-15 Configuration options: [Disabled] [Enabled] System BIOS Cacheable [Disable] This option allows... [Yes] PCI Latency Timer(CLK) [64] Allows you to enable or disable the Memory Hole at 15M-16M. Select an item then press to enter the value in this menu show the PCIPnP ...configuration settings. Memory Hole [Disable] This option allows you to display a pop-up menu with the configuration options. Configuration...