
User Guide
Page 21
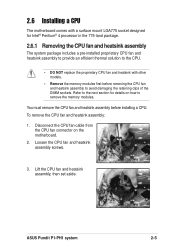
... fan and heatsink assembly to remove the memory modules. Loosen the CPU fan and heatsink assembly screws. 3. ASUS Pundit P1-PH1 system 2-5 2.6 Installing a CPU The motherboard comes with a surface mount LGA775 socket designed for details on the motherboard. 2. Disconnect the CPU fan cable from the CPU fan connector on how to avoid damaging the retaining clips...
... fan and heatsink assembly to remove the memory modules. Loosen the CPU fan and heatsink assembly screws. 3. ASUS Pundit P1-PH1 system 2-5 2.6 Installing a CPU The motherboard comes with a surface mount LGA775 socket designed for details on the motherboard. 2. Disconnect the CPU fan cable from the CPU fan connector on how to avoid damaging the retaining clips...
User Guide
Page 25
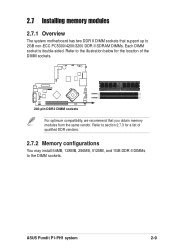
... sockets. ASUS Pundit P1-PH1 system 2-9 Refer to section 2.7.3 for the location of qualified DDR vendors. 2.7.2 Memory configurations You may install 64MB, 128MB, 256MB, 512MB, and 1GB DDR II DIMMs to 2GB non-ECC PC5300/4200/3200 DDR II SDRAM DIMMs. Each DIMM socket is double-sided. 2.7 Installing memory modules 2.7.1 Overview The system motherboard has...
... sockets. ASUS Pundit P1-PH1 system 2-9 Refer to section 2.7.3 for the location of qualified DDR vendors. 2.7.2 Memory configurations You may install 64MB, 128MB, 256MB, 512MB, and 1GB DDR II DIMMs to 2GB non-ECC PC5300/4200/3200 DDR II SDRAM DIMMs. Each DIMM socket is double-sided. 2.7 Installing memory modules 2.7.1 Overview The system motherboard has...
User Guide
Page 27
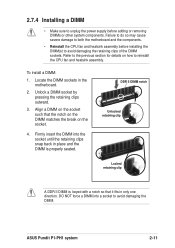
... a socket to avoid damaging the retaining clips of the DIMM sockets. Failure to do so may cause severe damage to both the motherboard and the components. • Reinstall the CPU fan and heatsink assembly before adding or removing DIMMs or other system components. Unlock a... a DIMM into the socket until the retaining clips snap back in the motherboard. 2. 2.7.4 Installing a DIMM • Make sure to reinstall the CPU fan and heatsink assembly. Refer to the previous section for details on the socket such that it fits in only one direction. ASUS Pundit P1-PH1 system 2-11
... a socket to avoid damaging the retaining clips of the DIMM sockets. Failure to do so may cause severe damage to both the motherboard and the components. • Reinstall the CPU fan and heatsink assembly before adding or removing DIMMs or other system components. Unlock a... a DIMM into the socket until the retaining clips snap back in the motherboard. 2. 2.7.4 Installing a DIMM • Make sure to reinstall the CPU fan and heatsink assembly. Refer to the previous section for details on the socket such that it fits in only one direction. ASUS Pundit P1-PH1 system 2-11
User Guide
Page 29
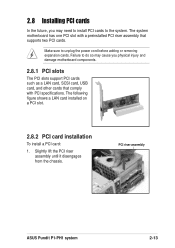
...riser assembly ASUS Pundit P1-PH1 system 2-13 The following figure shows a LAN card installed on a PCI slot. 2.8.2 PCI card installation To install a PCI card: 1. Make sure to the system. Slightly lift the PCI riser assembly until it disengages from the chassis. The system motherboard has one... PCI slot with a preinstalled PCI riser assembly that comply with PCI specifications. 2.8 Installing PCI cards In the future, you physical injury and damage motherboard components. 2.8.1 PCI slots The PCI slots support ...
...riser assembly ASUS Pundit P1-PH1 system 2-13 The following figure shows a LAN card installed on a PCI slot. 2.8.2 PCI card installation To install a PCI card: 1. Make sure to the system. Slightly lift the PCI riser assembly until it disengages from the chassis. The system motherboard has one... PCI slot with a preinstalled PCI riser assembly that comply with PCI specifications. 2.8 Installing PCI cards In the future, you physical injury and damage motherboard components. 2.8.1 PCI slots The PCI slots support ...
User Guide
Page 31
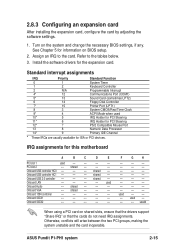
... to the card. shared -- shared -- -- -- Onboard 1394 controller -- -- -- -- -- Onboard SATA2 -- -- -- -- -- used Onboard Audio -- ASUS Pundit P1-PH1 system 2-15 PCI slot 2 -- used -- -- -- used -- -- -- -- usedd When using a PCI card on the system and change the necessary ... 12* 7 PS/2 Compatible Mouse Port 13 8 Numeric Data Processor 14* 9 Primary IDE Channel * These IRQs are usually available for this motherboard A B C D E PCI slot 1 used -- -- -- IRQ assignments for ISA or PCI devices. Assign an IRQ to the tables ...
... to the card. shared -- shared -- -- -- Onboard 1394 controller -- -- -- -- -- Onboard SATA2 -- -- -- -- -- used Onboard Audio -- ASUS Pundit P1-PH1 system 2-15 PCI slot 2 -- used -- -- -- used -- -- -- -- usedd When using a PCI card on the system and change the necessary ... 12* 7 PS/2 Compatible Mouse Port 13 8 Numeric Data Processor 14* 9 Primary IDE Channel * These IRQs are usually available for this motherboard A B C D E PCI slot 1 used -- -- -- IRQ assignments for ISA or PCI devices. Assign an IRQ to the tables ...
User Guide
Page 33
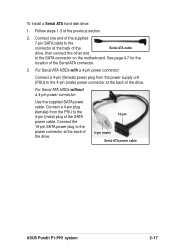
... the PSU to the 4-pin (male) plug of the Serial ATA connector. 3. Connect the 15-pin SATA power plug to the SATA connector on the motherboard. For Serial ATA HDDs without a 4-pin power connector: Use the supplied SATA power cable. To install a Serial ATA hard disk drive: 1. Follow steps 1-3... cable drive, then connect the other end to the power connector at the back of the drive. 15-pin 4-pin (male) Serial ATA power cable ASUS Pundit P1-PH1 system 2-17 Connect one end of the supplied 7-pin SATA cable to the 4-pin (male) power connector at the back of the drive. Connect ...
... the PSU to the 4-pin (male) plug of the Serial ATA connector. 3. Connect the 15-pin SATA power plug to the SATA connector on the motherboard. For Serial ATA HDDs without a 4-pin power connector: Use the supplied SATA power cable. To install a Serial ATA hard disk drive: 1. Follow steps 1-3... cable drive, then connect the other end to the power connector at the back of the drive. 15-pin 4-pin (male) Serial ATA power cable ASUS Pundit P1-PH1 system 2-17 Connect one end of the supplied 7-pin SATA cable to the 4-pin (male) power connector at the back of the drive. Connect ...
User Guide
Page 47
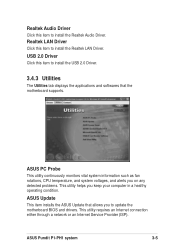
... the motherboard BIOS and drivers. This utility requires an Internet connection either through a network or an Internet Service Provider (ISP). Realtek LAN Driver Click this item to install the USB 2.0 Driver. 3.4.3 Utilities The Utilities tab displays the applications and softwares that allows you keep your computer in a healthy operating condition. ASUS Pundit P1-PH1 system...
... the motherboard BIOS and drivers. This utility requires an Internet connection either through a network or an Internet Service Provider (ISP). Realtek LAN Driver Click this item to install the USB 2.0 Driver. 3.4.3 Utilities The Utilities tab displays the applications and softwares that allows you keep your computer in a healthy operating condition. ASUS Pundit P1-PH1 system...

User Guide
Page 49
ASUS Pundit P1-PH1 system 3-7 Click an icon to display the specified information. Motherboard info Displays the general specifications of the support CD. 3.4.5 Other information The icons on the top right side of the screen give additional information on the motherboard and the contents of the motherboard. Browse this CD Displays the support CD contents in graphical format.
ASUS Pundit P1-PH1 system 3-7 Click an icon to display the specified information. Motherboard info Displays the general specifications of the support CD. 3.4.5 Other information The icons on the top right side of the screen give additional information on the motherboard and the contents of the motherboard. Browse this CD Displays the support CD contents in graphical format.

User Guide
Page 57
Serial port connector (10-1 pin COM1) This connector supports the rear panel serial port. ® Serial COM1 connector COM1 ASUS Pundit P1-PH1 system 4-7 6. Serial ATA connector (7-pin SATA1) This next generation connector supports the thin Serial ATA cable for Serial ATA drive and connections. •...pin count of the Serial ATA cable eliminates the problem caused by the wide, flat ribbon cables of the Parallel ATA interface. • This motherboard does not support hot plug function for a Serial ATA hard disk drive. The current Serial ATA interface allows up to 150 MB/s data ...
Serial port connector (10-1 pin COM1) This connector supports the rear panel serial port. ® Serial COM1 connector COM1 ASUS Pundit P1-PH1 system 4-7 6. Serial ATA connector (7-pin SATA1) This next generation connector supports the thin Serial ATA cable for Serial ATA drive and connections. •...pin count of the Serial ATA cable eliminates the problem caused by the wide, flat ribbon cables of the Parallel ATA interface. • This motherboard does not support hot plug function for a Serial ATA hard disk drive. The current Serial ATA interface allows up to 150 MB/s data ...
User Guide
Page 61
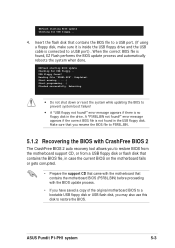
... BIOS file to P5R8L.BIN. 5.1.2 Recovering the BIOS with CrashFree BIOS 2 The CrashFree BIOS 2 auto recovery tool allows you to restore BIOS from the motherboard support CD, or from a USB floppy disk or flash disk that contains the BIOS file, in case the current BIOS on the... is connected to a USB port. (If using a floppy disk, make sure it is inside the USB floppy drive and the USB cable is found !" ASUS Pundit P1-PH1 system 5-3 Reading file "P5R8L.BIN". EZFlash starting BIOS update Checking for USB floppy... Start erasing.......| Start programming...| Flashed successfully.
... BIOS file to P5R8L.BIN. 5.1.2 Recovering the BIOS with CrashFree BIOS 2 The CrashFree BIOS 2 auto recovery tool allows you to restore BIOS from the motherboard support CD, or from a USB floppy disk or flash disk that contains the BIOS file, in case the current BIOS on the... is connected to a USB port. (If using a floppy disk, make sure it is inside the USB floppy drive and the USB cable is found !" ASUS Pundit P1-PH1 system 5-3 Reading file "P5R8L.BIN". EZFlash starting BIOS update Checking for USB floppy... Start erasing.......| Start programming...| Flashed successfully.
User Guide
Page 63
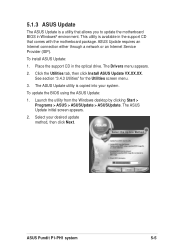
.... The Drivers menu appears. 2. ASUS Pundit P1-PH1 system 5-5 To update the BIOS using the ASUS Update: 1. Select your system. To install ASUS Update: 1. Click the Utilities tab, then click Install ASUS Update VX.XX.XX. See section "3.4.3 Utilities" for the Utilities screen menu. 3. The ASUS Update utility is a utility that comes with the motherboard package. Launch the utility...
.... The Drivers menu appears. 2. ASUS Pundit P1-PH1 system 5-5 To update the BIOS using the ASUS Update: 1. Select your system. To install ASUS Update: 1. Click the Utilities tab, then click Install ASUS Update VX.XX.XX. See section "3.4.3 Utilities" for the Utilities screen menu. 3. The ASUS Update utility is a utility that comes with the motherboard package. Launch the utility...
User Guide
Page 65
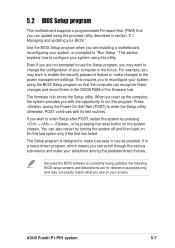
... settings. If you see on . Do this utility. The Setup program is designed to change the configuration of the firmware hub. ASUS Pundit P1-PH1 system 5-7 You can also restart by pressing the reset button on the system chassis. Because the BIOS software is a menu-driven ...Setup program, you with its test routines. It is constantly being updated, the following BIOS setup screens and descriptions are installing a motherboard, reconfiguring your system using the provided utility described in section "5.1 Managing and updating your selections among the predetermined choices. Use the ...
... settings. If you see on . Do this utility. The Setup program is designed to change the configuration of the firmware hub. ASUS Pundit P1-PH1 system 5-7 You can also restart by pressing the reset button on the system chassis. Because the BIOS software is a menu-driven ...Setup program, you with its test routines. It is constantly being updated, the following BIOS setup screens and descriptions are installing a motherboard, reconfiguring your system using the provided utility described in section "5.1 Managing and updating your selections among the predetermined choices. Use the ...