
User Guide
Page 23
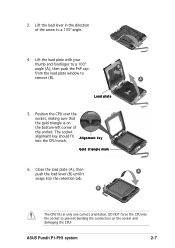
... plate window to a 135º angle. 4. The socket alignment key should fit A l i g n m e n t k e y into the retention tab. Gold triangle mark 6. B The CPU fits in the direction of the socket. 3. DO NOT force the CPU into the socket to prevent bending the connectors on the bottom-left corner of the arrow to remove (B). ASUS Pundit P1...
... plate window to a 135º angle. 4. The socket alignment key should fit A l i g n m e n t k e y into the retention tab. Gold triangle mark 6. B The CPU fits in the direction of the socket. 3. DO NOT force the CPU into the socket to prevent bending the connectors on the bottom-left corner of the arrow to remove (B). ASUS Pundit P1...

User Guide
Page 44
... book size barebone system. CompactFlash card slot 3-2 Chapter 3: Starting up The system power button is located on the front panel. 3.1 Installing an operating system The ASUS book size barebone system supports Windows® 2000 / XP operating systems (OS).
... book size barebone system. CompactFlash card slot 3-2 Chapter 3: Starting up The system power button is located on the front panel. 3.1 Installing an operating system The ASUS book size barebone system supports Windows® 2000 / XP operating systems (OS).

User Guide
Page 57
... ATA connector (7-pin SATA1) This next generation connector supports the thin Serial ATA cable for Serial ATA drive and connections. • Install Windows® XP™ Service Pack 1 when using Serial ATA. 7. The lower pin count of the Serial ATA cable eliminates the problem caused...ATA hard disk drive. Serial port connector (10-1 pin COM1) This connector supports the rear panel serial port. ® Serial COM1 connector COM1 ASUS Pundit P1-PH1 system 4-7 The current Serial ATA interface allows up to 150 MB/s data transfer rate, faster than the standard parallel ATA with 133 MB/s...
... ATA connector (7-pin SATA1) This next generation connector supports the thin Serial ATA cable for Serial ATA drive and connections. • Install Windows® XP™ Service Pack 1 when using Serial ATA. 7. The lower pin count of the Serial ATA cable eliminates the problem caused...ATA hard disk drive. Serial port connector (10-1 pin COM1) This connector supports the rear panel serial port. ® Serial COM1 connector COM1 ASUS Pundit P1-PH1 system 4-7 The current Serial ATA interface allows up to 150 MB/s data transfer rate, faster than the standard parallel ATA with 133 MB/s...
User Guide
Page 60
Important notes • We recommend that you to download the latest BIOS file for each utility. B I N. 2. ASUS Update (Updates the BIOS in Windows® environment.) Refer to the corresponding section for the motherboard and rename the same to P 5 R 8 L . Press + during POST to display the following utilities allow you ...
Important notes • We recommend that you to download the latest BIOS file for each utility. B I N. 2. ASUS Update (Updates the BIOS in Windows® environment.) Refer to the corresponding section for the motherboard and rename the same to P 5 R 8 L . Press + during POST to display the following utilities allow you ...
User Guide
Page 63
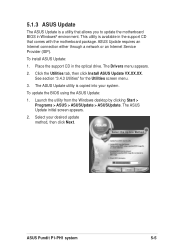
... support CD in the support CD that allows you to update the motherboard BIOS in Windows® environment. See section "3.4.3 Utilities" for the Utilities screen menu. 3. Launch the utility from the Windows desktop by clicking Start > Programs > ASUS > ASUSUpdate > ASUSUpdate. ASUS Pundit P1-PH1 system 5-5 To install ASUS Update: 1. This utility is available in the optical drive.
... support CD in the support CD that allows you to update the motherboard BIOS in Windows® environment. See section "3.4.3 Utilities" for the Utilities screen menu. 3. Launch the utility from the Windows desktop by clicking Start > Programs > ASUS > ASUSUpdate > ASUSUpdate. ASUS Pundit P1-PH1 system 5-5 To install ASUS Update: 1. This utility is available in the optical drive.
User Guide
Page 64
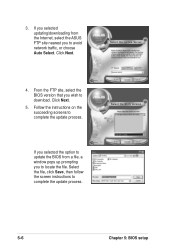
If you selected updating/downloading from a file, a window pops up prompting you to locate the file. From the FTP site, select the BIOS version that you to download. Follow the instructions on the succeeding screens to complete the update process. 5-6 Chapter 5: BIOS setup Click Next. 5. Select the file, click Save, then follow the screen instructions to complete the update process. If you selected the option to update the BIOS from the Internet, select the ASUS FTP site nearest you wish to avoid network traffic, or choose Auto Select. 3. Click Next. 4.
If you selected updating/downloading from a file, a window pops up prompting you to locate the file. From the FTP site, select the BIOS version that you to download. Follow the instructions on the succeeding screens to complete the update process. 5-6 Chapter 5: BIOS setup Click Next. 5. Select the file, click Save, then follow the screen instructions to complete the update process. If you selected the option to update the BIOS from the Internet, select the ASUS FTP site nearest you wish to avoid network traffic, or choose Auto Select. 3. Click Next. 4.

User Guide
Page 67
... pointer indicates that will not fit in the Item Specific Help window located to field within a sub-menu as shown on saving changes and exiting the setup program. If you accidentally make unwanted changes to any menu by simply pressing . ASUS Pundit P1-PH1 system 5-9 Use the legend keys to load the Setup default...
... pointer indicates that will not fit in the Item Specific Help window located to field within a sub-menu as shown on saving changes and exiting the setup program. If you accidentally make unwanted changes to any menu by simply pressing . ASUS Pundit P1-PH1 system 5-9 Use the legend keys to load the Setup default...

User Guide
Page 87
... exit the Setup utility. ASUS Pundit P1-PH1 system 5-29 Exit & Save Changes Once you are saved to the CMOS RAM. The CMOS RAM is sustained by an onboard backup battery and stays on even when the PC is turned off. Exit & Discard Changes Select this option, a confirmation window appears. If you attempt to...
... exit the Setup utility. ASUS Pundit P1-PH1 system 5-29 Exit & Save Changes Once you are saved to the CMOS RAM. The CMOS RAM is sustained by an onboard backup battery and stays on even when the PC is turned off. Exit & Discard Changes Select this option, a confirmation window appears. If you attempt to...

User Guide
Page 88
... for each of the parameters on the Setup menus. After selecting this option or if you select this option, a confirmation appears. When you press , a confirmation window appears.
... for each of the parameters on the Setup menus. After selecting this option or if you select this option, a confirmation appears. When you press , a confirmation window appears.