User Guide
Page 4
... Configuration 3-19 3.6.12 Thunderbolt(TM) Configuration 3-20 3.6.13 PCH-FW Configuration 3-20 3.7 Monitor menu 3-20 3.8 Boot menu 3-20 3.9 Tool menu 3-22 3.9.1 ASUS EZ Flash 3 Utility 3-22 3.9.2 Secure Erase 3-23 3.9.3 ASUS Overclocking Profile 3-24 3.9.4 ASUS SPD Information 3-24 3.9.5 Graphics Card Information 3-24 3.10 Exit menu 3-25 3.11 Updating BIOS 3-26 3.11.1 EZ Update 3-26 3.11...
... Configuration 3-19 3.6.12 Thunderbolt(TM) Configuration 3-20 3.6.13 PCH-FW Configuration 3-20 3.7 Monitor menu 3-20 3.8 Boot menu 3-20 3.9 Tool menu 3-22 3.9.1 ASUS EZ Flash 3 Utility 3-22 3.9.2 Secure Erase 3-23 3.9.3 ASUS Overclocking Profile 3-24 3.9.4 ASUS SPD Information 3-24 3.9.5 Graphics Card Information 3-24 3.10 Exit menu 3-25 3.11 Updating BIOS 3-26 3.11.1 EZ Update 3-26 3.11...

User Guide
Page 11
ASUS Q-Connector - PRIME X299-DELUXE specifications summary ASUS Exclusive Features OC Design: ASUS PRO Clock Technology - Auto Tuning, TPU EPU Fan Xpert 4 with Addressable header control 3D Printing Friendly design Turbo LAN File Transfer - ASUS Q-DIMM - ASUS Q-Slot (continued on the...® USB 3.1 Gen 2 Controller supports Multiple-INs function Thunderbolt 3 Support- Cloud GO! - ASUS Q-Code - ASUS Q-Shield - Full BCLK range for extreme overclocking performance. 5-Way Optimization - DRAM: Digital 2-phase power design TPU - blistering-fast 40Gb/s data transfers...
ASUS Q-Connector - PRIME X299-DELUXE specifications summary ASUS Exclusive Features OC Design: ASUS PRO Clock Technology - Auto Tuning, TPU EPU Fan Xpert 4 with Addressable header control 3D Printing Friendly design Turbo LAN File Transfer - ASUS Q-DIMM - ASUS Q-Slot (continued on the...® USB 3.1 Gen 2 Controller supports Multiple-INs function Thunderbolt 3 Support- Cloud GO! - ASUS Q-Code - ASUS Q-Shield - Full BCLK range for extreme overclocking performance. 5-Way Optimization - DRAM: Digital 2-phase power design TPU - blistering-fast 40Gb/s data transfers...
User Guide
Page 22
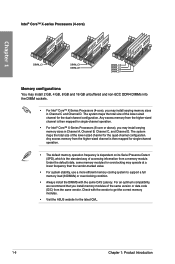
...Detect (SPD), which is then mapped for the latest QVL. 1-6 Chapter 1: Product Introduction Under the default state, some memory modules for overclocking may operate at a lower frequency than the vendor-marked value. • For system stability, use a more efficient memory cooling system to... support a full memory load (8 DIMMs) or overclocking condition. • Always install the DIMMS with the vendor to get the correct memory modules. • Visit the ASUS website for single-channel operation. • For Intel® Core™ X-Series ...
...Detect (SPD), which is then mapped for the latest QVL. 1-6 Chapter 1: Product Introduction Under the default state, some memory modules for overclocking may operate at a lower frequency than the vendor-marked value. • For system stability, use a more efficient memory cooling system to... support a full memory load (8 DIMMs) or overclocking condition. • Always install the DIMMS with the vendor to get the correct memory modules. • Visit the ASUS website for single-channel operation. • For Intel® Core™ X-Series ...
User Guide
Page 25
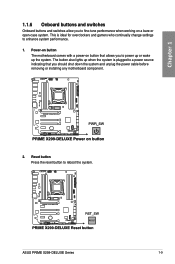
... system and unplug the power cable before removing or installing any motherboard component. 2. ASUS PRIME X299-DELUXE Series 1-9 Chapter 1 1.1.6 Onboard buttons and switches Onboard buttons and switches allow you to power up or wake up when the system is ideal for overclockers and gamers who continually change settings to a power source indicating that allows you...
... system and unplug the power cable before removing or installing any motherboard component. 2. ASUS PRIME X299-DELUXE Series 1-9 Chapter 1 1.1.6 Onboard buttons and switches Onboard buttons and switches allow you to power up or wake up when the system is ideal for overclockers and gamers who continually change settings to a power source indicating that allows you...
User Guide
Page 26
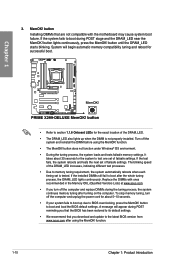
It takes about 5-10 seconds. • If your system fails to BIOS overclocking, press the MemOK! function. 1-10 Chapter 1: Product Introduction Chapter 1 • Refer to section 1.1.8 Onboard LEDs for the exact location of failsafe settings. ...restored to its default settings. • We recommend that are not compatible with ones recommended in the Memory QVL (Qualified Vendors Lists) at www.asus.com. • If you download and update to memory tuning requirement, the system automatically reboots when each timing set of the DRAM_LED increases, indicating...
It takes about 5-10 seconds. • If your system fails to BIOS overclocking, press the MemOK! function. 1-10 Chapter 1: Product Introduction Chapter 1 • Refer to section 1.1.8 Onboard LEDs for the exact location of failsafe settings. ...restored to its default settings. • We recommend that are not compatible with ones recommended in the Memory QVL (Qualified Vendors Lists) at www.asus.com. • If you download and update to memory tuning requirement, the system automatically reboots when each timing set of the DRAM_LED increases, indicating...
User Guide
Page 27
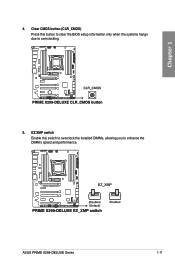
Chapter 1 4. Clear CMOS button (CLR_CMOS) Press this switch to overclock the installed DIMMs, allowing you to overclocking. 5. EZ XMP switch Enable this button to clear the BIOS setup information only when the systems hangs due to enhance the DIMM's speed and performance. ASUS PRIME X299-DELUXE Series 1-11
Chapter 1 4. Clear CMOS button (CLR_CMOS) Press this switch to overclock the installed DIMMs, allowing you to overclocking. 5. EZ XMP switch Enable this button to clear the BIOS setup information only when the systems hangs due to enhance the DIMM's speed and performance. ASUS PRIME X299-DELUXE Series 1-11

User Guide
Page 28
CPU Over Voltage jumper (3-pin CPU_OV) The CPU Over Voltage jumper allows you to pins 2-3. Chapter 1 1-12 Chapter 1: Product Introduction 1.1.7 Jumpers 1. To gain more CPU voltage setting, insert the jumper to set a higher CPU voltage for a flexible overclocking system, depending on the type of the installed CPU. To go back to its default CPU voltage setting, insert the jumper to pins 1-2.
CPU Over Voltage jumper (3-pin CPU_OV) The CPU Over Voltage jumper allows you to pins 2-3. Chapter 1 1-12 Chapter 1: Product Introduction 1.1.7 Jumpers 1. To gain more CPU voltage setting, insert the jumper to set a higher CPU voltage for a flexible overclocking system, depending on the type of the installed CPU. To go back to its default CPU voltage setting, insert the jumper to pins 1-2.
User Guide
Page 67
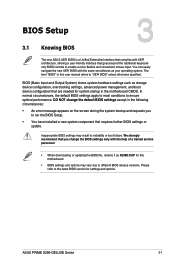
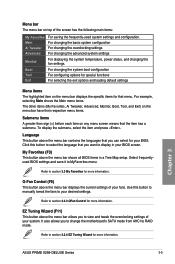
... Chapter 3 ASUS PRIME X299-DELUXE Series 3-1 In normal circumstances, the default BIOS settings apply to most conditions to the latest BIOS version for settings and options. BIOS (Basic Input and Output System) stores system hardware settings such as storage device configuration, overclocking settings, advanced ...change the default BIOS settings except in the motherboard CMOS. Chapter 3: BIOS Setup BIOS Setup 3.1 Knowing BIOS 3 The new ASUS UEFI BIOS is a Unified Extensible Interface that complies with UEFI architecture, offering a user-friendly interface that goes beyond the ...
... Chapter 3 ASUS PRIME X299-DELUXE Series 3-1 In normal circumstances, the default BIOS settings apply to most conditions to the latest BIOS version for settings and options. BIOS (Basic Input and Output System) stores system hardware settings such as storage device configuration, overclocking settings, advanced ...change the default BIOS settings except in the motherboard CMOS. Chapter 3: BIOS Setup BIOS Setup 3.1 Knowing BIOS 3 The new ASUS UEFI BIOS is a Unified Extensible Interface that complies with UEFI architecture, offering a user-friendly interface that goes beyond the ...
User Guide
Page 69
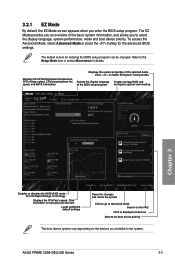
... the selected mode. ASUS PRIME X299-DELUXE Series 3-3 Click < or > to the Setup Mode item in section Boot menu for the advanced BIOS settings. Displays the CPU/motherboard temperature, CPU voltage output, CPU/chassis/power fan speed, and SATA information Displays the system properties of the BIOS setup program configures system overclocking Chapter 3 Enables or...
... the selected mode. ASUS PRIME X299-DELUXE Series 3-3 Click < or > to the Setup Mode item in section Boot menu for the advanced BIOS settings. Displays the CPU/motherboard temperature, CPU voltage output, CPU/chassis/power fan speed, and SATA information Displays the system properties of the BIOS setup program configures system overclocking Chapter 3 Enables or...
User Guide
Page 71
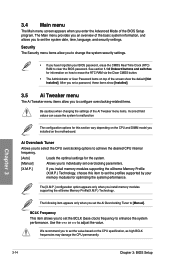
...item on any menu screen means that you to change the motherboard's SATA mode from AHCI to view and tweak the overclocking settings of the screen has the following main items: My Favorites Main Ai Tweaker Advanced For saving the frequently-used system ...menu bar displays the specific items for more information. Chapter 3 ASUS PRIME X299-DELUXE Series 3-5 Click this button to manually tweak the fans to MyFavorites menu. For changing the basic system configuration For changing the overclocking settings For changing the advanced system settings Monitor For displaying the system...
...item on any menu screen means that you to change the motherboard's SATA mode from AHCI to view and tweak the overclocking settings of the screen has the following main items: My Favorites Main Ai Tweaker Advanced For saving the frequently-used system ...menu bar displays the specific items for more information. Chapter 3 ASUS PRIME X299-DELUXE Series 3-5 Click this button to manually tweak the fans to MyFavorites menu. For changing the basic system configuration For changing the overclocking settings For changing the advanced system settings Monitor For displaying the system...
User Guide
Page 75
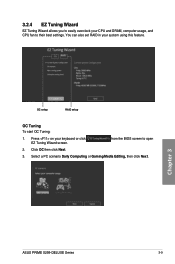
Chapter 3 ASUS PRIME X299-DELUXE Series 3-9 OC setup RAID setup OC Tuning To start OC Tuning: 1. from the BIOS screen to their best settings. 3.2.4 EZ Tuning Wizard EZ Tuning Wizard allows you to easily overclock your keyboard or click EZ Tuning Wizard screen. Select a PC scenario Daily Computing or Gaming/Media Editing, then click Next. Click OC then click Next. 3. Press on your CPU and DRAM, computer usage, and CPU fan to open 2. You can also set RAID in your system using this feature.
Chapter 3 ASUS PRIME X299-DELUXE Series 3-9 OC setup RAID setup OC Tuning To start OC Tuning: 1. from the BIOS screen to their best settings. 3.2.4 EZ Tuning Wizard EZ Tuning Wizard allows you to easily overclock your keyboard or click EZ Tuning Wizard screen. Select a PC scenario Daily Computing or Gaming/Media Editing, then click Next. Click OC then click Next. 3. Press on your CPU and DRAM, computer usage, and CPU fan to open 2. You can also set RAID in your system using this feature.
User Guide
Page 80
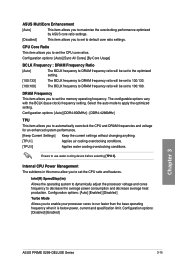
... of the Ai Tweaker menu items. Incorrect field values can cause the system to malfunction The configuration options for this item to set overclocking parameters. [X.M.P.] If you install memory modules supporting the eXtreme Memory Profile (X.M.P.) Technology, choose this section vary depending on the CPU and...password, erase the CMOS Real Time Clock (RTC) RAM to adjust the value. Security The Security menu items allow you to configure overclocking-related items. Be cautious when changing the settings of the basic system information, and allows you to set the BCLK (base clock)...
... of the Ai Tweaker menu items. Incorrect field values can cause the system to malfunction The configuration options for this item to set overclocking parameters. [X.M.P.] If you install memory modules supporting the eXtreme Memory Profile (X.M.P.) Technology, choose this section vary depending on the CPU and...password, erase the CMOS Real Time Clock (RTC) RAM to adjust the value. Security The Security menu items allow you to configure overclocking-related items. Be cautious when changing the settings of the basic system information, and allows you to set the BCLK (base clock)...
User Guide
Page 81
... operating frequency when it is below power, current and specification limit. ASUS MultiCore Enhancement [Auto] This item allows you to maximize the oveclocking performance optimized by ASUS core ratio settings. [Disabled] This item allows you to set to...] Keep the current settings without changing anything. [TPU I] Applies air cooling overclocking conditions. [TPU II] Applies water cooling overclocking conditions. Configuration options: [Disabled] [Enabled] Chapter 3 ASUS PRIME X299-DELUXE Series 3-15 Select the auto mode to use water cooling device before selecting...
... operating frequency when it is below power, current and specification limit. ASUS MultiCore Enhancement [Auto] This item allows you to maximize the oveclocking performance optimized by ASUS core ratio settings. [Disabled] This item allows you to set to...] Keep the current settings without changing anything. [TPU I] Applies air cooling overclocking conditions. [TPU II] Applies water cooling overclocking conditions. Configuration options: [Disabled] [Enabled] Chapter 3 ASUS PRIME X299-DELUXE Series 3-15 Select the auto mode to use water cooling device before selecting...
User Guide
Page 90
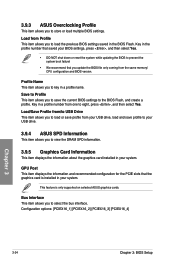
3.9.3 ASUS Overclocking Profile This item allows you to save the current BIOS settings to the BIOS Flash, ...from one to prevent the system boot failure! • We recommend that the graphics card is only supported on selected ASUS graphics cards. Key in a profile number from the same memory/ CPU configuration and BIOS version. Key in the ...your system. Profile Name This item allows you to load the previous BIOS settings saved in your USB drive. 3.9.4 ASUS SPD Information This item allows you to select the bus interface. Load from your USB drive, load and save profile...
3.9.3 ASUS Overclocking Profile This item allows you to save the current BIOS settings to the BIOS Flash, ...from one to prevent the system boot failure! • We recommend that the graphics card is only supported on selected ASUS graphics cards. Key in a profile number from the same memory/ CPU configuration and BIOS version. Key in the ...your system. Profile Name This item allows you to load the previous BIOS settings saved in your USB drive. 3.9.4 ASUS SPD Information This item allows you to select the bus interface. Load from your USB drive, load and save profile...


