

User Manual
Page 4
... as a missing pixel or a pixel lit all the time. • Due to the nature of the LCD screen, an afterimage of the previous screen may be removed with a cloth lightly dampened with the monitor and do not indicate a problem. • Due to the nature of the fluorescent light, the screen may...; Do not install the monitor in a location near heat sources such as radiators or air ducts, or in the factory. • To maintain cleanness of 99.99% or more , contact your LCD display, wipe it is originally packed in a place subject to direct sunlight, or excessive dust or mechanical vibration or...
... as a missing pixel or a pixel lit all the time. • Due to the nature of the LCD screen, an afterimage of the previous screen may be removed with a cloth lightly dampened with the monitor and do not indicate a problem. • Due to the nature of the fluorescent light, the screen may...; Do not install the monitor in a location near heat sources such as radiators or air ducts, or in the factory. • To maintain cleanness of 99.99% or more , contact your LCD display, wipe it is originally packed in a place subject to direct sunlight, or excessive dust or mechanical vibration or...

User Manual
Page 5
... • 43.2cm(17") TFT Color LCD Monitor. • Recommended Resolutions: SXGA 1280 X 1024 @60Hz. • 8ms (Tr+Tf) Quick Response Time. • SPLENDID™ Video Enhancement Technology. • 5 Video Preset Modes Switiched ... and Compact Case Design for Space Saving. • Both VGA and DVI-D Inputs. (for MM17T only) • 1.2Wx2 Stereo Speakers / Earphone Jack. (for MM17T only) 4 LCD Monitor 2. VGA Cable 6. User Guide (CD) 4. Power Cord 5. Audio Cable (for MM17T only) PACKAGE LIST The product package should include the following items: 1. Quick Start Guide 3.
... • 43.2cm(17") TFT Color LCD Monitor. • Recommended Resolutions: SXGA 1280 X 1024 @60Hz. • 8ms (Tr+Tf) Quick Response Time. • SPLENDID™ Video Enhancement Technology. • 5 Video Preset Modes Switiched ... and Compact Case Design for Space Saving. • Both VGA and DVI-D Inputs. (for MM17T only) • 1.2Wx2 Stereo Speakers / Earphone Jack. (for MM17T only) 4 LCD Monitor 2. VGA Cable 6. User Guide (CD) 4. Power Cord 5. Audio Cable (for MM17T only) PACKAGE LIST The product package should include the following items: 1. Quick Start Guide 3.
User Manual
Page 6
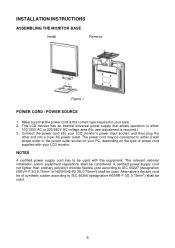
... area. 2. Alternative a flexible cord be used . 5 The relevant national installation and/or equipment regulations shall be used with your LCD monitor's power input socket, and then plug the other end into a 3-pin AC power outlet. The power cord may be connected to...IEC 60245 (designation H05RR-F 3G 0.75mm2) shall be considered. Connect the power cord into your LCD monitor. INSTALLATION INSTRUCTIONS ASSEMBLING THE MONITOR BASE Install Remove Figure 1 POWER CORD / POWER SOURCE 1. This LCD monitor has an internal universal power supply that the power cord is required.) 3.
... area. 2. Alternative a flexible cord be used . 5 The relevant national installation and/or equipment regulations shall be used with your LCD monitor's power input socket, and then plug the other end into a 3-pin AC power outlet. The power cord may be connected to...IEC 60245 (designation H05RR-F 3G 0.75mm2) shall be considered. Connect the power cord into your LCD monitor. INSTALLATION INSTRUCTIONS ASSEMBLING THE MONITOR BASE Install Remove Figure 1 POWER CORD / POWER SOURCE 1. This LCD monitor has an internal universal power supply that the power cord is required.) 3.
User Manual
Page 7
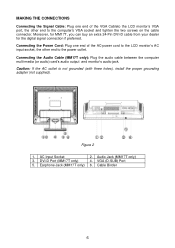
...(MM17T only): Plug the audio cable between the computer multi-media (or audio) card's audio output and monitor's audio jack. Connecting the Power Cord: Plug one end of the AC-power cord to the LCD monitor's AC input socket, the other end to the power outlet. Audio Jack (MM17T only) 4. MAKING THE... CONNECTIONS Connecting the Signal Cable: Plug one end of the VGA Cableto the LCD monitor's VGA port, the other end to the computer's VGA ...
...(MM17T only): Plug the audio cable between the computer multi-media (or audio) card's audio output and monitor's audio jack. Connecting the Power Cord: Plug one end of the AC-power cord to the LCD monitor's AC input socket, the other end to the power outlet. Audio Jack (MM17T only) 4. MAKING THE... CONNECTIONS Connecting the Signal Cable: Plug one end of the VGA Cableto the LCD monitor's VGA port, the other end to the computer's VGA ...
User Manual
Page 8
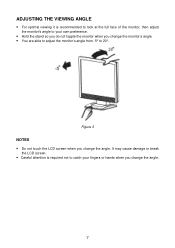
ADJUSTING THE VIEWING ANGLE • For optimal viewing it is required not to catch your own preference. • Hold the stand so you do not topple the monitor when you change the monitor's angle. • You are able to adjust the monitor's angle from -5° to your fingers or hands when you change the angle. 7 Figure 3 NOTES • Do not touch the LCD screen when you change the angle. It may cause damage or break the LCD screen. • Careful attention is recommended to look at the full face of the monitor, then adjust the monitor's angle to 20°.
ADJUSTING THE VIEWING ANGLE • For optimal viewing it is required not to catch your own preference. • Hold the stand so you do not topple the monitor when you change the monitor's angle. • You are able to adjust the monitor's angle from -5° to your fingers or hands when you change the angle. 7 Figure 3 NOTES • Do not touch the LCD screen when you change the angle. It may cause damage or break the LCD screen. • Careful attention is recommended to look at the full face of the monitor, then adjust the monitor's angle to 20°.
User Manual
Page 9
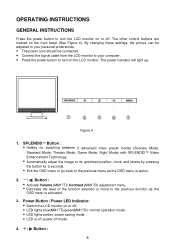
... adjusted to your personal preferences. • The power cord should be connected. • Connect the signal cable from the LCD monitor to your computer. • Press the power button to turn the LCD monitor on the LCD monitor. Figure 4 1. SPLENDID™ Button : • Hotkey for switching between 5 advanced video preset modes (Scenery Mode, Standard Mode, Theater... other control buttons are located on or off mode. 4. +/ Button : 8 The power indicator will light up. Power Button / Power LED Indicator: • Switch the LCD monitor on the front bezel (See Figure 4).
... adjusted to your personal preferences. • The power cord should be connected. • Connect the signal cable from the LCD monitor to your computer. • Press the power button to turn the LCD monitor on the LCD monitor. Figure 4 1. SPLENDID™ Button : • Hotkey for switching between 5 advanced video preset modes (Scenery Mode, Standard Mode, Theater... other control buttons are located on or off mode. 4. +/ Button : 8 The power indicator will light up. Power Button / Power LED Indicator: • Switch the LCD monitor on the front bezel (See Figure 4).


