User Manual
Page 4
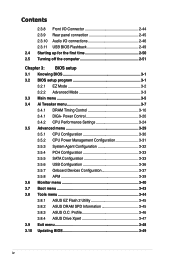
Profile 3-46 3.8.4 ASUS Drive Xpert 3-47 3.9 Exit menu 3-48 3.10 Updating BIOS 3-49 iv Contents 2.3.8 Front I/O Connector 2-44 2.3.9 Rear panel connection 2-45 2.3.10 Audio I/O connections 2-46 2.3.11 USB BIOS Flashback 2-49 2.4 Starting up for the first time 2-50 2.5 Turning off the computer 2-51 Chapter 3: BIOS setup 3.1 ...3-33 3.5.5 SATA Configuration 3-33 3.5.6 USB Configuration 3-36 3.5.7 Onboard Devices Configuraton 3-37 3.5.8 APM 3-39 3.6 Monitor menu 3-40 3.7 Boot menu 3-43 3.8 Tools menu 3-44 3.8.1 ASUS EZ Flash 2 Utility 3-45 3.8.2 ASUS DRAM SPD Information 3-45...
Profile 3-46 3.8.4 ASUS Drive Xpert 3-47 3.9 Exit menu 3-48 3.10 Updating BIOS 3-49 iv Contents 2.3.8 Front I/O Connector 2-44 2.3.9 Rear panel connection 2-45 2.3.10 Audio I/O connections 2-46 2.3.11 USB BIOS Flashback 2-49 2.4 Starting up for the first time 2-50 2.5 Turning off the computer 2-51 Chapter 3: BIOS setup 3.1 ...3-33 3.5.5 SATA Configuration 3-33 3.5.6 USB Configuration 3-36 3.5.7 Onboard Devices Configuraton 3-37 3.5.8 APM 3-39 3.6 Monitor menu 3-40 3.7 Boot menu 3-43 3.8 Tools menu 3-44 3.8.1 ASUS EZ Flash 2 Utility 3-45 3.8.2 ASUS DRAM SPD Information 3-45...
User Manual
Page 5
Contents 3.10.1 3.10.2 3.10.3 3.10.4 ASUS Update utility 3-49 ASUS EZ Flash 2 utility 3-52 ASUS CrashFree BIOS 3 utility 3-53 ASUS BIOS Updater 3-54 Chapter 4: Software support 4.1 Installing an operating system 4-1 4.2 Support DVD information 4-1 4.2.1 ... 4-10 4.3.5 FAN Xpert 4-11 4.3.6 Probe II 4-12 4.3.7 Sensor Recorder 4-13 4.3.8 USB 3.0 Boost 4-14 4.3.9 ASUS SSD Caching 4-15 4.3.10 ASUS Update 4-16 4.3.11 MyLogo2 4-17 4.3.12 Audio configurations 4-19 4.4 RAID configurations 4-20 4.4.1 RAID definitions 4-20 4.4.2 Installing Serial ATA hard disks 4-21 4.4.3 Setting the...
Contents 3.10.1 3.10.2 3.10.3 3.10.4 ASUS Update utility 3-49 ASUS EZ Flash 2 utility 3-52 ASUS CrashFree BIOS 3 utility 3-53 ASUS BIOS Updater 3-54 Chapter 4: Software support 4.1 Installing an operating system 4-1 4.2 Support DVD information 4-1 4.2.1 ... 4-10 4.3.5 FAN Xpert 4-11 4.3.6 Probe II 4-12 4.3.7 Sensor Recorder 4-13 4.3.8 USB 3.0 Boost 4-14 4.3.9 ASUS SSD Caching 4-15 4.3.10 ASUS Update 4-16 4.3.11 MyLogo2 4-17 4.3.12 Audio configurations 4-19 4.4 RAID configurations 4-20 4.4.1 RAID definitions 4-20 4.4.2 Installing Serial ATA hard disks 4-21 4.4.3 Setting the...
User Manual
Page 13
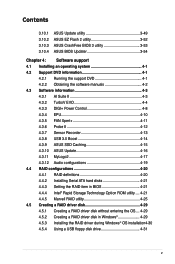
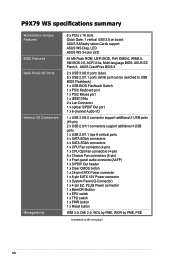
... Power Design - Auto Tuning, TurboV - EPU Switch ASUS Exclusive Features - Front Panel USB 3.0 Support - ASUS CrashFree BIOS 3 - Supports 192kHz/ 24bit BD Lossless Sound - DRAM Power Utility ASUS TPU - MemOK! - P9X79 WS specifications summary Audio ASUS Unique Features ASUS Q-Design Realtek® ALC 898 8-channel High Definition Audio CODEC - ASUS SSD Caching - ASUS Fan Xpert+ ASUS EZ DIY - DTS Surround Sensation UltraPC II...
... Power Design - Auto Tuning, TurboV - EPU Switch ASUS Exclusive Features - Front Panel USB 3.0 Support - ASUS CrashFree BIOS 3 - Supports 192kHz/ 24bit BD Lossless Sound - DRAM Power Utility ASUS TPU - MemOK! - P9X79 WS specifications summary Audio ASUS Unique Features ASUS Q-Design Realtek® ALC 898 8-channel High Definition Audio CODEC - ASUS SSD Caching - ASUS Fan Xpert+ ASUS EZ DIY - DTS Surround Sensation UltraPC II...
User Manual
Page 14
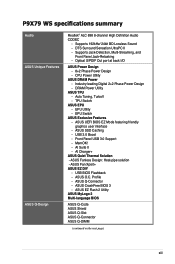
..., ASUS EZ Flash 2, ASUS CrashFree BIOS 3 2 x USB 3.0/2.0 ports (blue) 8 x USB 2.0/1.1 ports (white port can be switched to USB BIOS Flashback) 1 x USB BIOS Flashback Switch 1 x PS/2 Keyboard port 1 x PS/2 Mouse port 1 x IEEE1394a 2 x Lan Connector 1 x optical S/PDIF Out port 1 x 8-channel Audio I /O Connectors Manageability 6 x PCIe x 16 slots Quick Gate: 1 vertical USB 2.0 on the next page) xiv P9X79 WS...
..., ASUS EZ Flash 2, ASUS CrashFree BIOS 3 2 x USB 3.0/2.0 ports (blue) 8 x USB 2.0/1.1 ports (white port can be switched to USB BIOS Flashback) 1 x USB BIOS Flashback Switch 1 x PS/2 Keyboard port 1 x PS/2 Mouse port 1 x IEEE1394a 2 x Lan Connector 1 x optical S/PDIF Out port 1 x 8-channel Audio I /O Connectors Manageability 6 x PCIe x 16 slots Quick Gate: 1 vertical USB 2.0 on the next page) xiv P9X79 WS...
User Manual
Page 21
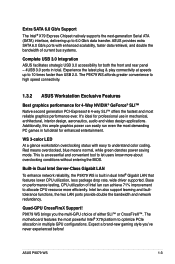
...CPU utilization of Intel lan can easily run even the most reliable graphics performance ever. The P9X79 WS affords greater convenience to high speed connectivity. 1.3.2 ASUS Workstation Exclusive Features Best graphics performance for 4-Way NVIDIA® GeForce® SLI™ Native...features the most powerful Intel® X79 platform to optimize PCIe allocation in mechanical, architectural, interior design, aeronautics, audio and video design applications. ASUS P9X79 WS 1-3 Extra SATA 6.0 Gb/s Support The Intel® X79 Express Chipset natively supports the next-generation Serial ATA...
...CPU utilization of Intel lan can easily run even the most reliable graphics performance ever. The P9X79 WS affords greater convenience to high speed connectivity. 1.3.2 ASUS Workstation Exclusive Features Best graphics performance for 4-Way NVIDIA® GeForce® SLI™ Native...features the most powerful Intel® X79 platform to optimize PCIe allocation in mechanical, architectural, interior design, aeronautics, audio and video design applications. ASUS P9X79 WS 1-3 Extra SATA 6.0 Gb/s Support The Intel® X79 Express Chipset natively supports the next-generation Serial ATA...
User Manual
Page 26
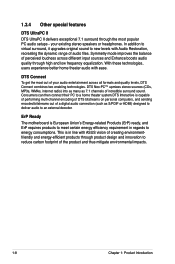
... is European Union's Energy-related Products (ErP) ready, and ErP requires products to meet certain energy efficiency requirement in line with ASUS vision of creating environmentfriendly and energy-efficient products through product design and innovation to an external decoder. DTS Neo:PC™ upmixes...speakers or headphones. ErP Ready The motherboard is in regards to new levels with ease. DTS Connect To get the most popular PC audio setups - In addition to virtual surround, it upgrades original sound to energy consumptions. 1.3.4 Other special features DTS UltraPC II DTS ...
... is European Union's Energy-related Products (ErP) ready, and ErP requires products to meet certain energy efficiency requirement in line with ASUS vision of creating environmentfriendly and energy-efficient products through product design and innovation to an external decoder. DTS Neo:PC™ upmixes...speakers or headphones. ErP Ready The motherboard is in regards to new levels with ease. DTS Connect To get the most popular PC audio setups - In addition to virtual surround, it upgrades original sound to energy consumptions. 1.3.4 Other special features DTS UltraPC II DTS ...
User Manual
Page 31
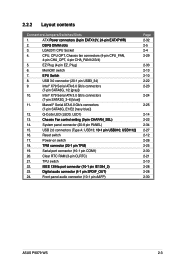
...;(3�-�p�in �T�P��M�) 19. Front panel audio connector (10-1 pin AAFP) Page 2-32 2-5 2-4 2-29 2-33 2-13 2-10 2-22 2-23 2-24 2-25 2-14 2-22 2-34 2-27 2-12 2-26 2-25 2-30 2-21 2-10 2-28 2-28 2-30 ASUS P9X79 WS 2-3 Marvell® Serial ATA 6.0 Gb/s connectors (7-pin SATA6G_E1/E2 [navy blue...
...;(3�-�p�in �T�P��M�) 19. Front panel audio connector (10-1 pin AAFP) Page 2-32 2-5 2-4 2-29 2-33 2-13 2-10 2-22 2-23 2-24 2-25 2-14 2-22 2-34 2-27 2-12 2-26 2-25 2-30 2-21 2-10 2-28 2-28 2-30 ASUS P9X79 WS 2-3 Marvell® Serial ATA 6.0 Gb/s connectors (7-pin SATA6G_E1/E2 [navy blue...
User Manual
Page 36
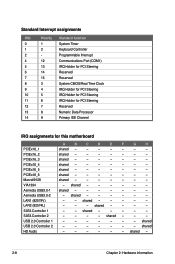
PCIEx16_2 shared - - - - - - - PCIEx16_4 shared - - - - - - - PCIEx16_6 shared - - - - - - - Asmedia USB3.0-1 shared - - - - - - - shared - - - - - - shared - - - - - shared - - - shared - - - - SATA Controller 2 - - - - shared HD Audio - - - - - - Marvell9128 shared - - - - - - - Asmedia USB3.0-2 - SATA Controller 1 - - shared - 2-8 Chapter 2: Hardware information shared - - - - - - shared USB 2.0 Controller 2 - - - - - - - VIA1394 - shared - - - - - PCIEx16_3 shared - - - ...
PCIEx16_2 shared - - - - - - - PCIEx16_4 shared - - - - - - - PCIEx16_6 shared - - - - - - - Asmedia USB3.0-1 shared - - - - - - - shared - - - - - - shared - - - - - shared - - - shared - - - - SATA Controller 2 - - - - shared HD Audio - - - - - - Marvell9128 shared - - - - - - - Asmedia USB3.0-2 - SATA Controller 1 - - shared - 2-8 Chapter 2: Hardware information shared - - - - - - shared USB 2.0 Controller 2 - - - - - - - VIA1394 - shared - - - - - PCIEx16_3 shared - - - ...

User Manual
Page 56
... 1394a module is purchased separately. 2-28 Chapter 2: Hardware information IEEE 1394a port connector (10-1 pin IE1394_2) This connector is for an IEEE 1394a port. Digital audio connector (4-1 pin SPDIF_OUT) This connector is for an additional Sony/Philips Digital Interface (S/PDIF) port(s). Connect the IEEE 1394a module cable to this connector, then...
... 1394a module is purchased separately. 2-28 Chapter 2: Hardware information IEEE 1394a port connector (10-1 pin IE1394_2) This connector is for an IEEE 1394a port. Digital audio connector (4-1 pin SPDIF_OUT) This connector is for an additional Sony/Philips Digital Interface (S/PDIF) port(s). Connect the IEEE 1394a module cable to this connector, then...

User Manual
Page 58
...]. 10. Connect the serial port module cable to this connector, set the item to [AC97]. if you want to connect an AC'97 front panel audio module to this connector, then install the module to a slot opening at the back of the front panel... audio I /O module that you connect a high-definition front panel audio module to this connector to avail of the motherboard's high-definition audio capability. • If you want to connect a high-definition front panel audio module to this connector is purchased separately. 2-30 Chapter 2: ...
...]. 10. Connect the serial port module cable to this connector, set the item to [AC97]. if you want to connect an AC'97 front panel audio module to this connector, then install the module to a slot opening at the back of the front panel... audio I /O module that you connect a high-definition front panel audio module to this connector to avail of the motherboard's high-definition audio capability. • If you want to connect a high-definition front panel audio module to this connector is purchased separately. 2-30 Chapter 2: ...
User Manual
Page 72
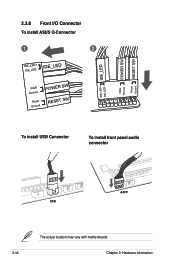
2.3.8 Front I/O Connector To install ASUS Q-Connector 1 2 IDE_LED+ IDE_LED- IDE_LED PWR Ground Reset Ground POWER SW RESET SW To install USB Connector To install front panel audio connector AAFP USB The actual location may vary with motherboards. 2-44 Chapter 2: Hardware information
2.3.8 Front I/O Connector To install ASUS Q-Connector 1 2 IDE_LED+ IDE_LED- IDE_LED PWR Ground Reset Ground POWER SW RESET SW To install USB Connector To install front panel audio connector AAFP USB The actual location may vary with motherboards. 2-44 Chapter 2: Hardware information
User Manual
Page 73
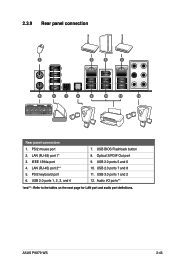
LAN (RJ-45) port 1* 3. PS/2 keyboard port 6. USB 2.0 ports 5 and 6 10. USB 3.0 ports 1 and 2 12. PS/2 mouse port 2. IEEE 1394a port 4. USB BIOS Flashback button 8. LAN (RJ-45) port 2** 5. USB 2.0 ports 7 and 8 11. Optical S/PDIF Out port 9. USB 2.0 ports 1, 2, 3, and 4 7. 2.3.9 Rear panel connection 1 2 3 4 5 6 7 8 9 10 11 12 Rear panel connectors 1. ASUS P9X79 WS 2-45 Audio I/O ports** *and **: Refer to the tables on the next page for LAN port and audio port definitions.
LAN (RJ-45) port 1* 3. PS/2 keyboard port 6. USB 2.0 ports 5 and 6 10. USB 3.0 ports 1 and 2 12. PS/2 mouse port 2. IEEE 1394a port 4. USB BIOS Flashback button 8. LAN (RJ-45) port 2** 5. USB 2.0 ports 7 and 8 11. Optical S/PDIF Out port 9. USB 2.0 ports 1, 2, 3, and 4 7. 2.3.9 Rear panel connection 1 2 3 4 5 6 7 8 9 10 11 12 Rear panel connectors 1. ASUS P9X79 WS 2-45 Audio I/O ports** *and **: Refer to the tables on the next page for LAN port and audio port definitions.
User Manual
Page 74
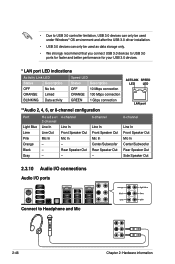
...Center/Subwoofer Rear Speaker Out - 8-channel Line In Front Speaker Out Mic In Center/Subwoofer Rear Speaker Out Side Speaker Out 2.3.10 Audio I/O connections Audio I/O ports Connect to USB 3.0 ports for faster and better performance for your USB 3.0 devices. * LAN port LED indications Activity ... Data activity Speed LED Status Description OFF 10 Mbps connection ORANGE 100 Mbps connection GREEN 1 Gbps connection ACT/LINK SPEED LED LED LAN port **Audio 2, 4, 6, or 8-channel configuration Port Light Blue Lime Pink Orange Black Gray Headset 2-channel Line In Line Out Mic In - - ...
...Center/Subwoofer Rear Speaker Out - 8-channel Line In Front Speaker Out Mic In Center/Subwoofer Rear Speaker Out Side Speaker Out 2.3.10 Audio I/O connections Audio I/O ports Connect to USB 3.0 ports for faster and better performance for your USB 3.0 devices. * LAN port LED indications Activity ... Data activity Speed LED Status Description OFF 10 Mbps connection ORANGE 100 Mbps connection GREEN 1 Gbps connection ACT/LINK SPEED LED LED LAN port **Audio 2, 4, 6, or 8-channel configuration Port Light Blue Lime Pink Orange Black Gray Headset 2-channel Line In Line Out Mic In - - ...
User Manual
Page 117
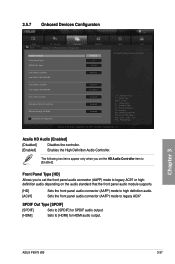
... the controller. [Enabled] Enables the High Definition Audio Controller. Chapter 3 ASUS P9X79 WS 3-37 Front Panel Type [HD] Allows you set the front panel audio connector (AAFP) mode to legacy AC97 or highdefinition audio depending on the audio standard that the front panel audio module supports. [HD] [AC97] Sets the front panel audio connector (AAFP) mode to [HDMI] for...
... the controller. [Enabled] Enables the High Definition Audio Controller. Chapter 3 ASUS P9X79 WS 3-37 Front Panel Type [HD] Allows you set the front panel audio connector (AAFP) mode to legacy AC97 or highdefinition audio depending on the audio standard that the front panel audio module supports. [HD] [AC97] Sets the front panel audio connector (AAFP) mode to [HDMI] for...

User Manual
Page 155
... button Control settings Analog and digital connector status B. Realtek HD Audio Manager with the motherboard package. Double-click on your computer. A. ASUS P9X79 WS 4-19 Follow the installation wizard to the software manual in the support DVD or visit the ASUS website at www.asus.com for Windows XP Configuration options Set default device buttons Connector...
... button Control settings Analog and digital connector status B. Realtek HD Audio Manager with the motherboard package. Double-click on your computer. A. ASUS P9X79 WS 4-19 Follow the installation wizard to the software manual in the support DVD or visit the ASUS website at www.asus.com for Windows XP Configuration options Set default device buttons Connector...
User Manual
Page 159
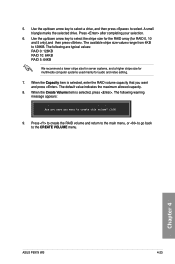
... size for multimedia computer systems used mainly for RAID 0, 10 and 5 only),and then press . Are you sure you want to create this volume? (Y/N): 9. Chapter 4 ASUS P9X79 WS 4-23 Use the up /down arrow key to select. Press to create the RAID volume and return to the main menu, or to go back... the selected drive. Use the up /down arrow key to select a drive, and then press to select the stripe size for the RAID array (for audio and video editing. 7. When the Capacity item is selected, press .
... size for multimedia computer systems used mainly for RAID 0, 10 and 5 only),and then press . Are you sure you want to create this volume? (Y/N): 9. Chapter 4 ASUS P9X79 WS 4-23 Use the up /down arrow key to select. Press to create the RAID volume and return to the main menu, or to go back... the selected drive. Use the up /down arrow key to select a drive, and then press to select the stripe size for the RAID array (for audio and video editing. 7. When the Capacity item is selected, press .
User Manual
Page 162
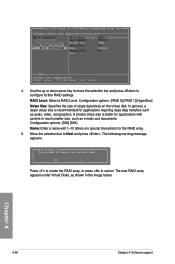
... virtual disk. In general, a larger stripe size is better for applications with 1-10 letters (no special characters) for applications requiring large data transfers such as audio, video, and graphics. Configuration options: [32K] [64K] Name: Enter a name with content in much smaller size, such as shown in the image below. Configure->Select...
... virtual disk. In general, a larger stripe size is better for applications with 1-10 letters (no special characters) for applications requiring large data transfers such as audio, video, and graphics. Configuration options: [32K] [64K] Name: Enter a name with content in much smaller size, such as shown in the image below. Configure->Select...

