
User Manual
Page 147
... reboot or you can click on Yes to adjust image size compatibility or adjust the resolution bar. 3. This utility will help you restart your system. ASUS P9X79 DELUXE 4-19 Then at Picture File, Browse to the boot logo. 5. Then click Next. 4. Change the boot logo of the BIOS version. 2. 2.
... reboot or you can click on Yes to adjust image size compatibility or adjust the resolution bar. 3. This utility will help you restart your system. ASUS P9X79 DELUXE 4-19 Then at Picture File, Browse to the boot logo. 5. Then click Next. 4. Change the boot logo of the BIOS version. 2. 2.
User Manual
Page 164
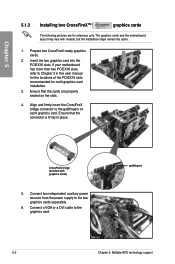
... steps remain the same. 1. Align and firmly insert the CrossFireX bridge connector to the graphics card. Chapter 5 5.1.3 Installing two CrossFireX™ graphics cards The following pictures are properly seated on each graphics card. Insert the two graphics card into the PCIEX16 slots. Ensure that the cards are for multi-graphics card...
... steps remain the same. 1. Align and firmly insert the CrossFireX bridge connector to the graphics card. Chapter 5 5.1.3 Installing two CrossFireX™ graphics cards The following pictures are properly seated on each graphics card. Insert the two graphics card into the PCIEX16 slots. Ensure that the cards are for multi-graphics card...
User Manual
Page 166
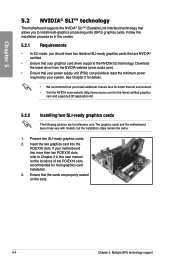
... zone website (http://www.nzone.com) for the latest certified graphics card and supported 3D application list. 5.2.2 Installing two SLI-ready graphics cards The following pictures are properly seated on the slots. 5-4 Chapter 5: Multiple GPU technology support Download the latest driver from the NVIDIA website (www.nvidia.com). • Ensure that...
... zone website (http://www.nzone.com) for the latest certified graphics card and supported 3D application list. 5.2.2 Installing two SLI-ready graphics cards The following pictures are properly seated on the slots. 5-4 Chapter 5: Multiple GPU technology support Download the latest driver from the NVIDIA website (www.nvidia.com). • Ensure that...