
User Guide
Page 61
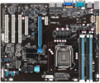
... from a USB flash drive To recover the BIOS from a USB flash drive: 1. DO NOT shut down or reset the system while recovering the BIOS! ASUS P9D-X 4-3 BUPDATER Updates the BIOS in DOS mode using a USB flash disk. 3. Copy the original motherboard BIOS using a bootable USB flash disk drive when ... the motherboard Basic Input/Output System (BIOS) setup: 1. 4.1 Managing and updating your BIOS The following utilities allow you to restore the BIOS file when it fails or gets corrupted during the updating process. Refer to one USB port on these utilities. Insert the USB flash drive with the...
... from a USB flash drive To recover the BIOS from a USB flash drive: 1. DO NOT shut down or reset the system while recovering the BIOS! ASUS P9D-X 4-3 BUPDATER Updates the BIOS in DOS mode using a USB flash disk. 3. Copy the original motherboard BIOS using a bootable USB flash disk drive when ... the motherboard Basic Input/Output System (BIOS) setup: 1. 4.1 Managing and updating your BIOS The following utilities allow you to restore the BIOS file when it fails or gets corrupted during the updating process. Refer to one USB port on these utilities. Insert the USB flash drive with the...

User Guide
Page 62
... USB port. 2. Download the latest BIOS from the ASUS website at www.asus.com before using EzFlash Utility: 1. Press to switch to the Folder Info field. 6. EzFlash Utility Current Platform Platform : P9D-X Version : 0060 Build Date :12/03/2013 New Platform Platform : P9D-X Version : 0077 Build Date :01/31/2013 FS0... utility. Go to the Tool menu to select ASUS EzFlash Utility and press to use a DOS‑based utility. ASUS Tek. Press the Up/Down arrow keys to find the USB flash disk that contains the latest BIOS file to find the BIOS file then press . 7. Insert the USB flash disk...
... USB port. 2. Download the latest BIOS from the ASUS website at www.asus.com before using EzFlash Utility: 1. Press to switch to the Folder Info field. 6. EzFlash Utility Current Platform Platform : P9D-X Version : 0060 Build Date :12/03/2013 New Platform Platform : P9D-X Version : 0077 Build Date :01/31/2013 FS0... utility. Go to the Tool menu to select ASUS EzFlash Utility and press to use a DOS‑based utility. ASUS Tek. Press the Up/Down arrow keys to find the USB flash disk that contains the latest BIOS file to find the BIOS file then press . 7. Insert the USB flash disk...
User Guide
Page 63
...file in DOS mode, then at support.asus.com to the bootable USB flash disk drive you created earlier. 3. Save the BIOS file... to ensure system compatibility and stability. Boot the system in DOS environment using the BUPDATER utility: 1. Updating the BIOS file To update the BIOS file...ASUS support website at the prompt, type: BUPDATER /i[filename].CAP where [filename] is the latest or the original BIOS file... as a USB flash disk with the updated BIOS file. Ensure to load the BIOS default settings to a...
...file in DOS mode, then at support.asus.com to the bootable USB flash disk drive you created earlier. 3. Save the BIOS file... to ensure system compatibility and stability. Boot the system in DOS environment using the BUPDATER utility: 1. Updating the BIOS file To update the BIOS file...ASUS support website at the prompt, type: BUPDATER /i[filename].CAP where [filename] is the latest or the original BIOS file... as a USB flash disk with the updated BIOS file. Ensure to load the BIOS default settings to a...
User Guide
Page 64
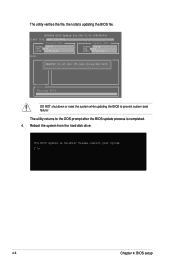
ASUSTek BIOS Update for DOS V1.06 (09/08/04) FLASH TYPE: MXIC 25L1605A Current ROM Update ROM BOARD: P9D-X VER: 0201 DATE: 12/01/2013 BOARD: P9D-X VER: 0202 DATE: 12/09/2013 PATH: WARNING! The BIOS update is completed. 4. Please restart your system. Reboot the system from the hard disk drive... shut down or reset the system while updating the BIOS to the DOS prompt after the BIOS update process is finished! The utility verifies the file, then starts updating the BIOS file. C:\> 4-6 Chapter 4: BIOS setup The utility returns to prevent system boot failure!
ASUSTek BIOS Update for DOS V1.06 (09/08/04) FLASH TYPE: MXIC 25L1605A Current ROM Update ROM BOARD: P9D-X VER: 0201 DATE: 12/01/2013 BOARD: P9D-X VER: 0202 DATE: 12/09/2013 PATH: WARNING! The BIOS update is completed. 4. Please restart your system. Reboot the system from the hard disk drive... shut down or reset the system while updating the BIOS to the DOS prompt after the BIOS update process is finished! The utility verifies the file, then starts updating the BIOS file. C:\> 4-6 Chapter 4: BIOS setup The utility returns to prevent system boot failure!
User Guide
Page 65
... to enter the Setup utility; This requires you can also restart by pressing the reset button on your screen. • Visit the ASUS website (www.asus.com) to use as easy to ensure optimum performance. Press during the Power-On Self-Test (POST) to reconfigure your system using this...program, it lets you can update using the navigation keys. • The default BIOS settings for this utility. ASUS P9D-X 4-7 Even if you are not prompted to download the latest BIOS file for reference purposes only, and may not exactly match what you wish to "Run Setup." Do this program. ...
... to enter the Setup utility; This requires you can also restart by pressing the reset button on your screen. • Visit the ASUS website (www.asus.com) to use as easy to ensure optimum performance. Press during the Power-On Self-Test (POST) to reconfigure your system using this...program, it lets you can update using the navigation keys. • The default BIOS settings for this utility. ASUS P9D-X 4-7 Even if you are not prompted to download the latest BIOS file for reference purposes only, and may not exactly match what you wish to "Run Setup." Do this program. ...
User Guide
Page 123
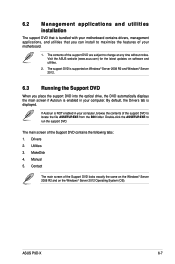
...enabled in your computer. If Autorun is NOT enabled in your computer, browse the contents of the support DVD are subject to locate the file ASSETUP.EXE from the BIN folder. Utilities 3. MakeDisk 4. Manual 5. The main screen of the Support DVD looks exactly the same on ...software and utilities. 2. The contents of the support DVD to change at any time without notice. The support DVD is displayed. ASUS P9D-X 6-7 Visit the ASUS website (www.asus.com) for the latest updates on the Windows® Server 2012 Operating System (OS). Drivers 2. Contact The main screen of ...
...enabled in your computer. If Autorun is NOT enabled in your computer, browse the contents of the support DVD are subject to locate the file ASSETUP.EXE from the BIN folder. Utilities 3. MakeDisk 4. Manual 5. The main screen of the Support DVD looks exactly the same on ...software and utilities. 2. The contents of the support DVD to change at any time without notice. The support DVD is displayed. ASUS P9D-X 6-7 Visit the ASUS website (www.asus.com) for the latest updates on the Windows® Server 2012 Operating System (OS). Drivers 2. Contact The main screen of ...
User Guide
Page 126
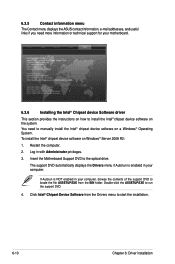
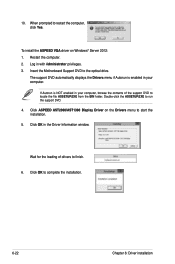
... Intel® chipset device software on a Windows® Operating System. Restart the computer. 2. Insert the Motherboard Support DVD to locate the file ASSETUP.EXE from the Drivers menu to run the support DVD. 4. If Autorun is enabled in your computer. Click Intel® Chipset Device...-click the ASSETUP.EXE to start the installation. 6-10 Chapter 6: Driver installation 6.3.5 Contact information menu The Contact menu displays the ASUS contact information, e-mail addresses, and useful links if you need to install the Intel® chipset device software on the system.
... Intel® chipset device software on a Windows® Operating System. Restart the computer. 2. Insert the Motherboard Support DVD to locate the file ASSETUP.EXE from the Drivers menu to run the support DVD. 4. If Autorun is enabled in your computer. Click Intel® Chipset Device...-click the ASSETUP.EXE to start the installation. 6-10 Chapter 6: Driver installation 6.3.5 Contact information menu The Contact menu displays the ASUS contact information, e-mail addresses, and useful links if you need to install the Intel® chipset device software on the system.
User Guide
Page 127
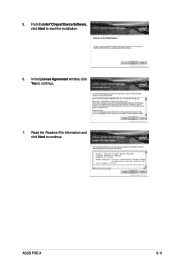
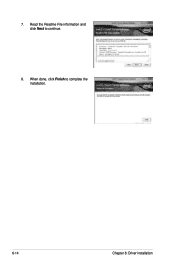
ASUS P9D-X 6-11 5. Read the Readme File information and click Next to start the installation. 6. From the Intel® Chipset Device Software, click Next to continue. In the License Agreement window, click Yes to continue. 7.
ASUS P9D-X 6-11 5. Read the Readme File information and click Next to start the installation. 6. From the Intel® Chipset Device Software, click Next to continue. In the License Agreement window, click Yes to continue. 7.
User Guide
Page 129
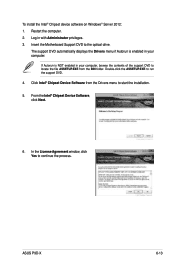
... is enabled in with Administrator privileges. 3. In the License Agreement window, click Yes to start the installation. 5. ASUS P9D-X 6-13 Log in your computer, browse the contents of the support DVD to locate the file ASSETUP.EXE from the Drivers menu to continue the process. To install the Intel® Chipset device software...
... is enabled in with Administrator privileges. 3. In the License Agreement window, click Yes to start the installation. 5. ASUS P9D-X 6-13 Log in your computer, browse the contents of the support DVD to locate the file ASSETUP.EXE from the Drivers menu to continue the process. To install the Intel® Chipset device software...
User Guide
Page 130
When done, click Finish to continue. 8. 7. Read the Readme File information and click Next to complete the installation. 6-14 Chapter 6: Driver installation
When done, click Finish to continue. 8. 7. Read the Readme File information and click Next to complete the installation. 6-14 Chapter 6: Driver installation
User Guide
Page 131
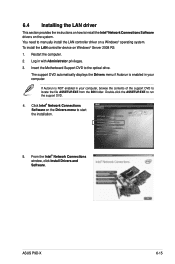
Log in your computer, browse the contents of the support DVD to run the support DVD. 4. ASUS P9D-X 6-15 6.4 Installing the LAN driver This section provides the instructions on how to manually install the LAN controller driver on a Windows® operating system.... 5. The support DVD automatically displays the Drivers menu if Autorun is NOT enabled in your computer. Double-click the ASSETUP.EXE to locate the file ASSETUP.EXE from the BIN folder. If Autorun is enabled in with Administrator privileges. 3. From the Intel® Network Connections window, click Install ...
Log in your computer, browse the contents of the support DVD to run the support DVD. 4. ASUS P9D-X 6-15 6.4 Installing the LAN driver This section provides the instructions on how to manually install the LAN controller driver on a Windows® operating system.... 5. The support DVD automatically displays the Drivers menu if Autorun is NOT enabled in your computer. Double-click the ASSETUP.EXE to locate the file ASSETUP.EXE from the BIN folder. If Autorun is enabled in with Administrator privileges. 3. From the Intel® Network Connections window, click Install ...

User Guide
Page 133
.... 2. Insert the Motherboard Support DVD to complete the installation. Double-click the ASSETUP.EXE to locate the file ASSETUP.EXE from the BIN folder. Click Intel® Network Connections Software on Windows® Server 2012: 1. ASUS P9D-X 6-17 10. Log in the dialog box to start the installation. To install the LAN controller...
.... 2. Insert the Motherboard Support DVD to complete the installation. Double-click the ASSETUP.EXE to locate the file ASSETUP.EXE from the BIN folder. Click Intel® Network Connections Software on Windows® Server 2012: 1. ASUS P9D-X 6-17 10. Log in the dialog box to start the installation. To install the LAN controller...
User Guide
Page 136
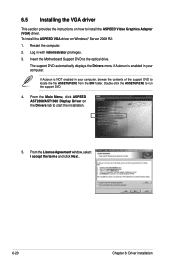
...) driver. Double-click the ASSETUP.EXE to the optical drive. From the Main Menu, click ASPEED AST2300/AST1300 Display Driver on how to locate the file ASSETUP.EXE from the BIN folder. From the License Agreement window, select I accept the terms and click Next.. 6-20 Chapter 6: Driver installation To install the...
...) driver. Double-click the ASSETUP.EXE to the optical drive. From the Main Menu, click ASPEED AST2300/AST1300 Display Driver on how to locate the file ASSETUP.EXE from the BIN folder. From the License Agreement window, select I accept the terms and click Next.. 6-20 Chapter 6: Driver installation To install the...
User Guide
Page 138
... the Drivers menu if Autorun is NOT enabled in with Administrator privileges. 3. Click OK in your computer, browse the contents of drivers to locate the file ASSETUP.EXE from the BIN folder. Double-click the ASSETUP.EXE to complete the installation. 6-22 Chapter 6: Driver installation Click OK to run the support...
... the Drivers menu if Autorun is NOT enabled in with Administrator privileges. 3. Click OK in your computer, browse the contents of drivers to locate the file ASSETUP.EXE from the BIN folder. Double-click the ASSETUP.EXE to complete the installation. 6-22 Chapter 6: Driver installation Click OK to run the support...
User Guide
Page 139
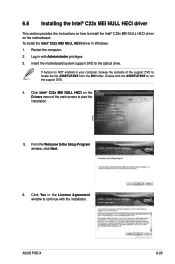
... the instructions on how to install the Intel® C22x MEI NULL HECI driver on the Drivers menu of the support DVD to locate the file ASSETUP.EXE from the BIN folder. Double-click the ASSETUP.EXE to run the support DVD. 4. ASUS P9D-X 6-23
... the instructions on how to install the Intel® C22x MEI NULL HECI driver on the Drivers menu of the support DVD to locate the file ASSETUP.EXE from the BIN folder. Double-click the ASSETUP.EXE to run the support DVD. 4. ASUS P9D-X 6-23
User Guide
Page 141
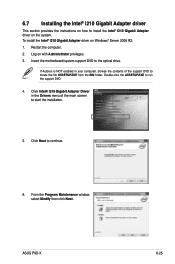
Click Intel® I210 Gigabit Adapter Driver in your computer, browse the contents of the main screen to the optical drive. ASUS P9D-X 6-25 Insert the motherboard/system support DVD to start the installation. 5. Click Next to run the support DVD. 4. To install the Intel® I210 Gigabit ...; I210 Gigabit Adapter driver on the system. 6.7 Installing the Intel® I210 Gigabit Adapter driver This section provides the instructions on how to locate the file ASSETUP.EXE from the BIN folder. From the Program Maintenance window, select Modify then click Next.
Click Intel® I210 Gigabit Adapter Driver in your computer, browse the contents of the main screen to the optical drive. ASUS P9D-X 6-25 Insert the motherboard/system support DVD to start the installation. 5. Click Next to run the support DVD. 4. To install the Intel® I210 Gigabit ...; I210 Gigabit Adapter driver on the system. 6.7 Installing the Intel® I210 Gigabit Adapter driver This section provides the instructions on how to locate the file ASSETUP.EXE from the BIN folder. From the Program Maintenance window, select Modify then click Next.
User Guide
Page 143
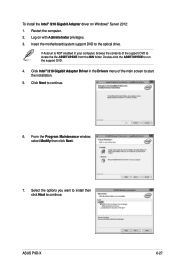
Log on Windows® Server 2012: 1. ASUS P9D-X 6-27 Insert the motherboard/system support DVD to run the support DVD. 4. To install the Intel® I210 Gigabit Adapter driver on with Administrator privileges. 3. Double-click the ASSETUP.EXE to the optical drive. Click Next to locate the file ASSETUP.EXE from the BIN folder...
Log on Windows® Server 2012: 1. ASUS P9D-X 6-27 Insert the motherboard/system support DVD to run the support DVD. 4. To install the Intel® I210 Gigabit Adapter driver on with Administrator privileges. 3. Double-click the ASSETUP.EXE to the optical drive. Click Next to locate the file ASSETUP.EXE from the BIN folder...