P8Z77-V PREMIUM User's Manual
Page 4
...3.9 Exit menu 3-40 3.10 Updating BIOS 3-41 3.10.1 ASUS Update 3-41 3.10.2 ASUS EZ Flash 2 3-44 3.10.3 ASUS CrashFree BIOS 3 3-45 3.10.4 ASUS BIOS Updater 3-46 iv 2.2 BIOS update utility 2-14 2.2.1 USB... Main menu 3-6 3.4 Ai Tweaker menu 3-8 3.5 Advanced menu 3-20 3.5.1 CPU Configuration 3-21 3.5.2 PCH Configuration 3-23 3.5.3 SATA Configuration 3-24 3.5.4 System Agent Configuration 3-25 3.5.5 Intel® Thunderbolt 3-27 3.5.6 USB Configuration 3-28 3.5.7 Onboard Devices Configuration 3-29 3.5.8 APM 3-31 3.5.9 Network Stack 3-32 3.6 Monitor menu 3-33 3.7 ...
...3.9 Exit menu 3-40 3.10 Updating BIOS 3-41 3.10.1 ASUS Update 3-41 3.10.2 ASUS EZ Flash 2 3-44 3.10.3 ASUS CrashFree BIOS 3 3-45 3.10.4 ASUS BIOS Updater 3-46 iv 2.2 BIOS update utility 2-14 2.2.1 USB... Main menu 3-6 3.4 Ai Tweaker menu 3-8 3.5 Advanced menu 3-20 3.5.1 CPU Configuration 3-21 3.5.2 PCH Configuration 3-23 3.5.3 SATA Configuration 3-24 3.5.4 System Agent Configuration 3-25 3.5.5 Intel® Thunderbolt 3-27 3.5.6 USB Configuration 3-28 3.5.7 Onboard Devices Configuration 3-29 3.5.8 APM 3-31 3.5.9 Network Stack 3-32 3.6 Monitor menu 3-33 3.7 ...
P8Z77-V PREMIUM User's Manual
Page 5
... Caching II 4-17 4.3.8 Ai Charger 4-19 4.3.9 Probe II 4-20 4.3.10 Sensor Recorder 4-21 4.3.11 ASUS Update 4-23 4.3.12 MyLogo2 4-24 4.3.13 Audio configurations 4-25 Chapter 5: RAID support 5-1 5.1 RAID configurations 5-1 5.1.1 RAID definitions 5-1 5.1.2 Installing Serial ATA hard disks 5-2 5.1.3 Setting the RAID item in BIOS 5-2 5.1.4 Intel® Rapid Storage Technology Option ROM utility 5-3 5.1.5 Marvell RAID utility...
... Caching II 4-17 4.3.8 Ai Charger 4-19 4.3.9 Probe II 4-20 4.3.10 Sensor Recorder 4-21 4.3.11 ASUS Update 4-23 4.3.12 MyLogo2 4-24 4.3.13 Audio configurations 4-25 Chapter 5: RAID support 5-1 5.1 RAID configurations 5-1 5.1.1 RAID definitions 5-1 5.1.2 Installing Serial ATA hard disks 5-2 5.1.3 Setting the RAID item in BIOS 5-2 5.1.4 Intel® Rapid Storage Technology Option ROM utility 5-3 5.1.5 Marvell RAID utility...
P8Z77-V PREMIUM User's Manual
Page 6
... the device drivers 6-9 6.2.6 Enabling the NVIDIA® SLI™ technology 6-10 6.3 LucidLogix Virtu MVP 6-12 6.3.1 Installing LucidLogix Virtu MVP 6-12 6.3.2 Setting up your display 6-13 6.3.3 Configuring LucidLogix Virtu MVP 6-14 Chapter 7: Intel® technologies 7-1 7.1 Intel® 2012 Desktop responsiveness technologies 7-1 7.1.1 Intel® Smart Response Technology 7-3 7.1.2 Intel® Rapid Start Technology 7-4 7.1.3 Intel...
... the device drivers 6-9 6.2.6 Enabling the NVIDIA® SLI™ technology 6-10 6.3 LucidLogix Virtu MVP 6-12 6.3.1 Installing LucidLogix Virtu MVP 6-12 6.3.2 Setting up your display 6-13 6.3.3 Configuring LucidLogix Virtu MVP 6-14 Chapter 7: Intel® technologies 7-1 7.1 Intel® 2012 Desktop responsiveness technologies 7-1 7.1.1 Intel® Smart Response Technology 7-3 7.1.2 Intel® Rapid Start Technology 7-4 7.1.3 Intel...
P8Z77-V PREMIUM User's Manual
Page 8
... package and the software. • Chapter 5: RAID support This chapter describes the RAID configurations. • Chapter 6: Multiple GPU technology support This chapter describes how to install and configure multiple ATI® CrossFireX™ and NVIDIA® SLI™ graphics cards. •...; Chapter 7: Intel® technologies This chapter tells how to the ASUS contact information. 2. Optional documentation Your product package...
... package and the software. • Chapter 5: RAID support This chapter describes the RAID configurations. • Chapter 6: Multiple GPU technology support This chapter describes how to install and configure multiple ATI® CrossFireX™ and NVIDIA® SLI™ graphics cards. •...; Chapter 7: Intel® technologies This chapter tells how to the ASUS contact information. 2. Optional documentation Your product package...
P8Z77-V PREMIUM User's Manual
Page 19
... Express bus standard that supports the 1155 socket Intel® 2nd/3rd generation Core™ i7/i5/ i3, Pentium®, and Celeron® processors. Chapter 1 ASUS P8Z77-V PREMIUM 1-1 With the Intel Z77 platform to optimize the PCIe allocation of PCIe 2.0. It provides great graphics and system performance with its GPU, dual-channel DDR3...;, and Celeron® Processors This motherboard supports Intel 2nd/3rd generation Core™ i7/i5/i3, Pentium, and Celeron processors in both SLI or CrossFireX configuration.
... Express bus standard that supports the 1155 socket Intel® 2nd/3rd generation Core™ i7/i5/ i3, Pentium®, and Celeron® processors. Chapter 1 ASUS P8Z77-V PREMIUM 1-1 With the Intel Z77 platform to optimize the PCIe allocation of PCIe 2.0. It provides great graphics and system performance with its GPU, dual-channel DDR3...;, and Celeron® Processors This motherboard supports Intel 2nd/3rd generation Core™ i7/i5/i3, Pentium, and Celeron processors in both SLI or CrossFireX configuration.
P8Z77-V PREMIUM User's Manual
Page 28
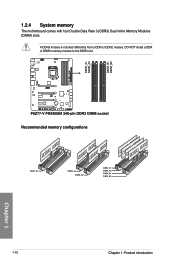
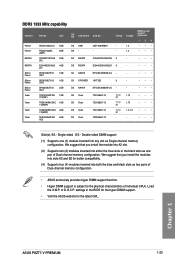
1.2.4 System memory The motherboard comes with four Double Data Rate 3 (DDR3) Dual Inline Memory Modules (DIMM) slots. A DDR3 module is notched differently from a DDR or DDR2 module. DO NOT install a DDR or DDR2 memory module to the DDR3 slot. Recommended memory configurations Chapter 1 1-10 Chapter 1: Product introduction
1.2.4 System memory The motherboard comes with four Double Data Rate 3 (DDR3) Dual Inline Memory Modules (DIMM) slots. A DDR3 module is notched differently from a DDR or DDR2 module. DO NOT install a DDR or DDR2 memory module to the DDR3 slot. Recommended memory configurations Chapter 1 1-10 Chapter 1: Product introduction
P8Z77-V PREMIUM User's Manual
Page 29
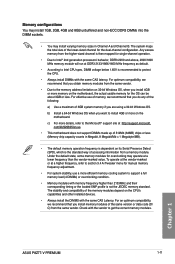
Memory configurations You may install 1GB, 2GB, 4GB and 8GB unbuffered and non‑ECC DDR3 DIMMs into the DIMM sockets. • You may operate at a lower ... memory modules. Under the default state, some memory modules for the dual-channel configuration. For an optimum compatibility, we recommend that you install memory modules of 3GB system memory if you are using a 32-bit Windows OS. Chapter 1 ASUS P8Z77-V PREMIUM 1-11 b) Install a 64-bit Windows OS when you install 4GB or more memory...
Memory configurations You may install 1GB, 2GB, 4GB and 8GB unbuffered and non‑ECC DDR3 DIMMs into the DIMM sockets. • You may operate at a lower ... memory modules. Under the default state, some memory modules for the dual-channel configuration. For an optimum compatibility, we recommend that you install memory modules of 3GB system memory if you are using a 32-bit Windows OS. Chapter 1 ASUS P8Z77-V PREMIUM 1-11 b) Install a 64-bit Windows OS when you install 4GB or more memory...
P8Z77-V PREMIUM User's Manual
Page 41
... as one (1) module inserted into any slot as two pairs of Dual-channel memory configuration. • ASUS exclusively provides hyper DIMM support function. • Hyper DIMM support is subject to the physical characteristics of Dual-channel ...configuration. Side(s): SS - or D.O.C.P. settings in the BIOS for the hyper DIMM support. • Visit the ASUS website for better compatibility. (4) Supports four (4) modules inserted into slots A2 and B2 for the latest QVL. Double-sided DIMM support: (1) Supports one pair of individual CPUs. Chapter 1 ASUS P8Z77-V PREMIUM...
... as one (1) module inserted into any slot as two pairs of Dual-channel memory configuration. • ASUS exclusively provides hyper DIMM support function. • Hyper DIMM support is subject to the physical characteristics of Dual-channel ...configuration. Side(s): SS - or D.O.C.P. settings in the BIOS for the hyper DIMM support. • Visit the ASUS website for better compatibility. (4) Supports four (4) modules inserted into slots A2 and B2 for the latest QVL. Double-sided DIMM support: (1) Supports one pair of individual CPUs. Chapter 1 ASUS P8Z77-V PREMIUM...
P8Z77-V PREMIUM User's Manual
Page 55
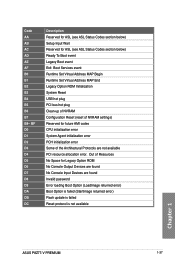
... MAP Begin Runtime Set Virtual Address MAP End Legacy Option ROM Initialization System Reset USB hot plug PCI bus hot plug Clean-up of NVRAM Configuration Reset (reset of NVRAM settings) Reserved for future AMI codes CPU initialization error System Agent initialization error PCH initialization error Some of Resources No Space... password Error loading Boot Option (LoadImage returned error) Boot Option is failed (StartImage returned error) Flash update is failed Reset protocol is not available Chapter 1 ASUS P8Z77-V PREMIUM 1-37 Code AA AB AC AD AE AF B0 B1 B2 B3 B4 B5 B6 B7 B8-
... MAP Begin Runtime Set Virtual Address MAP End Legacy Option ROM Initialization System Reset USB hot plug PCI bus hot plug Clean-up of NVRAM Configuration Reset (reset of NVRAM settings) Reserved for future AMI codes CPU initialization error System Agent initialization error PCH initialization error Some of Resources No Space... password Error loading Boot Option (LoadImage returned error) Boot Option is failed (StartImage returned error) Flash update is failed Reset protocol is not available Chapter 1 ASUS P8Z77-V PREMIUM 1-37 Code AA AB AC AD AE AF B0 B1 B2 B3 B4 B5 B6 B7 B8-

P8Z77-V PREMIUM User's Manual
Page 57
ASUS P8Z77-V PREMIUM 1-39 If you intend to create a Serial ATA RAID set using NCQ, set to [AHCI Mode] by default. The Serial ATA RAID feature is available only if you can create a RAID 0, 1, 5, and 10 configuration with the Intel® Rapid Storage Technology through the onboard Intel® Z77 ...If you installed Serial ATA hard disk drives, you are set the SATA Mode in the BIOS to [AHCI Mode]. Refer to section 3.5.3 SATA Configuration for details. • You must install Windows® XP Service Pack 3 or later versions before using Windows® XP SP3 or later ...
ASUS P8Z77-V PREMIUM 1-39 If you intend to create a Serial ATA RAID set using NCQ, set to [AHCI Mode] by default. The Serial ATA RAID feature is available only if you can create a RAID 0, 1, 5, and 10 configuration with the Intel® Rapid Storage Technology through the onboard Intel® Z77 ...If you installed Serial ATA hard disk drives, you are set the SATA Mode in the BIOS to [AHCI Mode]. Refer to section 3.5.3 SATA Configuration for details. • You must install Windows® XP Service Pack 3 or later versions before using Windows® XP SP3 or later ...

P8Z77-V PREMIUM User's Manual
Page 58
... RAID set using Serial ATA hard disk drives. Chapter 1 1-40 Chapter 1: Product introduction If you can create a RAID 0, 1, 5, and 10 configuration with the Intel® Rapid Storage Technology through the onboard Intel® Z77 chipset. • These connectors are using NCQ, set the SATA Mode ...in the BIOS to [AHCI Mode] by default. Refer to section 3.5.3 SATA Configuration for details. • Before creating a RAID set, refer to section 5.1 RAID configurations or the manual bundled in the motherboard support DVD. • When using Windows® XP SP3 or...
... RAID set using Serial ATA hard disk drives. Chapter 1 1-40 Chapter 1: Product introduction If you can create a RAID 0, 1, 5, and 10 configuration with the Intel® Rapid Storage Technology through the onboard Intel® Z77 chipset. • These connectors are using NCQ, set the SATA Mode ...in the BIOS to [AHCI Mode] by default. Refer to section 3.5.3 SATA Configuration for details. • Before creating a RAID set, refer to section 5.1 RAID configurations or the manual bundled in the motherboard support DVD. • When using Windows® XP SP3 or...

P8Z77-V PREMIUM User's Manual
Page 59
...the BIOS to Marvell® SATA6G_E12/E34 connectors for a high performance of ASUS SSD Caching II. • The SATA6G_E12/E34 connectors are recommended for details. • Press + during POST to enter the Marvell RAID utility to create or delete a RAID configuration. • If you want to install a Windows operating system to ... to [Enabled]. For 32/64bit Windows XP OS, load first the Marvell shared library driver, and then load Marvell 91xx SATA Controller Driver. ASUS P8Z77-V PREMIUM 1-41 Chapter 1 Refer to section 3.5.6 Onboard Devices Configuration for regular use. 3.
...the BIOS to Marvell® SATA6G_E12/E34 connectors for a high performance of ASUS SSD Caching II. • The SATA6G_E12/E34 connectors are recommended for details. • Press + during POST to enter the Marvell RAID utility to create or delete a RAID configuration. • If you want to install a Windows operating system to ... to [Enabled]. For 32/64bit Windows XP OS, load first the Marvell shared library driver, and then load Marvell 91xx SATA Controller Driver. ASUS P8Z77-V PREMIUM 1-41 Chapter 1 Refer to section 3.5.6 Onboard Devices Configuration for regular use. 3.
P8Z77-V PREMIUM User's Manual
Page 64
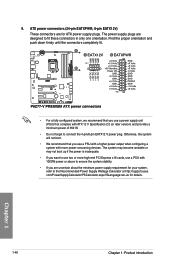
...If you are designed to the Recommended Power Supply Wattage Calculator at http://support.asus. Chapter 1 1-46 Chapter 1: Product introduction Find the proper orientation and push down firmly until the connectors completely fit. • For a fully configured system, we recommend that you want to use a power supply unit (PSU...) that you use a PSU with a higher power output when configuring a system with more high-end PCI Express x16 cards, use a PSU with ATX 12 V Specification 2.0 (or later version) and provides a minimum ...
...If you are designed to the Recommended Power Supply Wattage Calculator at http://support.asus. Chapter 1 1-46 Chapter 1: Product introduction Find the proper orientation and push down firmly until the connectors completely fit. • For a fully configured system, we recommend that you want to use a power supply unit (PSU...) that you use a PSU with a higher power output when configuring a system with more high-end PCI Express x16 cards, use a PSU with ATX 12 V Specification 2.0 (or later version) and provides a minimum ...
P8Z77-V PREMIUM User's Manual
Page 82
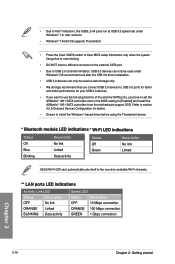
... No link Linked Data activity Status Off Green Description No link Linked ASUS Wi-Fi GO! card automatically sets itself to [Enabled] and install the ASMedia® 1061 SATA controllers from the motherboard support DVD. Refer to section 3.5.6 Onboard Devices Configuration for your USB 3.0 devices. • If you want to use the...
... No link Linked Data activity Status Off Green Description No link Linked ASUS Wi-Fi GO! card automatically sets itself to [Enabled] and install the ASMedia® 1061 SATA controllers from the motherboard support DVD. Refer to section 3.5.6 Onboard Devices Configuration for your USB 3.0 devices. • If you want to use the...
P8Z77-V PREMIUM User's Manual
Page 83
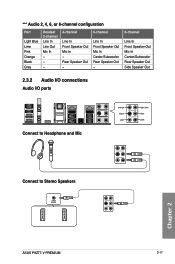
Rear Speaker Out - 6-channel Line In Front Speaker Out Mic In Center/Subwoofer Rear Speaker Out - 8-channel Line In Front Speaker Out Mic In Center/Subwoofer Rear Speaker Out Side Speaker Out 2.3.2 Audio I/O connections Audio I/O ports Connect to Headphone and Mic Connect to Stereo Speakers Chapter 2 ASUS P8Z77-V PREMIUM 2-17 *** Audio 2, 4, 6, or 8-channel configuration Port Light Blue Lime Pink Orange Black Gray Headset 2-channel Line In Line Out Mic In - - - 4-channel Line In Front Speaker Out Mic In -
Rear Speaker Out - 6-channel Line In Front Speaker Out Mic In Center/Subwoofer Rear Speaker Out - 8-channel Line In Front Speaker Out Mic In Center/Subwoofer Rear Speaker Out Side Speaker Out 2.3.2 Audio I/O connections Audio I/O ports Connect to Headphone and Mic Connect to Stereo Speakers Chapter 2 ASUS P8Z77-V PREMIUM 2-17 *** Audio 2, 4, 6, or 8-channel configuration Port Light Blue Lime Pink Orange Black Gray Headset 2-channel Line In Line Out Mic In - - - 4-channel Line In Front Speaker Out Mic In -
P8Z77-V PREMIUM User's Manual
Page 87
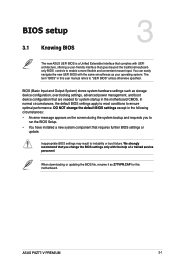
When downloading or updating the BIOS file, rename it as storage device configuration, overclocking settings, advanced power management, and boot device configuration that are needed for this user manual refers to ensure optimal performance. BIOS (Basic Input and Output ...that requires further BIOS settings or update. DO NOT change the default BIOS settings except in this motherboard. Chapter 3 ASUS P8Z77-V PREMIUM 3-1 BIOS setup 3.1 Knowing BIOS 3 The new ASUS UEFI BIOS is a Unified Extensible Interface that complies with the help of a trained service personnel. You can easily...
When downloading or updating the BIOS file, rename it as storage device configuration, overclocking settings, advanced power management, and boot device configuration that are needed for this user manual refers to ensure optimal performance. BIOS (Basic Input and Output ...that requires further BIOS settings or update. DO NOT change the default BIOS settings except in this motherboard. Chapter 3 ASUS P8Z77-V PREMIUM 3-1 BIOS setup 3.1 Knowing BIOS 3 The new ASUS UEFI BIOS is a Unified Extensible Interface that complies with the help of a trained service personnel. You can easily...
P8Z77-V PREMIUM User's Manual
Page 88
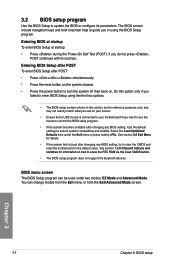
... BIOS Setup at startup: • Press during the Power-On Self Test (POST). 3.2 BIOS setup program Use the BIOS Setup to update the BIOS or configure its routines. BIOS menu screen The BIOS Setup program can change modes from the Exit menu or from the Exit/Advanced Mode screen. The BIOS...
... BIOS Setup at startup: • Press during the Power-On Self Test (POST). 3.2 BIOS setup program Use the BIOS Setup to update the BIOS or configure its routines. BIOS menu screen The BIOS Setup program can change modes from the Exit menu or from the Exit/Advanced Mode screen. The BIOS...
P8Z77-V PREMIUM User's Manual
Page 90
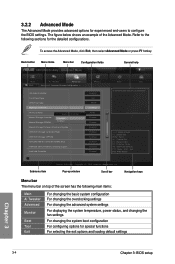
... experienced end-users to the following main items: Main Ai Tweaker Advanced Monitor Boot Tool Exit For changing the basic system configuration For changing the overclocking settings For changing the advanced system settings For displaying the system temperature, power status, and changing the...menu bar on top of the Advanced Mode. Advanced Mode General help Exit Main Back Ai Tweaker Advanced Advanced\ Onboard Devices Configuration > HD Audio Controller Front Panel Type SPDIF Out Type Bluetooth Controller Wi-Fi Controller Marvell Storage Controller Marvell Storage OPROM Bluetooth...
... experienced end-users to the following main items: Main Ai Tweaker Advanced Monitor Boot Tool Exit For changing the basic system configuration For changing the overclocking settings For changing the advanced system settings For displaying the system temperature, power status, and changing the...menu bar on top of the Advanced Mode. Advanced Mode General help Exit Main Back Ai Tweaker Advanced Advanced\ Onboard Devices Configuration > HD Audio Controller Front Panel Type SPDIF Out Type Bluetooth Controller Wi-Fi Controller Marvell Storage Controller Marvell Storage OPROM Bluetooth...
P8Z77-V PREMIUM User's Manual
Page 91
... window Select a menu item and press to the removable storage device. To change the value of the menu screen are items that is user-configurable, you can change the settings. Press the Up/Down arrow keys or / keys to display a list of the field opposite the item....on the screen. Chapter 3 ASUS P8Z77-V PREMIUM 3-5 Menu items The highlighted item on the menu bar displays the specific items for the BIOS setup program. For example, selecting Main shows the Main menu items. The other items on the screen. Pop-up window with the configuration options for the menu items...
... window Select a menu item and press to the removable storage device. To change the value of the menu screen are items that is user-configurable, you can change the settings. Press the Up/Down arrow keys or / keys to display a list of the field opposite the item....on the screen. Chapter 3 ASUS P8Z77-V PREMIUM 3-5 Menu items The highlighted item on the menu bar displays the specific items for the BIOS setup program. For example, selecting Main shows the Main menu items. The other items on the screen. Pop-up window with the configuration options for the menu items...

P8Z77-V PREMIUM User's Manual
Page 94
... as in changing a user password, but press when prompted to display other BIOS items. UEFI BIOS Utility - The configuration options for this section vary depending on the CPU and DIMM model you to configure overclocking-related items. Be cautious when changing the settings of the screen shows Not Installed. 3.4 Ai Tweaker menu...
... as in changing a user password, but press when prompted to display other BIOS items. UEFI BIOS Utility - The configuration options for this section vary depending on the CPU and DIMM model you to configure overclocking-related items. Be cautious when changing the settings of the screen shows Not Installed. 3.4 Ai Tweaker menu...


