
User Guide
Page 35
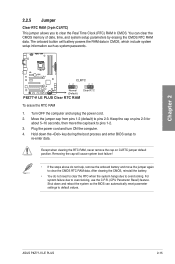
...cap on CLRTC jumper default position. Plug the power cord and turn ON the computer. 4. Hold down and reboot the system so the BIOS can clear the CMOS memory of date, time, and system setup parameters by erasing the CMOS RTC RAM data. Except when clearing the ...1-2 (default) to clear the Real Time Clock (RTC) RAM in CMOS, which include system setup information such as system passwords. ASUS P8Z77-V LE PLUS 2-15 You can automatically reset parameter settings to overclocking. Turn OFF the computer and unplug the power cord. 2. The onboard button cell battery powers the RAM data...
...cap on CLRTC jumper default position. Plug the power cord and turn ON the computer. 4. Hold down and reboot the system so the BIOS can clear the CMOS memory of date, time, and system setup parameters by erasing the CMOS RTC RAM data. Except when clearing the ...1-2 (default) to clear the Real Time Clock (RTC) RAM in CMOS, which include system setup information such as system passwords. ASUS P8Z77-V LE PLUS 2-15 You can automatically reset parameter settings to overclocking. Turn OFF the computer and unplug the power cord. 2. The onboard button cell battery powers the RAM data...
User Guide
Page 67
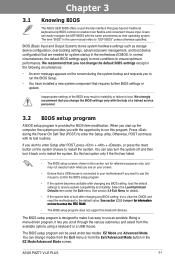
... Mode screen. Being a menu-driven program, it lets you wish to enter Setup after changing any BIOS setting, try to clear the CMOS and reset the motherboard to the default value. �S�e�e��s�e��c�ti�o&#...BIOS setup screens shown in this section are needed for reference purposes only, and may result to instability or failure to ensure optimum performance. Select the Load Optimized Defaults item under two modes: EZ Mode and Advanced Mode. You can easily navigate the UEFI BIOS with its test routines. ASUS P8Z77-V LE PLUS...
... Mode screen. Being a menu-driven program, it lets you wish to enter Setup after changing any BIOS setting, try to clear the CMOS and reset the motherboard to the default value. �S�e�e��s�e��c�ti�o&#...BIOS setup screens shown in this section are needed for reference purposes only, and may result to instability or failure to ensure optimum performance. Select the Load Optimized Defaults item under two modes: EZ Mode and Advanced Mode. You can easily navigate the UEFI BIOS with its test routines. ASUS P8Z77-V LE PLUS...

User Guide
Page 68
...Selects the boot device priority Selects the Advanced mode functions Normal mode ASUS Optimal mode Selects the boot device priority Displays the system properties of the BIOS setup program Clicks to the system. 3-2 Chapter 3: BIOS setup 3.2.1 EZ Mode By default, the EZ Mode screen appears ... changes and resets the system, or enters the Advanced Mode UEFI BIOS Utility - To access the Advanced Mode, click Exit/Advanced Mode, then select Advanced Mode or press F7 hot key for entering the BIOS setup program can be changed. EZ Mode Monday [9/13/2010] P8Z77-V LE PLUS BIOS Version : ...
...Selects the boot device priority Selects the Advanced mode functions Normal mode ASUS Optimal mode Selects the boot device priority Displays the system properties of the BIOS setup program Clicks to the system. 3-2 Chapter 3: BIOS setup 3.2.1 EZ Mode By default, the EZ Mode screen appears ... changes and resets the system, or enters the Advanced Mode UEFI BIOS Utility - To access the Advanced Mode, click Exit/Advanced Mode, then select Advanced Mode or press F7 hot key for entering the BIOS setup program can be changed. EZ Mode Monday [9/13/2010] P8Z77-V LE PLUS BIOS Version : ...

User Guide
Page 99
...65533;e���p�r�o�f�i�le� number that saved your BIOS settings, press , and then select Yes. • DO NOT shut down or reset the system while updating the BIOS to prevent the system boot failure! •.../CPU configuration and BIOS version. 3.8.3 ASUS SPD Information DIMM Slot # [DIMM_A1] Displays the Serial Presence Detect (SPD) information of the setup profile. Configuration options: [DIMM_A1] [DIMM_A2] [DIMM_B1 [DIMM_B2] Chapter 3 ASUS P8Z77-V LE PLUS 3-33 Load from Profile Allows you update the BIOS file only coming from...
...65533;e���p�r�o�f�i�le� number that saved your BIOS settings, press , and then select Yes. • DO NOT shut down or reset the system while updating the BIOS to prevent the system boot failure! •.../CPU configuration and BIOS version. 3.8.3 ASUS SPD Information DIMM Slot # [DIMM_A1] Displays the Serial Presence Detect (SPD) information of the setup profile. Configuration options: [DIMM_A1] [DIMM_A2] [DIMM_B1 [DIMM_B2] Chapter 3 ASUS P8Z77-V LE PLUS 3-33 Load from Profile Allows you update the BIOS file only coming from...

User Guide
Page 100
...;h��e�n�y�o�u� select this option or if you press , a confirmation window appears. Chapter 3 3-34 Chapter 3: BIOS setup Select Yes to save or discard your selections, choose this option or if you press , a confirmation window appears. Launch EFI Shell from... you to load the default values for each of the available filesystem devices. Exit Load Optimized Defaults Save Changes & Reset Discard Changes & Exit ASUS EZ Mode Launch EFI Shell from the Exit menu. Select Yes to discard changes and exit�. When you select...
...;h��e�n�y�o�u� select this option or if you press , a confirmation window appears. Chapter 3 3-34 Chapter 3: BIOS setup Select Yes to save or discard your selections, choose this option or if you press , a confirmation window appears. Launch EFI Shell from... you to load the default values for each of the available filesystem devices. Exit Load Optimized Defaults Save Changes & Reset Discard Changes & Exit ASUS EZ Mode Launch EFI Shell from the Exit menu. Select Yes to discard changes and exit�. When you select...

User Guide
Page 105
... 3 ASUS P8Z77-V LE PLUS 3-39 Recovering the BIOS To recover the BIOS: 1. Turn on the ASUS official website. The utility automatically checks the devices for details. 3.10.3 ASUS CrashFree BIOS 3 utility The ASUS CrashFree BIOS 3 utility is an auto recovery tool that contains the BIOS file. • The BIOS file in the removable device into Z77VLEP.CAP. DO NOT shut down or reset the...
... 3 ASUS P8Z77-V LE PLUS 3-39 Recovering the BIOS To recover the BIOS: 1. Turn on the ASUS official website. The utility automatically checks the devices for details. 3.10.3 ASUS CrashFree BIOS 3 utility The ASUS CrashFree BIOS 3 utility is an auto recovery tool that contains the BIOS file. • The BIOS file in the removable device into Z77VLEP.CAP. DO NOT shut down or reset the...

User Guide
Page 107
... prompt after updating the BIOS file if you have disconnected them. DO NOT shut down or reset the system while updating the BIOS to prevent system boot failure! • For BIOS Updater version 1.04 or later, the utility automatically exits to update BIOS? D:\>bupdater /pc /g... [B] Backup [V] Drive Info [Esc] Exit 3. ASUSTek BIOS Updater for details. • Ensure to connect all SATA hard disk drives after updating BIOS. • Ensure to load the BIOS default settings to confirm BIOS update. Yes No 4. ASUS P8Z77-V LE PLUS 3-41 See Chaper 3 of your computer. Are you to...
... prompt after updating the BIOS file if you have disconnected them. DO NOT shut down or reset the system while updating the BIOS to prevent system boot failure! • For BIOS Updater version 1.04 or later, the utility automatically exits to update BIOS? D:\>bupdater /pc /g... [B] Backup [V] Drive Info [Esc] Exit 3. ASUSTek BIOS Updater for details. • Ensure to connect all SATA hard disk drives after updating BIOS. • Ensure to load the BIOS default settings to confirm BIOS update. Yes No 4. ASUS P8Z77-V LE PLUS 3-41 See Chaper 3 of your computer. Are you to...

User Guide
Page 150
Connect the SATA signal cables. 3. Enter the BIOS Setup during POST. 2. Set the SATA Mode Selection item to Chapter 3 for a RAID configuration: 1. Refer to [RAID]. 4. All Rights Reserved. [ MAIN MENU ] 1. Reset Disks to the Advanced menu > SATA Configuration, and then press . 3. Physical Devices: Port Device Model 0 ...using SATA HDDs. Acceleration Options 6. Install the SATA hard disks into the drive bays. 2. Save your changes, and then exit the BIOS Setup. During POST, press + to RAID mode, all SATA ports run at RAID mode together. 4.5.4 Intel® Rapid Storage Technology...
Connect the SATA signal cables. 3. Enter the BIOS Setup during POST. 2. Set the SATA Mode Selection item to Chapter 3 for a RAID configuration: 1. Refer to [RAID]. 4. All Rights Reserved. [ MAIN MENU ] 1. Reset Disks to the Advanced menu > SATA Configuration, and then press . 3. Physical Devices: Port Device Model 0 ...using SATA HDDs. Acceleration Options 6. Install the SATA hard disks into the drive bays. 2. Save your changes, and then exit the BIOS Setup. During POST, press + to RAID mode, all SATA ports run at RAID mode together. 4.5.4 Intel® Rapid Storage Technology...


