

User Guide
Page 5
... drive 4-48 Chapter 5: Multiple GPU technology support 5.1 ATI® CrossFireX™ technology 5-1 5.1.1 Requirements 5-1 5.1.2 Before you begin 5-1 5.1.3 Installing two CrossFireX™ graphics cards 5-2 5.1.4 Installing the device drivers 5-3 5.1.5 Enabling the ATI® CrossFireX™ technology 5-3 5.2 NVIDIA® SLI™ technology 5-4 5.2.1 Requirements 5-4 5.2.2 Installing two SLI-ready graphics cards 5-4 5.2.3 Installing the device...
... drive 4-48 Chapter 5: Multiple GPU technology support 5.1 ATI® CrossFireX™ technology 5-1 5.1.1 Requirements 5-1 5.1.2 Before you begin 5-1 5.1.3 Installing two CrossFireX™ graphics cards 5-2 5.1.4 Installing the device drivers 5-3 5.1.5 Enabling the ATI® CrossFireX™ technology 5-3 5.2 NVIDIA® SLI™ technology 5-4 5.2.1 Requirements 5-4 5.2.2 Installing two SLI-ready graphics cards 5-4 5.2.3 Installing the device...

User Guide
Page 12
...header 24-pin EATX Power connector 8-pin EATX 12V Power connector 1 x System panel connector 1 x Clear CMOS jumper 1 x MemOK! P8Z77-V LE PLUS specifications summary Rear panel I/O ports Internal I/O connectors BIOS features Manageability Accessories Support DVD Form factor 1 x PS/2 keyboard / mouse combo... 3.0/2.0 ports (blue, 1 supports USB BIOS Flashback) 2 x USB 2.0/1.1 ports 8-channel audio I /O Shield 1 x Support DVD Drivers ASUS Utilities ASUS Update Anti-virus software (OEM version) ATX Form Factor, 12"x 9.6" (30.5cm x 24.4cm) * Specifications are subject to change without notice. xii...
...header 24-pin EATX Power connector 8-pin EATX 12V Power connector 1 x System panel connector 1 x Clear CMOS jumper 1 x MemOK! P8Z77-V LE PLUS specifications summary Rear panel I/O ports Internal I/O connectors BIOS features Manageability Accessories Support DVD Form factor 1 x PS/2 keyboard / mouse combo... 3.0/2.0 ports (blue, 1 supports USB BIOS Flashback) 2 x USB 2.0/1.1 ports 8-channel audio I /O Shield 1 x Support DVD Drivers ASUS Utilities ASUS Update Anti-virus software (OEM version) ATX Form Factor, 12"x 9.6" (30.5cm x 24.4cm) * Specifications are subject to change without notice. xii...

User Guide
Page 61
DVI-D port 4. DisplayPort 6. ASUS P8Z77-V LE PLUS 2-41 2.3.10 Rear panel connection Chapter 2 12 Rear panel connectors 1. Video Graphics Adapter (VGA) port 9. Realtek® LAN (RJ-45) port* 10. External SATA 6.0Gb/s ... and audio port definitions. • Due to USB 3.0 controller limitation, USB 3.0 devices can only be used under Windows® OS environment and after the USB 3.0 driver is installed. • Due to Intel® limitations, the USB3_12 only support Windows® 7 operating system. • USB 3.0 devices can be used as data storage...
DVI-D port 4. DisplayPort 6. ASUS P8Z77-V LE PLUS 2-41 2.3.10 Rear panel connection Chapter 2 12 Rear panel connectors 1. Video Graphics Adapter (VGA) port 9. Realtek® LAN (RJ-45) port* 10. External SATA 6.0Gb/s ... and audio port definitions. • Due to USB 3.0 controller limitation, USB 3.0 devices can only be used under Windows® OS environment and after the USB 3.0 driver is installed. • Due to Intel® limitations, the USB3_12 only support Windows® 7 operating system. • USB 3.0 devices can be used as data storage...

User Guide
Page 86
... feature allows the hard disk to use the Serial ATA hard disk drives as Parallel ATA physical storage devices. The AHCI allows the onboard storage driver to enable advanced Serial ATA features that increases storage performance on random workloads by allowing the drive to the corresponding SATA port. Advanced Mode Exit...
... feature allows the hard disk to use the Serial ATA hard disk drives as Parallel ATA physical storage devices. The AHCI allows the onboard storage driver to enable advanced Serial ATA features that increases storage performance on random workloads by allowing the drive to the corresponding SATA port. Advanced Mode Exit...

User Guide
Page 109
... enabled in your computer, browse the contents of the support DVD are subject to open the folder of supplementary user manuals. The Drivers menu shows the available device drivers if the system detects installed devices. ASUS P8Z77-V LE PLUS 4-1 The Manual menu contains the list of the user manual. Click an item to change at www...
... enabled in your computer, browse the contents of the support DVD are subject to open the folder of supplementary user manuals. The Drivers menu shows the available device drivers if the system detects installed devices. ASUS P8Z77-V LE PLUS 4-1 The Manual menu contains the list of the user manual. Click an item to change at www...

User Guide
Page 111
...to the Auto Tuning Mode under TurboV EVO • The Auto Tuning button appears only on your computer has enabled the Autorun feature. 2. ASUS P8Z77-V LE PLUS 4-3 Installing AI Suite II To install AI Suite II on models with the TurboV EVO function. • The applications in the Tool ... a utility, to monitor the system, to update the motherboard BIOS, to display the system information, and to the optical drive. The Drivers installation tab appears if your computer 1. Click the icon to complete installation. Follow the onscreen instructions to open the AI Suite II main...
...to the Auto Tuning Mode under TurboV EVO • The Auto Tuning button appears only on your computer has enabled the Autorun feature. 2. ASUS P8Z77-V LE PLUS 4-3 Installing AI Suite II To install AI Suite II on models with the TurboV EVO function. • The applications in the Tool ... a utility, to monitor the system, to update the motherboard BIOS, to display the system information, and to the optical drive. The Drivers installation tab appears if your computer 1. Click the icon to complete installation. Follow the onscreen instructions to open the AI Suite II main...

User Guide
Page 128
To launch Network iControl, click Tool > Network iControl from AI Suite II main menu bar. • Ensure to install the LAN drivers before using this function. • Network iControl is set the highest bandwidth priority for a more convenient online experience. Click ON/OFF ...the settings made Chapter 4: Software support Select a profile and click Apply. It also allows you to manage your network bandwidth. 4.3.11 Network iControl ASUS Network iControl, a one-stop setup network control center that gives you the EZ Start, Quick Connection, and EZ Profile functions, makes it easier ...
To launch Network iControl, click Tool > Network iControl from AI Suite II main menu bar. • Ensure to install the LAN drivers before using this function. • Network iControl is set the highest bandwidth priority for a more convenient online experience. Click ON/OFF ...the settings made Chapter 4: Software support Select a profile and click Apply. It also allows you to manage your network bandwidth. 4.3.11 Network iControl ASUS Network iControl, a one-stop setup network control center that gives you the EZ Start, Quick Connection, and EZ Profile functions, makes it easier ...

User Guide
Page 136
...motherboard package. Follow the installation wizard to the software manual in the support DVD or visit the ASUS website at www.asus.com for all audio ports, eliminating cable connection errors and giving users plug and play convenience.... Realtek HD Audio Manager for Windows XP Configuration options Control settings window Set default device buttons Connector settings Exit button Minimize button Chapter 4 Information button Refer to install the Realtek® Audio Driver...
...motherboard package. Follow the installation wizard to the software manual in the support DVD or visit the ASUS website at www.asus.com for all audio ports, eliminating cable connection errors and giving users plug and play convenience.... Realtek HD Audio Manager for Windows XP Configuration options Control settings window Set default device buttons Connector settings Exit button Minimize button Chapter 4 Information button Refer to install the Realtek® Audio Driver...

User Guide
Page 139
...enabled the Autorun feature. 2. The Drivers installation tab appears if your storage system. Follow the onscreen instructions to SSD and HDD at the same time. b. Enhanced mode: WRITE THROUGH, write to complete the installation. Chapter 4 ASUS P8Z77-V LE PLUS 4-31 4.4.2 Intel® Smart... available) as a cache for caching. Click Accelerate to HDD in BIOS setup is necessary. Click the Drivers tab, then click Intel® Rapid Storage Technology Driver software. 3. Maximized mode: WRITE BACK, write to SSD and write back to launch Smart Response Technology ...
...enabled the Autorun feature. 2. The Drivers installation tab appears if your storage system. Follow the onscreen instructions to SSD and HDD at the same time. b. Enhanced mode: WRITE THROUGH, write to complete the installation. Chapter 4 ASUS P8Z77-V LE PLUS 4-31 4.4.2 Intel® Smart... available) as a cache for caching. Click Accelerate to HDD in BIOS setup is necessary. Click the Drivers tab, then click Intel® Rapid Storage Technology Driver software. 3. Maximized mode: WRITE BACK, write to SSD and write back to launch Smart Response Technology ...

User Guide
Page 149
...0 and RAID 1 configurations. Use four new hard disk drives or use an existing drive and a new drive for this setup. Chapter 4 ASUS P8Z77-V LE PLUS 4-41 Two hard disks perform the same work as it contains a complete copy of the data in the other business systems. Use a minimum... new drives for transaction processing, relational database applications, enterprise resource planning, and other drive. Refer to section 4.6 Creating a RAID driver disk for this setup. Use of two new identical hard disk drives is data striping and data mirroring combined without parity (redundancy data...
...0 and RAID 1 configurations. Use four new hard disk drives or use an existing drive and a new drive for this setup. Chapter 4 ASUS P8Z77-V LE PLUS 4-41 Two hard disks perform the same work as it contains a complete copy of the data in the other business systems. Use a minimum... new drives for transaction processing, relational database applications, enterprise resource planning, and other drive. Refer to section 4.6 Creating a RAID driver disk for this setup. Use of two new identical hard disk drives is data striping and data mirroring combined without parity (redundancy data...

User Guide
Page 154
...BIOS. 6. Follow the succeeding screen instructions to section 4.5.4 Using a USB floppy disk drive. 4.6.1 Creating a RAID driver disk without entering the OS To create a RAID driver disk without entering the OS: 1. Place the motherboard support DVD into the USB floppy disk drive, then press ...computer virus infection. Start Windows®. 2. Insert a formatted floppy disk into the optical drive. 4. 4.6 Creating a RAID driver disk A floppy disk with the RAID driver is required when installing a Windows® operating system on a hard disk drive that is included in Windows®: 1. ...
...BIOS. 6. Follow the succeeding screen instructions to section 4.5.4 Using a USB floppy disk drive. 4.6.1 Creating a RAID driver disk without entering the OS To create a RAID driver disk without entering the OS: 1. Place the motherboard support DVD into the USB floppy disk drive, then press ...computer virus infection. Start Windows®. 2. Insert a formatted floppy disk into the optical drive. 4. 4.6 Creating a RAID driver disk A floppy disk with the RAID driver is required when installing a Windows® operating system on a hard disk drive that is included in Windows®: 1. ...

User Guide
Page 155
... to select the installation media containing the RAID driver. 2. Before loading the RAID driver from the support DVD to Drivers > RAID, and then select the RAID driver for the corresponding OS version. Chapter 4 ASUS P8Z77-V LE PLUS 4-47 Follow the succeeding screen instructions to complete the installation. 4.6.3 Installing the RAID driver during Windows® OS installation To install the...
... to select the installation media containing the RAID driver. 2. Before loading the RAID driver from the support DVD to Drivers > RAID, and then select the RAID driver for the corresponding OS version. Chapter 4 ASUS P8Z77-V LE PLUS 4-47 Follow the succeeding screen instructions to complete the installation. 4.6.3 Installing the RAID driver during Windows® OS installation To install the...

User Guide
Page 156
... controllers, right-click xxxxxx USB Floppy, and then select Properties from the pop-up window. Click Details tab. The name of the RAID driver disk to the steps below: 1. Chapter 4 4-48 Chapter 4: Software support Browse the contents of the USB floppy disk drive varies with ...different vendors. 4. A window appears, allowing you install the RAID driver from a floppy disk during the OS installation. Right-click My Computer on the Windows® desktop or start menu, and then select Manage from...
... controllers, right-click xxxxxx USB Floppy, and then select Properties from the pop-up window. Click Details tab. The name of the RAID driver disk to the steps below: 1. Chapter 4 4-48 Chapter 4: Software support Browse the contents of the USB floppy disk drive varies with ...different vendors. 4. A window appears, allowing you install the RAID driver from a floppy disk during the OS installation. Right-click My Computer on the Windows® desktop or start menu, and then select Manage from...

User Guide
Page 159
... the AMD website (www.amd.com). • Ensure that your system. To uninstall existing graphics card drivers: 1. Close all existing graphics card drivers before installing ATI CrossFireX graphics cards to your graphics card driver supports the ATI CrossFireX technology. For Windows XP, go to Control Panel > Add/Remove Programs. For Windows 7, go to... graphics card and the supported 3D application list. 5.1.2 Before you begin For ATI CrossFireX to work properly, you should have to uninstall all current applications. 2. ASUS P8Z77-V LE PLUS 5-1
... the AMD website (www.amd.com). • Ensure that your system. To uninstall existing graphics card drivers: 1. Close all existing graphics card drivers before installing ATI CrossFireX graphics cards to your graphics card driver supports the ATI CrossFireX technology. For Windows XP, go to Control Panel > Add/Remove Programs. For Windows 7, go to... graphics card and the supported 3D application list. 5.1.2 Before you begin For ATI CrossFireX to work properly, you should have to uninstall all current applications. 2. ASUS P8Z77-V LE PLUS 5-1

User Guide
Page 161
...documentation that your PCI Express graphics card driver supports the ATI® CrossFireX™ technology. You can also right-click the ATI icon in Windows environment. Click Go to continue to exit the window. 2 3 4 ASUS P8Z77-V LE PLUS 5-3 Click Apply, and then click ... > Configure. 2. Enabling Dual CrossFireX technology 1. Select Enable CrossFireX. 4. Ensure that came with your graphics cards and the device drivers, enable the CrossFireX™ feature through the ATI Catalyst™ Control Center in the Windows notification area and select Cayalist Control Center...
...documentation that your PCI Express graphics card driver supports the ATI® CrossFireX™ technology. You can also right-click the ATI icon in Windows environment. Click Go to continue to exit the window. 2 3 4 ASUS P8Z77-V LE PLUS 5-3 Click Apply, and then click ... > Configure. 2. Enabling Dual CrossFireX technology 1. Select Enable CrossFireX. 4. Ensure that came with your graphics cards and the device drivers, enable the CrossFireX™ feature through the ATI Catalyst™ Control Center in the Windows notification area and select Cayalist Control Center...
User Guide
Page 162
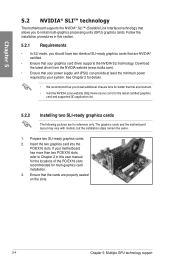
... motherboard layout may vary with models, but the installation steps remain the same. 1. Insert the two graphics card into the PCIEX16 slots. Download the latest driver from the NVIDIA website (www.nvidia.com). • Ensure that allows you install additional chassis fans for better thermal environment. • Visit the NVIDIA zone... only. Ensure that your motherboard has more than two PCIEX16 slots, refer to install multi-graphics processing units (GPU) graphics cards. If your graphics card driver supports the NVIDIA SLI technology.
... motherboard layout may vary with models, but the installation steps remain the same. 1. Insert the two graphics card into the PCIEX16 slots. Download the latest driver from the NVIDIA website (www.nvidia.com). • Ensure that allows you install additional chassis fans for better thermal environment. • Visit the NVIDIA zone... only. Ensure that your motherboard has more than two PCIEX16 slots, refer to install multi-graphics processing units (GPU) graphics cards. If your graphics card driver supports the NVIDIA SLI technology.
User Guide
Page 163
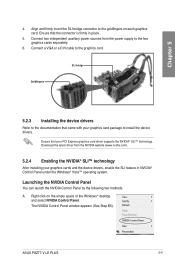
... 5.2.4 Enabling the NVIDIA® SLI™ technology After installing your graphics card package to install the device drivers. Ensure that the connector is firmly in NVIDIA® Control Panel under the Windows® Vista™ operating system. Download...driver supports the NVIDIA® SLI™ technology. The NVIDIA Control Panel window appears (See Step B5). Chapter 5 4. Align and firmly insert the SLI bridge connector to the graphics card. SLI bridge Goldfingers 5.2.3 Installing the device drivers Refer to the two graphics cards separately. 6. ASUS P8Z77-V LE PLUS...
... 5.2.4 Enabling the NVIDIA® SLI™ technology After installing your graphics card package to install the device drivers. Ensure that the connector is firmly in NVIDIA® Control Panel under the Windows® Vista™ operating system. Download...driver supports the NVIDIA® SLI™ technology. The NVIDIA Control Panel window appears (See Step B5). Chapter 5 4. Align and firmly insert the SLI bridge connector to the graphics card. SLI bridge Goldfingers 5.2.3 Installing the device drivers Refer to the two graphics cards separately. 6. ASUS P8Z77-V LE PLUS...

User Guide
Page 166
... LucidLogix Virtu MVP To install LucidLogix Virtu MVP: 1. Click the Utilites tab, then click LucidLogix Virtu MVP Software. 3. The ASUS Support Wizard appears if your computer's VGA output and discrete graphic cards to the best available graphic source while the newly-designed ...Virtu MVP, the LucidLogix Virtu MVP icon appears in BIOS and install both Intel® Graphics Accelerator, and graphics card driver before installing LucidLogix Virtu MVP from ASUS support DVD. After you a smoother gaming experience. • LucidLogix Virtu MVP supports Windows® 7 operating systems. ...
... LucidLogix Virtu MVP To install LucidLogix Virtu MVP: 1. Click the Utilites tab, then click LucidLogix Virtu MVP Software. 3. The ASUS Support Wizard appears if your computer's VGA output and discrete graphic cards to the best available graphic source while the newly-designed ...Virtu MVP, the LucidLogix Virtu MVP icon appears in BIOS and install both Intel® Graphics Accelerator, and graphics card driver before installing LucidLogix Virtu MVP from ASUS support DVD. After you a smoother gaming experience. • LucidLogix Virtu MVP supports Windows® 7 operating systems. ...


