
User Manual
Page 4
... 3.9 Exit menu 3-31 3.10 Updating BIOS 3-32 3.10.1 ASUS Update utility 3-32 3.10.2 ASUS EZ Flash 2 utility 3-35 3.10.3 ASUS CrashFree BIOS 3 utility 3-36 3.10.4 ASUS BIOS Updater 3-37 Chapter 4: Software support 4.1 Installing an operating system 4-1 4.2 Support DVD information 4-1 4.2.1 Running the support DVD 4-1 4.2.2 ... Configuration 3-17 3.5.4 SATA Configuration 3-18 3.5.5 USB Configuration 3-20 3.5.6 Onboard Devices Configuration 3-21 3.5.7 APM 3-24 3.6 Monitor menu 3-25 3.7 Boot menu 3-28 3.8 Tools menu 3-29 3.8.1 ASUS EZ Flash 2 Utility 3-29 3.8.2.
... 3.9 Exit menu 3-31 3.10 Updating BIOS 3-32 3.10.1 ASUS Update utility 3-32 3.10.2 ASUS EZ Flash 2 utility 3-35 3.10.3 ASUS CrashFree BIOS 3 utility 3-36 3.10.4 ASUS BIOS Updater 3-37 Chapter 4: Software support 4.1 Installing an operating system 4-1 4.2 Support DVD information 4-1 4.2.1 Running the support DVD 4-1 4.2.2 ... Configuration 3-17 3.5.4 SATA Configuration 3-18 3.5.5 USB Configuration 3-20 3.5.6 Onboard Devices Configuration 3-21 3.5.7 APM 3-24 3.6 Monitor menu 3-25 3.7 Boot menu 3-28 3.8 Tools menu 3-29 3.8.1 ASUS EZ Flash 2 Utility 3-29 3.8.2.
User Manual
Page 11
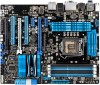
... 16-phase* Power Design - Disk Unlocker ASUS Quiet Thermal Solutions - ASUS EZ Flash 2 ASUS Q-LED (CPU, DRAM, VGA, Boot Device LED) ASUS Q-Slot ASUS Q-DIMM (continued on the next page) xi BD Audio Layer Content Protection - Tuner - Absolute Pitch 192khz/24bit True BD Lossless Sound - AI Charger+ - AI Suite II - P8Z68-V PRO specifications summary Bluetooth Audio IEEE 1394...
... 16-phase* Power Design - Disk Unlocker ASUS Quiet Thermal Solutions - ASUS EZ Flash 2 ASUS Q-LED (CPU, DRAM, VGA, Boot Device LED) ASUS Q-Slot ASUS Q-DIMM (continued on the next page) xi BD Audio Layer Content Protection - Tuner - Absolute Pitch 192khz/24bit True BD Lossless Sound - AI Charger+ - AI Suite II - P8Z68-V PRO specifications summary Bluetooth Audio IEEE 1394...

User Manual
Page 16
.... determines failsafe settings and dramatically improves your PC's loading. AI Suite II With its user-friendly interface, ASUS AI Suite II consolidates all -in different geographic regions and your system boot success. quickly ensures memory boot compatibility. This remarkable memory rescue tool requires a mere push of the chipset and power phase area through...
.... determines failsafe settings and dramatically improves your PC's loading. AI Suite II With its user-friendly interface, ASUS AI Suite II consolidates all -in different geographic regions and your system boot success. quickly ensures memory boot compatibility. This remarkable memory rescue tool requires a mere push of the chipset and power phase area through...
User Manual
Page 33
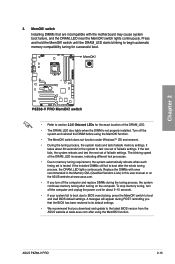
...when each timing set of failsafe settings. It takes about 5-10 seconds. • If your system fail to boot due to the latest BIOS version from the ASUS website at www.asus.com. • If you download and update to BIOS overclocking, press the MemOK! To stop memory tuning, ... of the DRAM_LED. • The DRAM_LED also lights when the DIMM is tested. switch until the DRAM_LED starts blinking to boot and load BIOS default settings. ASUS P8Z68-V PRO 2-15 switch Installing DIMMs that you turn off the system and reinstall the DIMM before using the MemOK! Replace the DIMMs...
...when each timing set of failsafe settings. It takes about 5-10 seconds. • If your system fail to boot due to the latest BIOS version from the ASUS website at www.asus.com. • If you download and update to BIOS overclocking, press the MemOK! To stop memory tuning, ... of the DRAM_LED. • The DRAM_LED also lights when the DIMM is tested. switch until the DRAM_LED starts blinking to boot and load BIOS default settings. ASUS P8Z68-V PRO 2-15 switch Installing DIMMs that you turn off the system and reinstall the DIMM before using the MemOK! Replace the DIMMs...
User Manual
Page 38
... and unplug the power cord. 2. For system failure due to pins 2-3. Shut down the key during the boot process and enter BIOS setup to re-enter data. function. Removing the cap will cause system boot failure! • If the steps above do not need to clear the RTC when the system hangs...
... and unplug the power cord. 2. For system failure due to pins 2-3. Shut down the key during the boot process and enter BIOS setup to re-enter data. function. Removing the cap will cause system boot failure! • If the steps above do not need to clear the RTC when the system hangs...

User Manual
Page 46
... your system, refer to connect the 4-pin/8-pin EATX12 V power plug; otherwise, the system will not boot. • Use of 350 W. • Do not forget to the Recommended Power Supply Wattage Calculator at http://support.asus. com/PowerSupplyCalculator/PSCalculator.aspx?SLanguage=en-us for details. • If you want to ensure the...
... your system, refer to connect the 4-pin/8-pin EATX12 V power plug; otherwise, the system will not boot. • Use of 350 W. • Do not forget to the Recommended Power Supply Wattage Calculator at http://support.asus. com/PowerSupplyCalculator/PSCalculator.aspx?SLanguage=en-us for details. • If you want to ensure the...
User Manual
Page 66
... short beeps then a pause (repeated) One continuous beep followed by three short beeps One continuous beep followed by four short beeps Description VGA detected Quick boot set to enter the BIOS Setup. After applying power, the system power LED on the screen. Check the jumper settings and connections or call your...
... short beeps then a pause (repeated) One continuous beep followed by three short beeps One continuous beep followed by four short beeps Description VGA detected Quick boot set to enter the BIOS Setup. After applying power, the system power LED on the screen. Check the jumper settings and connections or call your...
User Manual
Page 67
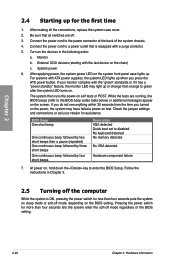
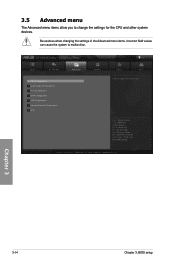
...for BIOS item modification. Otherwise, POST continues with the same smoothness as storage device configuration, overclocking settings, advanced power management, and boot device configuration that a USB mouse is provided for information on to ensure system compatibility and stability. Do this section are needed for ...enable more flexible and convenient mouse input. You can also turn the system off and then turn it back on how to boot. Chapter 3 ASUS P8Z68-V PRO 3-1 The term "BIOS" in the EZ Mode/Advanced Mode screen. We strongly recommend that you scroll through the various ...
...for BIOS item modification. Otherwise, POST continues with the same smoothness as storage device configuration, overclocking settings, advanced power management, and boot device configuration that a USB mouse is provided for information on to ensure system compatibility and stability. Do this section are needed for ...enable more flexible and convenient mouse input. You can also turn the system off and then turn it back on how to boot. Chapter 3 ASUS P8Z68-V PRO 3-1 The term "BIOS" in the EZ Mode/Advanced Mode screen. We strongly recommend that you scroll through the various ...

User Manual
Page 68
EZ Mode Monday [9/13/2010] P8Z68-V PRO BIOS Version : 0209 CPU Type : Genuine Intel(R) CPU 0 @ 3.10GHz Total Memory :...MB +75.2ºF/+40.0ºC 3.3V 3.344V 12V 12.248V CHA_FAN1 N/A CHA_FAN2 N/A System Performance Quiet Performance Boot Priority Energy Saving Normal Chapter 3 Use the mouse to drag or keyboard to navigate to display all fan speeds ... mode ASUS Optimal mode Selects the boot device priority • The boot device options vary depending on the devices you installed to the system. • The Boot Menu(F8) button is available only when the boot device is...
EZ Mode Monday [9/13/2010] P8Z68-V PRO BIOS Version : 0209 CPU Type : Genuine Intel(R) CPU 0 @ 3.10GHz Total Memory :...MB +75.2ºF/+40.0ºC 3.3V 3.344V 12V 12.248V CHA_FAN1 N/A CHA_FAN2 N/A System Performance Quiet Performance Boot Priority Energy Saving Normal Chapter 3 Use the mouse to drag or keyboard to navigate to display all fan speeds ... mode ASUS Optimal mode Selects the boot device priority • The boot device options vary depending on the devices you installed to the system. • The Boot Menu(F8) button is available only when the boot device is...

User Manual
Page 69
... the exit options and loading default settings Chapter 3 ASUS P8Z68-V PRO 3-3 Back button Menu items Menu bar Configuration fields EFI BIOS Utility - 3.2.2 Advanced Mode The Advanced Mode provides advanced options for experienced end-users to the following main items: Main Ai Tweaker Advanced Monitor Boot Tool Exit For changing the basic system configuration For...
... the exit options and loading default settings Chapter 3 ASUS P8Z68-V PRO 3-3 Back button Menu items Menu bar Configuration fields EFI BIOS Utility - 3.2.2 Advanced Mode The Advanced Mode provides advanced options for experienced end-users to the following main items: Main Ai Tweaker Advanced Monitor Boot Tool Exit For changing the basic system configuration For...

User Manual
Page 70
... menu. U��s�e� key to capture the BIOS screen and save it and press to display the other items (Ai Tweaker, Advanced, Monitor, Boot, Tool, and Exit) on the screen. Chapter 3 3-4 Chapter 3: BIOS setup Press the Up/Down arrow keys or / keys to display a list of the menu screen...
... menu. U��s�e� key to capture the BIOS screen and save it and press to display the other items (Ai Tweaker, Advanced, Monitor, Boot, Tool, and Exit) on the screen. Chapter 3 3-4 Chapter 3: BIOS setup Press the Up/Down arrow keys or / keys to display a list of the menu screen...
User Manual
Page 71
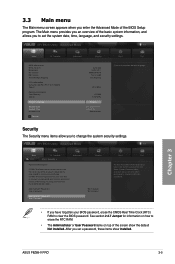
...MHz System Language English System Date System Time Access Level [Fri 03/25/2011] [16:46:15] Administrator > Security Boot Tool Choose the system default language Security The Security menu items allow you have Administrator rights Administrator Password User Password Administrator Password... to boot or enter Setup. See section 2.3.7 Jumper for when entering Setup If ONLY the User's password is set, then this is a power on top of the BIOS Setup program. After you set a password, these items show the default Not Installed. Chapter 3 ASUS P8Z68-V PRO 3-5 ...
...MHz System Language English System Date System Time Access Level [Fri 03/25/2011] [16:46:15] Administrator > Security Boot Tool Choose the system default language Security The Security menu items allow you have Administrator rights Administrator Password User Password Administrator Password... to boot or enter Setup. See section 2.3.7 Jumper for when entering Setup If ONLY the User's password is set, then this is a power on top of the BIOS Setup program. After you set a password, these items show the default Not Installed. Chapter 3 ASUS P8Z68-V PRO 3-5 ...
User Manual
Page 73
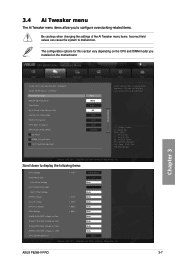
....1201. Copyright (C) 2010 American Megatrends, Inc. Scroll down to malfunction. Frequency Auto EPU Power Saving Mode Disabled > OC Tuner > DRAM Timing Control > CPU Power Management Boot Tool [X.M.P.] When XMP is enabled BLCK frequency, CPU ratio and memory parameters will be auto optimized. →←: Select Screen ↑↓: Select Item Enter... REF Voltage on the motherboard. F1: General Help F2: Previous Values F5: Optimized Defaults F10: Save ESC: Exit F12: Print Screen Chapter 3 Version 2.00.1201. ASUS P8Z68-V PRO 3-7
....1201. Copyright (C) 2010 American Megatrends, Inc. Scroll down to malfunction. Frequency Auto EPU Power Saving Mode Disabled > OC Tuner > DRAM Timing Control > CPU Power Management Boot Tool [X.M.P.] When XMP is enabled BLCK frequency, CPU ratio and memory parameters will be auto optimized. →←: Select Screen ↑↓: Select Item Enter... REF Voltage on the motherboard. F1: General Help F2: Previous Values F5: Optimized Defaults F10: Save ESC: Exit F12: Print Screen Chapter 3 Version 2.00.1201. ASUS P8Z68-V PRO 3-7
User Manual
Page 80
... system devices. Advanced Mode Main Ai Tweaker Advanced > CPU Configuration > System Agent Configuration > PCH Configuration > SATA Configuration > USB Configuration > Onboard Devices Configuration > APM Monitor Exit Boot Tool CPU Configuration Parameters →←: Select Screen ↑↓: Select Item Enter: Select +/-: Change Opt. F1: General Help F2: Previous Values F5: Optimized Defaults...
... system devices. Advanced Mode Main Ai Tweaker Advanced > CPU Configuration > System Agent Configuration > PCH Configuration > SATA Configuration > USB Configuration > Onboard Devices Configuration > APM Monitor Exit Boot Tool CPU Configuration Parameters →←: Select Screen ↑↓: Select Item Enter: Select +/-: Change Opt. F1: General Help F2: Previous Values F5: Optimized Defaults...

User Manual
Page 81
...-34 34 CPU Ratio Auto Intel Adaptive Thermal Monitor Enabled Hyper-threading Enabled Active Processor Cores All Limit CPUID Maximum Disabled Execute Disable Bit Enabled Boot Tool Adjust Non-Turbo Ratio →←: Select Screen ↑↓: Select Item Enter: Select +/-: Change Opt. Intel Adaptive Thermal Monitor [Enabled] [Enabled] Enables the... Turbo Mode Enabled CPU C1E Auto CPU C3 Report Auto CPU C6 Report Auto Version 2.00.1201. Use and keys to your CPU model. Chapter 3 ASUS P8Z68-V PRO 3-15
...-34 34 CPU Ratio Auto Intel Adaptive Thermal Monitor Enabled Hyper-threading Enabled Active Processor Cores All Limit CPUID Maximum Disabled Execute Disable Bit Enabled Boot Tool Adjust Non-Turbo Ratio →←: Select Screen ↑↓: Select Item Enter: Select +/-: Change Opt. Intel Adaptive Thermal Monitor [Enabled] [Enabled] Enables the... Turbo Mode Enabled CPU C1E Auto CPU C3 Report Auto CPU C6 Report Auto Version 2.00.1201. Use and keys to your CPU model. Chapter 3 ASUS P8Z68-V PRO 3-15

User Manual
Page 82
Configuration options: [All] [1] [2] [3] Limit CPUID Maximum [Disabled] [Enabled] Allows legacy operating systems to boot even without support for CPUs with extended CPUID functions. [Disabled] Disables this function. Intel(R) Virtualization Tech [Disabled] [Enabled] Allows a hardware platform to run faster than ...
Configuration options: [All] [1] [2] [3] Limit CPUID Maximum [Disabled] [Enabled] Allows legacy operating systems to boot even without support for CPUs with extended CPUID functions. [Disabled] Disables this function. Intel(R) Virtualization Tech [Disabled] [Enabled] Allows a hardware platform to run faster than ...

User Manual
Page 83
...] [Enabled] iGPU Multi-Monitor [Disabled] Allows you to decide which graphics controller to use as the primary boot device. Configuration options: [Disabled] [Enabled] 3.5.3 PCH Configuration EFI BIOS Utility - Configuration options: [Enabled] [Disabled] Chapter 3 ASUS P8Z68-V PRO 3-17 Initiate Graphic Adapter [PCIE/PCI] Allows you to enable or disable the High Precision Event Timer. 3.5.2 System...
...] [Enabled] iGPU Multi-Monitor [Disabled] Allows you to decide which graphics controller to use as the primary boot device. Configuration options: [Disabled] [Enabled] 3.5.3 PCH Configuration EFI BIOS Utility - Configuration options: [Enabled] [Disabled] Chapter 3 ASUS P8Z68-V PRO 3-17 Initiate Graphic Adapter [PCIE/PCI] Allows you to enable or disable the High Precision Event Timer. 3.5.2 System...

User Manual
Page 84
...Check Enabled SATA 6G_1 (Gray) Not Present Hot Plug Disabled SATA 6G_2 (Gray) Not Present Hot Plug Disabled SATA 3G_3 (Blue) ASUS CB-521 ATAPI Hot Plug Disabled SATA 3G_4 (Blue) Not Present Hot Plug Disabled SATA 3G_5 (Blue) Not Present Hot Plug ...Disabled SATA 3G_6 (Blue) Not Present Boot Tool (1) IDE Mode. (2) AHCI Mode. (3) RAID Mode. →←: Select Screen ↑↓: Select Item Enter: Select +/-: Change Opt....
...Check Enabled SATA 6G_1 (Gray) Not Present Hot Plug Disabled SATA 6G_2 (Gray) Not Present Hot Plug Disabled SATA 3G_3 (Blue) ASUS CB-521 ATAPI Hot Plug Disabled SATA 3G_4 (Blue) Not Present Hot Plug Disabled SATA 3G_5 (Blue) Not Present Hot Plug ...Disabled SATA 3G_6 (Blue) Not Present Boot Tool (1) IDE Mode. (2) AHCI Mode. (3) RAID Mode. →←: Select Screen ↑↓: Select Item Enter: Select +/-: Change Opt....

User Manual
Page 86
... device is detected, the item shows None. DISABLE option will keep USB devices available only for operating systems without an EHCI hand‑off Disabled Boot Tool Enables Legacy USB support. The USB Devices item shows the auto-detected values. If no USB device is detected, the legacy USB support is...
... device is detected, the item shows None. DISABLE option will keep USB devices available only for operating systems without an EHCI hand‑off Disabled Boot Tool Enables Legacy USB support. The USB Devices item shows the auto-detected values. If no USB device is detected, the legacy USB support is...
User Manual
Page 87
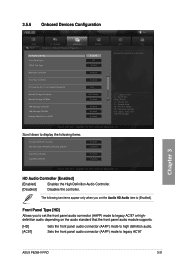
... (black) bandwidth Auto Marvell Storage Controller AHCI Mode Marvell Storage OPROM Enabled JMB Storage Controller Enabled JMB Storage OPROM Enabled Display OptionRom in POST Enabled Boot Tool Enabled/Disabled Azalia HD Audio →←: Select Screen ↑↓: Select Item Enter: Select +/-: Change Opt. The following items: Asmedia USB 3.0 .... Scroll down to display the following two items appear only when you to set the Azalia HD Audio item to legacy AC'97 Chapter 3 ASUS P8Z68-V PRO 3-21 3.5.6 Onboard Devices Configuration EFI BIOS Utility -
... (black) bandwidth Auto Marvell Storage Controller AHCI Mode Marvell Storage OPROM Enabled JMB Storage Controller Enabled JMB Storage OPROM Enabled Display OptionRom in POST Enabled Boot Tool Enabled/Disabled Azalia HD Audio →←: Select Screen ↑↓: Select Item Enter: Select +/-: Change Opt. The following items: Asmedia USB 3.0 .... Scroll down to display the following two items appear only when you to set the Azalia HD Audio item to legacy AC'97 Chapter 3 ASUS P8Z68-V PRO 3-21 3.5.6 Onboard Devices Configuration EFI BIOS Utility -


