User Manual
Page 5
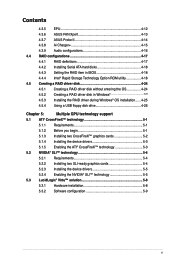
Contents 4.3.5 EPU 4-12 4.3.6 ASUS FAN Xpert 4-13 4.3.7 ASUS Probe II 4-14 4.3.8 Ai Charger 4-15 4.3.9 Audio configurations 4-16 4.4 RAID ...5.1.4 Installing the device drivers 5-3 5.1.5 Enabling the ATI® CrossFireX™ technology 5-3 5.2 NVIDIA® SLI™ technology 5-4 5.2.1 Requirements 5-4 5.2.2 Installing two SLI-ready graphics cards 5-4 5.2.3 Installing the device drivers 5-5 5.2.4 Enabling the NVIDIA® SLI™ technology 5-5 5.3 LucidLogix® Virtu™ solution 5-8 5.3.1 Hardware installation 5-8 5.3.2 Software configuration 5-9...
Contents 4.3.5 EPU 4-12 4.3.6 ASUS FAN Xpert 4-13 4.3.7 ASUS Probe II 4-14 4.3.8 Ai Charger 4-15 4.3.9 Audio configurations 4-16 4.4 RAID ...5.1.4 Installing the device drivers 5-3 5.1.5 Enabling the ATI® CrossFireX™ technology 5-3 5.2 NVIDIA® SLI™ technology 5-4 5.2.1 Requirements 5-4 5.2.2 Installing two SLI-ready graphics cards 5-4 5.2.3 Installing the device drivers 5-5 5.2.4 Enabling the NVIDIA® SLI™ technology 5-5 5.3 LucidLogix® Virtu™ solution 5-8 5.3.1 Hardware installation 5-8 5.3.2 Software configuration 5-9...
User Manual
Page 8
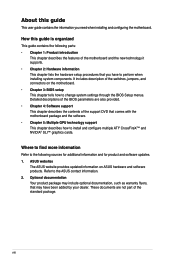
... includes description of the switches, jumpers, and connectors on ASUS hardware and software products. Where to find more information Refer to install and configure multiple ATI® CrossFireX™ and NVIDIA® SLI™ graphics cards. Optional documentation Your product package may ... sources for additional information and for product and software updates. 1. ASUS websites The ASUS website provides updated information on the motherboard. • Chapter 3: BIOS setup This chapter tells how to the ASUS contact information. 2. How this guide This user guide contains the ...
... includes description of the switches, jumpers, and connectors on ASUS hardware and software products. Where to find more information Refer to install and configure multiple ATI® CrossFireX™ and NVIDIA® SLI™ graphics cards. Optional documentation Your product package may ... sources for additional information and for product and software updates. 1. ASUS websites The ASUS website provides updated information on the motherboard. • Chapter 3: BIOS setup This chapter tells how to the ASUS contact information. 2. How this guide This user guide contains the ...
User Manual
Page 13
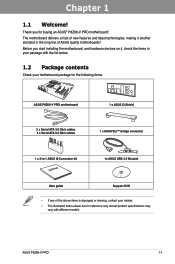
... for the following items. ASUS P8Z68-V PRO motherboard 1 x ASUS Q-Shield 2 x Serial ATA 3.0 Gb/s cables 2 x Serial ATA 6.0 Gb/s cables 1 x ASUS SLI™ bridge connector 1 x 2-in-1 ASUS Q-Connector kit User Manual 1x ASUS USB 3.0 Bracket User guide Support DVD • If any of ASUS quality motherboards! Chapter 1 ...damaged or missing, contact your retailer. • The illustrated items above are for buying an ASUS® P8Z68-V PRO motherboard! ASUS P8Z68-V PRO 1-1 Before you for reference only. Thank you start installing the motherboard, and hardware devices on...
... for the following items. ASUS P8Z68-V PRO motherboard 1 x ASUS Q-Shield 2 x Serial ATA 3.0 Gb/s cables 2 x Serial ATA 6.0 Gb/s cables 1 x ASUS SLI™ bridge connector 1 x 2-in-1 ASUS Q-Connector kit User Manual 1x ASUS USB 3.0 Bracket User guide Support DVD • If any of ASUS quality motherboards! Chapter 1 ...damaged or missing, contact your retailer. • The illustrated items above are for buying an ASUS® P8Z68-V PRO motherboard! ASUS P8Z68-V PRO 1-1 Before you for reference only. Thank you start installing the motherboard, and hardware devices on...
User Manual
Page 14
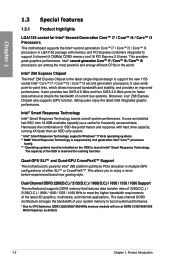
...(O.C.) / 2133(O.C.) / 1866 / 1600/ 1333 / 1066 MHz to enjoy a never before-experienced brand new gaming style. Harnesses the combination of either SLI™ or CrossFireX™. Intel® Z68 Express Chipset The Intel® Z68 Express Chipset is supported by 2nd generation Intel® Core™ ... integrated to support 2-channel (4 DIMMs) DDR3 memory and 16 PCI Express 2.0 lanes. This provides great graphics performance. Quad-GPU SLI™ and Quad-GPU CrossFireX™ Support The motherboard's powerful Intel® Z68 platform optimizes PCIe allocation in the world.
...(O.C.) / 2133(O.C.) / 1866 / 1600/ 1333 / 1066 MHz to enjoy a never before-experienced brand new gaming style. Harnesses the combination of either SLI™ or CrossFireX™. Intel® Z68 Express Chipset The Intel® Z68 Express Chipset is supported by 2nd generation Intel® Core™ ... integrated to support 2-channel (4 DIMMs) DDR3 memory and 16 PCI Express 2.0 lanes. This provides great graphics performance. Quad-GPU SLI™ and Quad-GPU CrossFireX™ Support The motherboard's powerful Intel® Z68 platform optimizes PCIe allocation in the world.
User Manual
Page 31
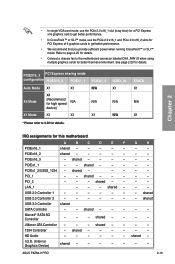
...to page 2-25 for details. • Connect a chassis fan to get better performance. • In CrossFireX™ or SLI™ mode, use the PCIe 2.0 x16_1 slot (navy blue) for a PCI Express x16 graphics card to get better performance... graphics cards for better thermal environment. shared - - - shared USB 3.0 Controller shared SATA Controller - - HD Audio - - - - - - JMicron ATA Controller - - - ASUS P8Z68-V PRO 2-13 PCIEx16_2 shared - - - - - - - See page 2-23 for this motherboard A B C D E F G H PCIEx16_1 shared - - - - - - -...
...to page 2-25 for details. • Connect a chassis fan to get better performance. • In CrossFireX™ or SLI™ mode, use the PCIe 2.0 x16_1 slot (navy blue) for a PCI Express x16 graphics card to get better performance... graphics cards for better thermal environment. shared - - - shared USB 3.0 Controller shared SATA Controller - - HD Audio - - - - - - JMicron ATA Controller - - - ASUS P8Z68-V PRO 2-13 PCIEx16_2 shared - - - - - - - See page 2-23 for this motherboard A B C D E F G H PCIEx16_1 shared - - - - - - -...

User Manual
Page 138
...manual for the locations of the PCIEX16 slots recommended for the latest certified graphics card and supported 3D application list. 5.2.2 Installing two SLI-ready graphics cards The following pictures are properly seated on the slots. 5-4 Chapter 5: Multiple GPU technology support The graphics cards ... layout may vary with models, but the installation steps remain the same. 1. Chapter 5 5.2 NVIDIA® SLI™ technology The motherboard supports the NVIDIA® SLI™ (Scalable Link Interface) technology that your power supply unit (PSU) can provide at least the minimum ...
...manual for the locations of the PCIEX16 slots recommended for the latest certified graphics card and supported 3D application list. 5.2.2 Installing two SLI-ready graphics cards The following pictures are properly seated on the slots. 5-4 Chapter 5: Multiple GPU technology support The graphics cards ... layout may vary with models, but the installation steps remain the same. 1. Chapter 5 5.2 NVIDIA® SLI™ technology The motherboard supports the NVIDIA® SLI™ (Scalable Link Interface) technology that your power supply unit (PSU) can provide at least the minimum ...
User Manual
Page 139
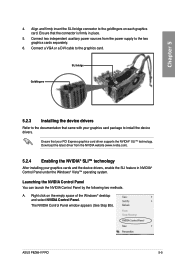
... You can launch the NVIDIA Control Panel by the following two methods. The NVIDIA Control Panel window appears (See Step B5). ASUS P8Z68-V PRO 5-5 Chapter 5 4. Right click on each graphics card. Ensure that came with your graphics card package to install the device drivers...sources from the NVIDIA website (www.nvidia.com). 5.2.4 Enabling the NVIDIA® SLI™ technology After installing your PCI Express graphics card driver supports the NVIDIA® SLI™ technology. SLI bridge Goldfingers 5.2.3 Installing the device drivers Refer to the goldfingers on the empty ...
... You can launch the NVIDIA Control Panel by the following two methods. The NVIDIA Control Panel window appears (See Step B5). ASUS P8Z68-V PRO 5-5 Chapter 5 4. Right click on each graphics card. Ensure that came with your graphics card package to install the device drivers...sources from the NVIDIA website (www.nvidia.com). 5.2.4 Enabling the NVIDIA® SLI™ technology After installing your PCI Express graphics card driver supports the NVIDIA® SLI™ technology. SLI bridge Goldfingers 5.2.3 Installing the device drivers Refer to the goldfingers on the empty ...

User Manual
Page 141
When done, click Apply. Select the NVIDIA GeForce tab, and then click Start the NVIDIA Control Panel. Enabling SLI settings From the NVIDIA Control Panel window, select Set SLI Configuration. The NVIDIA Control Panel window appears. Chapter 5 B5. Click Enable SLI and set the display for viewing SLI rendered content. ASUS P8Z68-V PRO 5-7 B4.
When done, click Apply. Select the NVIDIA GeForce tab, and then click Start the NVIDIA Control Panel. Enabling SLI settings From the NVIDIA Control Panel window, select Set SLI Configuration. The NVIDIA Control Panel window appears. Chapter 5 B5. Click Enable SLI and set the display for viewing SLI rendered content. ASUS P8Z68-V PRO 5-7 B4.


