User Guide
Page 6
... may cause undesired operation. Notices Federal Communications Commission Statement This device complies with Part 15 of electronic products. This equipment has been tested and found to comply with the limits for compliance could void the user's authority to which can radiate radio frequency energy and, if... not installed and used in our products at ASUS REACH website at http://csr.asus.com/english/REACH.htm. Operation is required to enable proper reuse of the FCC Rules. This product has been ...
... may cause undesired operation. Notices Federal Communications Commission Statement This device complies with Part 15 of electronic products. This equipment has been tested and found to comply with the limits for compliance could void the user's authority to which can radiate radio frequency energy and, if... not installed and used in our products at ASUS REACH website at http://csr.asus.com/english/REACH.htm. Operation is required to enable proper reuse of the FCC Rules. This product has been ...
User Guide
Page 34
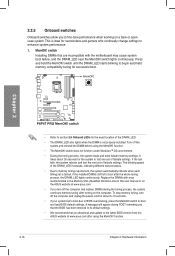
... the DRAM_LED lights continuously. switch does not function under Windows™ OS environment. • During the tuning process, the system loads and tests failsafe memory settings. It takes about 5-10 seconds. • If your system fail to boot due to memory tuning requirement, the system ... We recommend that are incompatible with ones recommended in the Memory QVL (Qualified Vendors Lists) in this user manual or on the ASUS website at www.asus.com after turning on a bare or opencase system. To stop memory tuning, turn off the computer and replace DIMMs during the...
... the DRAM_LED lights continuously. switch does not function under Windows™ OS environment. • During the tuning process, the system loads and tests failsafe memory settings. It takes about 5-10 seconds. • If your system fail to boot due to memory tuning requirement, the system ... We recommend that are incompatible with ones recommended in the Memory QVL (Qualified Vendors Lists) in this user manual or on the ASUS website at www.asus.com after turning on a bare or opencase system. To stop memory tuning, turn off the computer and replace DIMMs during the...
User Guide
Page 37
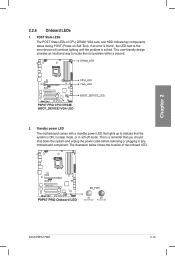
... in any motherboard component. Standby power LED The motherboard comes with a standby power LED that lights up to locate the root problem within a second. 2. Chapter 2 ASUS P8P67 PRO 2-19 This is a reminder that the system is solved. 2.2.6 Onboard LEDs 1. The illustration below shows the location of CPU, DRAM, VGA card, and HDD...
... in any motherboard component. Standby power LED The motherboard comes with a standby power LED that lights up to locate the root problem within a second. 2. Chapter 2 ASUS P8P67 PRO 2-19 This is a reminder that the system is solved. 2.2.6 Onboard LEDs 1. The illustration below shows the location of CPU, DRAM, VGA card, and HDD...
User Guide
Page 65
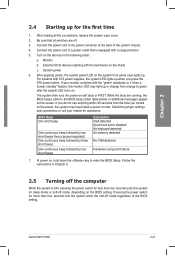
... lights up or change from the time you turned on the screen. System power 6. For systems with the last device on . While the tests are off. 3. If you press the ATX power button. Follow the instructions in the following order: a. Connect the power cord to the... on self tests or POST. Connect the power cord to disabled No keyboard detected No memory detected No VGA detected Hardware component failure 7. After making all switches are running, the BIOS beeps (refer to a power outlet that all the connections, replace the system case cover. 2. ASUS P8P67 PRO 2-47...
... lights up or change from the time you turned on the screen. System power 6. For systems with the last device on . While the tests are off. 3. If you press the ATX power button. Follow the instructions in the following order: a. Connect the power cord to the... on self tests or POST. Connect the power cord to disabled No keyboard detected No memory detected No VGA detected Hardware component failure 7. After making all switches are running, the BIOS beeps (refer to a power outlet that all the connections, replace the system case cover. 2. ASUS P8P67 PRO 2-47...
User Guide
Page 67
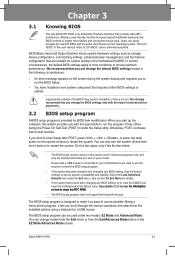
... value. �S�e�e��s�e��c�ti�o�n� 2.2.8 Jumper for BIOS item modification. Chapter 3 ASUS P8P67 PRO 3-1 When you start up the computer, the system provides you to run this program. The BIOS setup program is provided for ...two modes: EZ Mode and Advanced Mode. Otherwise, POST continues with uEFI architecture, offering a user-friendly interface that complies with its test routines. Do this last option only if the first two failed. • The BIOS setup screens shown in this section are needed...
... value. �S�e�e��s�e��c�ti�o�n� 2.2.8 Jumper for BIOS item modification. Chapter 3 ASUS P8P67 PRO 3-1 When you start up the computer, the system provides you to run this program. The BIOS setup program is provided for ...two modes: EZ Mode and Advanced Mode. Otherwise, POST continues with uEFI architecture, offering a user-friendly interface that complies with its test routines. Do this last option only if the first two failed. • The BIOS setup screens shown in this section are needed...
User Guide
Page 97
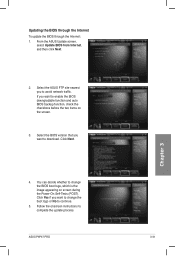
Click Next. If you to complete the update process. Chapter 3 4. Select the ASUS FTP site nearest you want to continue. 5. Select the BIOS version that you want to change the boot logo or No to enable the BIOS ...;On Self-Tests (POST). Follow the onscreen instructions to avoid network traffic. You can decide whether to download. From the ASUS Update screen, select Update BIOS from Internet, and then click Next. 2. Click Yes if you want to change the BIOS boot logo, which is the image appearing on the screen. 3. ASUS P8P67 PRO...
Click Next. If you to complete the update process. Chapter 3 4. Select the ASUS FTP site nearest you want to continue. 5. Select the BIOS version that you want to change the boot logo or No to enable the BIOS ...;On Self-Tests (POST). Follow the onscreen instructions to avoid network traffic. You can decide whether to download. From the ASUS Update screen, select Update BIOS from Internet, and then click Next. 2. Click Yes if you want to change the BIOS boot logo, which is the image appearing on the screen. 3. ASUS P8P67 PRO...
User Guide
Page 113
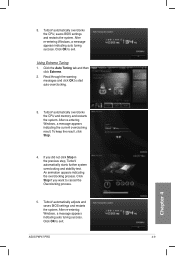
... memory and restarts the system. Click Stop if you did not click Stop in the previous step, TurboV automatically starts further system overclocking and stability test. ASUS P8P67 PRO 4-9 Chapter 4 After re-entering Windows, a message appears indicating the current overclocking result. Click OK to cancel the Overclocking process. 5. Using Extreme Tuning 1. 3. TurboV automatically...
... memory and restarts the system. Click Stop if you did not click Stop in the previous step, TurboV automatically starts further system overclocking and stability test. ASUS P8P67 PRO 4-9 Chapter 4 After re-entering Windows, a message appears indicating the current overclocking result. Click OK to cancel the Overclocking process. 5. Using Extreme Tuning 1. 3. TurboV automatically...

