User Guide
Page 3
Contents Notices ...vi Safety information...vii About this guide...viii P8P67 PRO specifications summary x Chapter 1: Product introduction 1.1 Welcome!...1-1 1.2 Package contents 1-1 1.3 Special features 1-2 1.3.1 Product highlights 1-2 1.3.2 Dual Intelligent Processors 2 with DIGI+ VRM 1-3 1.3.3 ASUS Exclusive Features 1-3 1.3.4 ASUS Quiet Thermal Solution 1-4 1.3.5 ASUS EZ DIY 1-4 1.3.6 Other special features 1-5 Chapter 2: Hardware information 2.1 Before you proceed 2-1 2.2 Motherboard overview 2-2 2.2.1 Motherboard layout 2-2 2.2.2 Central Processing...
Contents Notices ...vi Safety information...vii About this guide...viii P8P67 PRO specifications summary x Chapter 1: Product introduction 1.1 Welcome!...1-1 1.2 Package contents 1-1 1.3 Special features 1-2 1.3.1 Product highlights 1-2 1.3.2 Dual Intelligent Processors 2 with DIGI+ VRM 1-3 1.3.3 ASUS Exclusive Features 1-3 1.3.4 ASUS Quiet Thermal Solution 1-4 1.3.5 ASUS EZ DIY 1-4 1.3.6 Other special features 1-5 Chapter 2: Hardware information 2.1 Before you proceed 2-1 2.2 Motherboard overview 2-2 2.2.1 Motherboard layout 2-2 2.2.2 Central Processing...
User Guide
Page 4
... 3-3 3.3 Main menu 3-5 3.4 Ai Tweaker menu 3-7 3.5 Advanced menu 3-13 3.5.1 CPU Configuration 3-14 3.5.2 System Agent Configuration 3-16 3.5.3 PCH Configuration 3-16 3.5.4 SATA Configuration 3-17 3.5.5 USB Configuration 3-18 3.5.6 Onboard Devices Configuration 3-19 3.5.7 APM 3-22 3.6 Monitor menu 3-23 3.7 Boot menu 3-26 3.8 Tools menu 3-27 3.8.1 ASUS EZ Flash 2 3-27 3.8.2. Profile 3-28 3.9 Exit menu 3-29 3.10 Updating BIOS 3-30 3.10...
... 3-3 3.3 Main menu 3-5 3.4 Ai Tweaker menu 3-7 3.5 Advanced menu 3-13 3.5.1 CPU Configuration 3-14 3.5.2 System Agent Configuration 3-16 3.5.3 PCH Configuration 3-16 3.5.4 SATA Configuration 3-17 3.5.5 USB Configuration 3-18 3.5.6 Onboard Devices Configuration 3-19 3.5.7 APM 3-22 3.6 Monitor menu 3-23 3.7 Boot menu 3-26 3.8 Tools menu 3-27 3.8.1 ASUS EZ Flash 2 3-27 3.8.2. Profile 3-28 3.9 Exit menu 3-29 3.10 Updating BIOS 3-30 3.10...
User Guide
Page 14
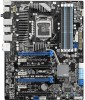
...at speeds up to support 2-channel (4 DIMMs) DDR3 memory and 16 PCI Express 2.0 lanes. Complete USB 3.0 Integration ASUS facilitates strategic USB 3.0 accessibility for both the front and rear panel - 4 USB 3.0 ports in the world. ASUS provides extra SATA 6.0 Gb/s ports with memory and PCI Express ...controllers integrated to 6.0 Gb/s data transfer. The P8P67 PRO affords greater convenience to CPU behavior, DDR3 2200/2000/1800 MHz memory module ...
...at speeds up to support 2-channel (4 DIMMs) DDR3 memory and 16 PCI Express 2.0 lanes. Complete USB 3.0 Integration ASUS facilitates strategic USB 3.0 accessibility for both the front and rear panel - 4 USB 3.0 ports in the world. ASUS provides extra SATA 6.0 Gb/s ports with memory and PCI Express ...controllers integrated to 6.0 Gb/s data transfer. The P8P67 PRO affords greater convenience to CPU behavior, DDR3 2200/2000/1800 MHz memory module ...
User Guide
Page 26
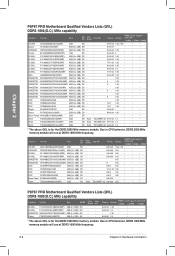
...2GB) DS Super Talent W1866UX2G8(XMP) 2GB (2 x 1GB) SS Team TXD32048M1866C9(XMP) 2GB DS Chip Brand Team Chip NO. T3D1288RT-16 Timing Voltage DIMM socket support (Optional) 1 DIMM 2 DIMM 4 DIMM 8-8-8-24 1.55~1.75 • • 9-9-9-24 1.65 ... - - - 9 - - - 7-8-7 - 7-8-7 - 9-9-9-24 - 8-8-8-24 - - Due to CPU behavior, DDR3 1800 MHz memory module will run at DDR3 1866 MHz frequency. Chapter 2 P8P67 PRO Motherboard Qualified Vendors Lists (QVL) DDR3-1866(O.C.) MHz capability Vendors Part No. Due to CPU behavior, DDR3 2000 MHz memory module will run at...
...2GB) DS Super Talent W1866UX2G8(XMP) 2GB (2 x 1GB) SS Team TXD32048M1866C9(XMP) 2GB DS Chip Brand Team Chip NO. T3D1288RT-16 Timing Voltage DIMM socket support (Optional) 1 DIMM 2 DIMM 4 DIMM 8-8-8-24 1.55~1.75 • • 9-9-9-24 1.65 ... - - - 9 - - - 7-8-7 - 7-8-7 - 9-9-9-24 - 8-8-8-24 - - Due to CPU behavior, DDR3 1800 MHz memory module will run at DDR3 1866 MHz frequency. Chapter 2 P8P67 PRO Motherboard Qualified Vendors Lists (QVL) DDR3-1866(O.C.) MHz capability Vendors Part No. Due to CPU behavior, DDR3 2000 MHz memory module will run at...
User Guide
Page 34
switch Installing DIMMs that you download and update to the latest BIOS version from the ASUS website at www.asus.com. • If you turn off the computer and unplug the power cord ... computer. A messgae will appear during the tuning process, the system continues memory tuning after turning on the ASUS website at www.asus.com after the whole tuning process, the DRAM_LED lights continuously. If the installed DIMMs still fail to begin ... process, the system loads and tests failsafe memory settings. Press and hold the MemOK! function. 2-16 Chapter 2: Hardware information
switch Installing DIMMs that you download and update to the latest BIOS version from the ASUS website at www.asus.com. • If you turn off the computer and unplug the power cord ... computer. A messgae will appear during the tuning process, the system continues memory tuning after turning on the ASUS website at www.asus.com after the whole tuning process, the DRAM_LED lights continuously. If the installed DIMMs still fail to begin ... process, the system loads and tests failsafe memory settings. Press and hold the MemOK! function. 2-16 Chapter 2: Hardware information

User Guide
Page 71
... password and must be entered to boot or enter Setup. After you set a password, these items show the default Not Installed. Chapter 3 ASUS P8P67 PRO 3-5 EFI BIOS Utility - EFI BIOS Utility - The Main menu provides you an overview of the BIOS Setup program. Advanced Mode Exit ... Memory Information Total Memory Speed 512 MB 1066 MHz System Language English System Date System Time Access Level [Mon 10/11/2010] [16:46:15] Administrator > Security Boot Tool Choose the system default language Security The Security menu items allow you to clear the BIOS password...
... password and must be entered to boot or enter Setup. After you set a password, these items show the default Not Installed. Chapter 3 ASUS P8P67 PRO 3-5 EFI BIOS Utility - EFI BIOS Utility - The Main menu provides you an overview of the BIOS Setup program. Advanced Mode Exit ... Memory Information Total Memory Speed 512 MB 1066 MHz System Language English System Date System Time Access Level [Mon 10/11/2010] [16:46:15] Administrator > Security Boot Tool Choose the system default language Security The Security menu items allow you to clear the BIOS password...

User Guide
Page 80
...(R) CPU 0 @ 3.10GHz EM64T Processor Speed Processor Stepping Microcode Revision Processor Cores Intel HT Technology CPU Ratio Range CPU Current Ratio Supported 3100 MHz 206a5 4 4 Supported 16-31 31 CPU Ratio Auto Intel Adaptive Thermal Monitor Enabled Hyper-threading Enabled Active Processor Cores All Limit CPUID Maximum Disabled Execute Disable Bit Enabled...
...(R) CPU 0 @ 3.10GHz EM64T Processor Speed Processor Stepping Microcode Revision Processor Cores Intel HT Technology CPU Ratio Range CPU Current Ratio Supported 3100 MHz 206a5 4 4 Supported 16-31 31 CPU Ratio Auto Intel Adaptive Thermal Monitor Enabled Hyper-threading Enabled Active Processor Cores All Limit CPUID Maximum Disabled Execute Disable Bit Enabled...

User Guide
Page 82
... Advanced Advanced\ PCH Configuration > Monitor PCH Configuration High Precision Timer Enabled Boot Tool Enabled/Disabled the High Precision Event Timer. Configuration options: [Enabled] [Disabled] Chapter 3 3-16 Chapter 3: BIOS setup Configuration options: [PCI/PEG] [PEG/PCI] 3.5.3 PCH Configuration EFI BIOS Utility - High Precision Timer [Enabled] Allows you to decide which graphics controller...
... Advanced Advanced\ PCH Configuration > Monitor PCH Configuration High Precision Timer Enabled Boot Tool Enabled/Disabled the High Precision Event Timer. Configuration options: [Enabled] [Disabled] Chapter 3 3-16 Chapter 3: BIOS setup Configuration options: [PCI/PEG] [PEG/PCI] 3.5.3 PCH Configuration EFI BIOS Utility - High Precision Timer [Enabled] Allows you to decide which graphics controller...
User Guide
Page 100
... that contains the BIOS file. Select the Load Optimized Defaults item under the Exit menu. When found, the utility reads the BIOS file and enters ASUS EZ Flash 2 utility automatically. 4. You can cause system boot failure! Insert the motherboard support DVD to the optical drive, or the USB flash...you to enter BIOS Setup to load default BIOS values. • This function can support devices such as a USB flash disk with FAT 32/16 format and single partition only. • DO NOT shut down or reset the system while updating the BIOS! The BIOS file in the motherboard support...
... that contains the BIOS file. Select the Load Optimized Defaults item under the Exit menu. When found, the utility reads the BIOS file and enters ASUS EZ Flash 2 utility automatically. 4. You can cause system boot failure! Insert the motherboard support DVD to the optical drive, or the USB flash...you to enter BIOS Setup to load default BIOS values. • This function can support devices such as a USB flash disk with FAT 32/16 format and single partition only. • DO NOT shut down or reset the system while updating the BIOS! The BIOS file in the motherboard support...
User Guide
Page 101
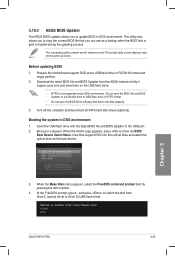
...Insert the USB flash drive with the latest BIOS file and BIOS Updater to show the BIOS Boot Device Select Menu. C:\>d: D:\> Chapter 3 ASUS P8P67 PRO 3-35 Before updating BIOS 1. Download the latest BIOS file and BIOS Updater from Drive C (optical drive) to boot using defaults 3. When ... ↑ and ↓ to move selection ENTER to select boot device ESC to Drive D (USB flash drive). Booting the system in FAT32/16 format and single partition. 2. The actual utility screen displays may not be same as the boot device. Boot your computer. Prepare the motherboard support...
...Insert the USB flash drive with the latest BIOS file and BIOS Updater to show the BIOS Boot Device Select Menu. C:\>d: D:\> Chapter 3 ASUS P8P67 PRO 3-35 Before updating BIOS 1. Download the latest BIOS file and BIOS Updater from Drive C (optical drive) to boot using defaults 3. When ... ↑ and ↓ to move selection ENTER to select boot device ESC to Drive D (USB flash drive). Booting the system in FAT32/16 format and single partition. 2. The actual utility screen displays may not be same as the boot device. Boot your computer. Prepare the motherboard support...

User Guide
Page 120
... keys at the bottom of the screen allow you want to include in creating the volume. [↑↓]-Prev/Next [SPACE]-SelectDisk [ENTER]-Done Chapter 4 4-16 Chapter 4: Software support The following screen appears: Intel(R) Rapid Storage Technology - When the RAID Level item is...
... keys at the bottom of the screen allow you want to include in creating the volume. [↑↓]-Prev/Next [SPACE]-SelectDisk [ENTER]-Done Chapter 4 4-16 Chapter 4: Software support The following screen appears: Intel(R) Rapid Storage Technology - When the RAID Level item is...