
User Manual
Page 5
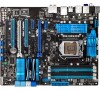
... 4.3.7 ASUS Probe II 4-12 4.3.8 Audio configurations 4-13 4.4 RAID configurations 4-14 4.4.1 RAID definitions 4-14 4.4.2 Installing Serial ATA hard disks 4-15 4.4.3 Setting the RAID item in BIOS 4-15 4.4.4 Intel® Rapid Storage Technology Option ROM utility 4-15 4.5 Creating a RAID driver disk 4-19 4.5.1 Creating a RAID driver disk without entering the OS 4-19 4.5.2 Creating a RAID driver disk in Windows...
... 4.3.7 ASUS Probe II 4-12 4.3.8 Audio configurations 4-13 4.4 RAID configurations 4-14 4.4.1 RAID definitions 4-14 4.4.2 Installing Serial ATA hard disks 4-15 4.4.3 Setting the RAID item in BIOS 4-15 4.4.4 Intel® Rapid Storage Technology Option ROM utility 4-15 4.5 Creating a RAID driver disk 4-19 4.5.1 Creating a RAID driver disk without entering the OS 4-19 4.5.2 Creating a RAID driver disk in Windows...
User Manual
Page 61
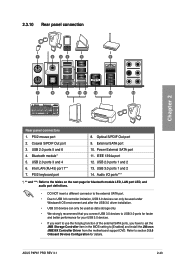
...to the external SATA port. • Due to USB 3.0 controller limitation, USB 3.0 devices can only be used under Windows® OS environment and after the USB 3.0 driver installation. • USB 3.0 devices can only be used as data storage only. • We strongly recommend that ... panel connection Chapter 2 Rear panel connectors 1. Optical S/PDIF Out port 9. Refer to [Enabled] and install the JMicron JMB36X Controller Driver from the motherboard support DVD. USB 2.0 ports 1 and 2 13. External SATA port 10. ASUS P8P67 PRO REV 3.1 2-43 Intel LAN (RJ-45) port 1** 7. PS/2 mouse port 2.
...to the external SATA port. • Due to USB 3.0 controller limitation, USB 3.0 devices can only be used under Windows® OS environment and after the USB 3.0 driver installation. • USB 3.0 devices can only be used as data storage only. • We strongly recommend that ... panel connection Chapter 2 Rear panel connectors 1. Optical S/PDIF Out port 9. Refer to [Enabled] and install the JMicron JMB36X Controller Driver from the motherboard support DVD. USB 2.0 ports 1 and 2 13. External SATA port 10. ASUS P8P67 PRO REV 3.1 2-43 Intel LAN (RJ-45) port 1** 7. PS/2 mouse port 2.
User Manual
Page 83
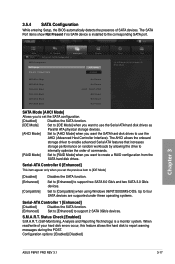
... Set to [Enhanced] to report warning messages during the POST. Configuration options: [Enabled] [Disabled] Chapter 3 ASUS P8P67 PRO REV 3.1 3-17 Set to support two SATA 6.0 Gb/s and two SATA 3.0 Gb/s devices. Status Check Enabled... the SATA hard disk drives. Set to [Enhanced] to [Compatible] when using Windows 98/NT/2000/MS-DOS. Advanced Mode Exit Main Back Ai Tweaker Advanced Advanced...Configuration SATA Mode AHCI Mode S.M.A.R.T. S.M.A.R.T. The AHCI allows the onboard storage driver to enable advanced Serial ATA features that increases storage performance on random ...
... Set to [Enhanced] to report warning messages during the POST. Configuration options: [Enabled] [Disabled] Chapter 3 ASUS P8P67 PRO REV 3.1 3-17 Set to support two SATA 6.0 Gb/s and two SATA 3.0 Gb/s devices. Status Check Enabled... the SATA hard disk drives. Set to [Enhanced] to [Compatible] when using Windows 98/NT/2000/MS-DOS. Advanced Mode Exit Main Back Ai Tweaker Advanced Advanced...Configuration SATA Mode AHCI Mode S.M.A.R.T. S.M.A.R.T. The AHCI allows the onboard storage driver to enable advanced Serial ATA features that increases storage performance on random ...
User Manual
Page 105
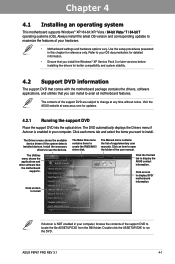
...items you want to use the devices. Install the necessary drivers to install. Double-click the ASSETUP.EXE to avail all motherboard features. Click an item to maximize the features of the user manual. ASUS P8P67 PRO REV 3.1 4-1 Always install the latest OS version and ... other software that you install the Windows® XP Service Pack 3 or later versions before installing the drivers for better compatibility and system stability. 4.2 Support DVD information The support DVD that comes with the motherboard package contains the drivers, software applications, and utilities that ...
...items you want to use the devices. Install the necessary drivers to install. Double-click the ASSETUP.EXE to avail all motherboard features. Click an item to maximize the features of the user manual. ASUS P8P67 PRO REV 3.1 4-1 Always install the latest OS version and ... other software that you install the Windows® XP Service Pack 3 or later versions before installing the drivers for better compatibility and system stability. 4.2 Support DVD information The support DVD that comes with the motherboard package contains the drivers, software applications, and utilities that ...
User Manual
Page 107
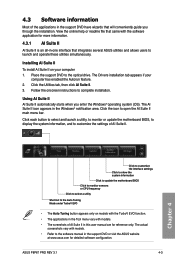
...2. 4.3 Software information Most of the applications in the support DVD have wizards that will conveniently guide you enter the Windows® operating system (OS). Click the Utilities tab, then click AI Suite II. 3. The AI Suite II...ASUS website at www.asus.com for reference only. The Drivers installation tab appears if your computer 1. The actual screenshots vary with the software application for more information. 4.3.1 AI Suite II AI Suite II is an all-in-one interface that came with models. • Refer to launch and operate these utilities simultaneously. ASUS P8P67 PRO...
...2. 4.3 Software information Most of the applications in the support DVD have wizards that will conveniently guide you enter the Windows® operating system (OS). Click the Utilities tab, then click AI Suite II. 3. The AI Suite II...ASUS website at www.asus.com for reference only. The Drivers installation tab appears if your computer 1. The actual screenshots vary with the software application for more information. 4.3.1 AI Suite II AI Suite II is an all-in-one interface that came with models. • Refer to launch and operate these utilities simultaneously. ASUS P8P67 PRO...
User Manual
Page 117
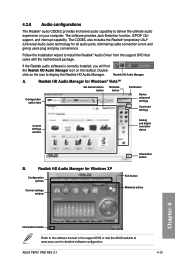
...the support DVD or visit the ASUS website at www.asus.com for Windows XP Configuration options Control settings window Information button Exit button Minimize button Chapter 4 Information button Refer to install the Realtek® Audio Driver from the support DVD that came ...Set default device button Minimize button Configuration option tabs Exit button Device advanced settings Connector settings Control settings window Analog and digital connector status B. Double- ASUS P8P67 PRO REV 3.1 4-13 Realtek HD Audio Manager A. click on the icon to deliver the ultimate audio ...
...the support DVD or visit the ASUS website at www.asus.com for Windows XP Configuration options Control settings window Information button Exit button Minimize button Chapter 4 Information button Refer to install the Realtek® Audio Driver from the support DVD that came ...Set default device button Minimize button Configuration option tabs Exit button Device advanced settings Connector settings Control settings window Analog and digital connector status B. Double- ASUS P8P67 PRO REV 3.1 4-13 Realtek HD Audio Manager A. click on the icon to deliver the ultimate audio ...
User Manual
Page 118
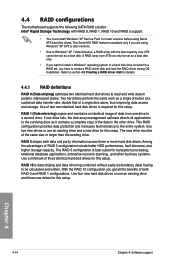
...improving data access and storage. If one drive to create a RAID driver disk and load the RAID driver during OS installation. RAID 10 is required for this setup. With the RAID 10 configuration you want to install a Windows® operating system to a hard disk drive included in the other... drive. A RAID array over 2TB cannot be set as a boot disk. Chapter 4 4-14 Chapter 4: Software support The new drive must install Windows® XP Service Pack 3 or later versions before using Serial ATA hard disk drives. Use of three identical hard disk drives for details. 4.4.1 ...
...improving data access and storage. If one drive to create a RAID driver disk and load the RAID driver during OS installation. RAID 10 is required for this setup. With the RAID 10 configuration you want to install a Windows® operating system to a hard disk drive included in the other... drive. A RAID array over 2TB cannot be set as a boot disk. Chapter 4 4-14 Chapter 4: Software support The new drive must install Windows® XP Service Pack 3 or later versions before using Serial ATA hard disk drives. Use of three identical hard disk drives for details. 4.4.1 ...
User Manual
Page 123
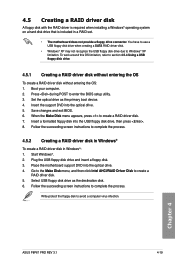
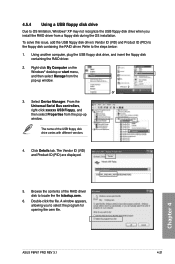
... OS: 1. Go to the Make Disk menu, and then click Intel AHCI/RAID Driver Disk to complete the process. Chapter 4 ASUS P8P67 PRO REV 3.1 4-19 Boot your computer. 2. Set the optical drive as the destination disk. 6. Save changes and exit BIOS. 6. Start Windows®. 2. Plug the USB floppy disk drive and insert a floppy disk. 3. Insert...
... OS: 1. Go to the Make Disk menu, and then click Intel AHCI/RAID Driver Disk to complete the process. Chapter 4 ASUS P8P67 PRO REV 3.1 4-19 Boot your computer. 2. Set the optical drive as the destination disk. 6. Save changes and exit BIOS. 6. Start Windows®. 2. Plug the USB floppy disk drive and insert a floppy disk. 3. Insert...
User Manual
Page 124
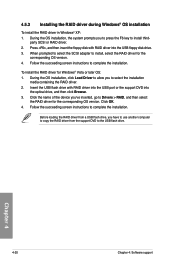
... Browse. 3. Follow the succeeding screen instructions to complete the installation. 4.5.3 Installing the RAID driver during Windows® OS installation To install the RAID driver in Windows® XP: 1. party SCSI or RAID driver. 2. Press , and then insert the floppy disk with RAID driver into the USB port or the support DVD into the USB floppy disk...
... Browse. 3. Follow the succeeding screen instructions to complete the installation. 4.5.3 Installing the RAID driver during Windows® OS installation To install the RAID driver in Windows® XP: 1. party SCSI or RAID driver. 2. Press , and then insert the floppy disk with RAID driver into the USB port or the support DVD into the USB floppy disk...
User Manual
Page 125
...; desktop or start menu, and then select Manage from the pop-up window. The name of the RAID driver disk to OS limitation, Windows® XP may not recognize the USB floppy disk drive when you to select the program for opening the oem file. Browse the... issue, add the USB floppy disk drive's Vendor ID (VID) and Product ID (PID) to the steps below: 1. A window appears, allowing you install the RAID driver from the pop-up window. Using another computer, plug the USB floppy disk drive, and insert the floppy disk containing the RAID driver. 2. Chapter 4 ASUS P8P67 PRO REV 3.1 4-21
...; desktop or start menu, and then select Manage from the pop-up window. The name of the RAID driver disk to OS limitation, Windows® XP may not recognize the USB floppy disk drive when you to select the program for opening the oem file. Browse the... issue, add the USB floppy disk drive's Vendor ID (VID) and Product ID (PID) to the steps below: 1. A window appears, allowing you install the RAID driver from the pop-up window. Using another computer, plug the USB floppy disk drive, and insert the floppy disk containing the RAID driver. 2. Chapter 4 ASUS P8P67 PRO REV 3.1 4-21

User Manual
Page 127
... should have to uninstall all current applications. 2. To uninstall existing graphics card drivers: 1. For Windows Vista, select Uninstall. 5. Turn off your current graphics card driver/s. 4. Download the latest driver from the AMD website (www.amd.com). • Ensure that your power...to your graphics card driver supports the ATI CrossFireX technology. Select your computer. For Windows XP, go to Control Panel > Add/Remove Programs. For Windows Vista, go to install multi-graphics processing units (GPU) graphics cards. ASUS P8P67 PRO REV 3.1 5-1 For Windows XP, select Add...
... should have to uninstall all current applications. 2. To uninstall existing graphics card drivers: 1. For Windows Vista, select Uninstall. 5. Turn off your current graphics card driver/s. 4. Download the latest driver from the AMD website (www.amd.com). • Ensure that your power...to your graphics card driver supports the ATI CrossFireX technology. Select your computer. For Windows XP, go to Control Panel > Add/Remove Programs. For Windows Vista, go to install multi-graphics processing units (GPU) graphics cards. ASUS P8P67 PRO REV 3.1 5-1 For Windows XP, select Add...
User Manual
Page 129
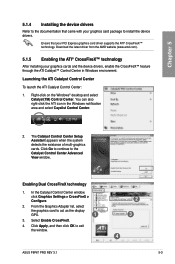
...the existance of multi-graphics cards. From the Graphics Adapter list, select the graphics card to exit the window. 2 3 4 ASUS P8P67 PRO REV 3.1 5-3 Download the latest driver from the AMD website (www.amd.com). 5.1.5 Enabling the ATI® CrossFireX™ technology After installing... continue to the Catalyst Control Center Advanced View window. You can also right-click the ATI icon in Windows environment. Chapter 5 5.1.4 Installing the device drivers Refer to the documentation that your PCI Express graphics card driver supports the ATI® CrossFireX™ technology...
...the existance of multi-graphics cards. From the Graphics Adapter list, select the graphics card to exit the window. 2 3 4 ASUS P8P67 PRO REV 3.1 5-3 Download the latest driver from the AMD website (www.amd.com). 5.1.5 Enabling the ATI® CrossFireX™ technology After installing... continue to the Catalyst Control Center Advanced View window. You can also right-click the ATI icon in Windows environment. Chapter 5 5.1.4 Installing the device drivers Refer to the documentation that your PCI Express graphics card driver supports the ATI® CrossFireX™ technology...
User Manual
Page 131
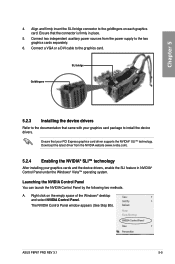
...; Vista™ operating system. The NVIDIA Control Panel window appears (See Step B5). Ensure that your PCI Express graphics card driver supports the NVIDIA® SLI™ technology. Connect a VGA or a DVI cable to install the device drivers. ASUS P8P67 PRO REV 3.1 5-5 Download the latest driver from the power supply to the two graphics cards separately. 6. A. Align...
...; Vista™ operating system. The NVIDIA Control Panel window appears (See Step B5). Ensure that your PCI Express graphics card driver supports the NVIDIA® SLI™ technology. Connect a VGA or a DVI cable to install the device drivers. ASUS P8P67 PRO REV 3.1 5-5 Download the latest driver from the power supply to the two graphics cards separately. 6. A. Align...


