
User Manual
Page 5
Contents 4.3.6 ASUS FAN Xpert 4-11 4.3.7 ASUS Probe II 4-12 4.3.8 Audio configurations 4-13 4.4 RAID configurations 4-14 4.4.1 RAID definitions 4-14 4.4.2 Installing Serial ATA hard disks 4-15 4.4.3 ...Before you begin 5-1 5.1.3 Installing two CrossFireX™ graphics cards 5-2 5.1.4 Installing the device drivers 5-3 5.1.5 Enabling the ATI® CrossFireX™ technology 5-3 5.2 NVIDIA® SLI™ technology 5-4 5.2.1 Requirements 5-4 5.2.2 Installing two SLI-ready graphics cards 5-4 5.2.3 Installing the device drivers 5-5 5.2.4 Enabling the NVIDIA®...
Contents 4.3.6 ASUS FAN Xpert 4-11 4.3.7 ASUS Probe II 4-12 4.3.8 Audio configurations 4-13 4.4 RAID configurations 4-14 4.4.1 RAID definitions 4-14 4.4.2 Installing Serial ATA hard disks 4-15 4.4.3 ...Before you begin 5-1 5.1.3 Installing two CrossFireX™ graphics cards 5-2 5.1.4 Installing the device drivers 5-3 5.1.5 Enabling the ATI® CrossFireX™ technology 5-3 5.2 NVIDIA® SLI™ technology 5-4 5.2.1 Requirements 5-4 5.2.2 Installing two SLI-ready graphics cards 5-4 5.2.3 Installing the device drivers 5-5 5.2.4 Enabling the NVIDIA®...
User Manual
Page 8
.... These documents are also provided. • Chapter 4: Software support This chapter describes the contents of the switches, jumpers, and connectors on ASUS hardware and software products. Where to find more information Refer to install and configure multiple ATI® CrossFireX™ and NVIDIA®...; SLI™ graphics cards. Refer to change system settings through the BIOS Setup menus. viii It includes description of the support DVD that...
.... These documents are also provided. • Chapter 4: Software support This chapter describes the contents of the switches, jumpers, and connectors on ASUS hardware and software products. Where to find more information Refer to install and configure multiple ATI® CrossFireX™ and NVIDIA®...; SLI™ graphics cards. Refer to change system settings through the BIOS Setup menus. viii It includes description of the support DVD that...
User Manual
Page 13
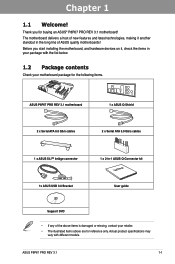
... the list below. 1.2 Package contents Check your motherboard package for the following items. Chapter 1 ASUS P8P67 PRO REV 3.1 motherboard 1 x ASUS Q-Shield 2 x Serial ATA 6.0 Gb/s cables 2 x Serial ATA 3.0 Gb/s cables 1 x ASUS SLI™ bridge connector 1x ASUS USB 3.0 Bracket 1 x 2-in your package with different models. ASUS P8P67 PRO REV 3.1 1-1 Chapter 1: Chapter 1 Product introduction 1.1 Welcome! Before you for reference only. Thank you...
... the list below. 1.2 Package contents Check your motherboard package for the following items. Chapter 1 ASUS P8P67 PRO REV 3.1 motherboard 1 x ASUS Q-Shield 2 x Serial ATA 6.0 Gb/s cables 2 x Serial ATA 3.0 Gb/s cables 1 x ASUS SLI™ bridge connector 1x ASUS USB 3.0 Bracket 1 x 2-in your package with different models. ASUS P8P67 PRO REV 3.1 1-1 Chapter 1: Chapter 1 Product introduction 1.1 Welcome! Before you for reference only. Thank you...
User Manual
Page 14
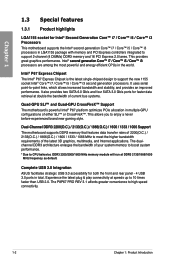
...memory and 16 PCI Express 2.0 lanes. Experience the latest plug & play connectivity at double the bandwidth of either SLI™ or CrossFireX™. Intel® s��e�c�o�n�d��g�e�n��...ASUS facilitates strategic USB 3.0 accessibility for both the front and rear panel - 4 USB 3.0 ports in multiple-GPU configurations of current bus systems. Quad-GPU SLI™ and Quad-GPU CrossFireX™ Support The motherboard's powerful Intel® P67 platform optimizes PCIe allocation in total. The P8P67 PRO...
...memory and 16 PCI Express 2.0 lanes. Experience the latest plug & play connectivity at double the bandwidth of either SLI™ or CrossFireX™. Intel® s��e�c�o�n�d��g�e�n��...ASUS facilitates strategic USB 3.0 accessibility for both the front and rear panel - 4 USB 3.0 ports in multiple-GPU configurations of current bus systems. Quad-GPU SLI™ and Quad-GPU CrossFireX™ Support The motherboard's powerful Intel® P67 platform optimizes PCIe allocation in total. The P8P67 PRO...
User Manual
Page 33
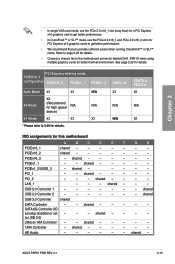
...8226; Connect a chassis fan to get better performance. • We recommend that you provide sufficient power when running CrossFireX™ or SLI™ mode. PCI_1 - - LAN_1 - - - ASUS P8P67 PRO REV 3.1 2-15 Chapter 2 • In single VGA card mode, use the PCIe 2.0 x16_1 slot (navy blue) for a ...PCI Express x16 graphics card to get better performance. • In CrossFireX™ or SLI™ mode, use the PCIe 2.0 x16_1 and ...
...8226; Connect a chassis fan to get better performance. • We recommend that you provide sufficient power when running CrossFireX™ or SLI™ mode. PCI_1 - - LAN_1 - - - ASUS P8P67 PRO REV 3.1 2-15 Chapter 2 • In single VGA card mode, use the PCIe 2.0 x16_1 slot (navy blue) for a ...PCI Express x16 graphics card to get better performance. • In CrossFireX™ or SLI™ mode, use the PCIe 2.0 x16_1 and ...
User Manual
Page 130
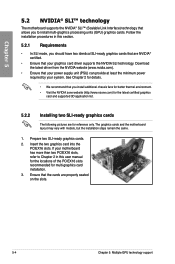
...Visit the NVIDIA zone website (http://www.nzone.com) for the latest certified graphics card and supported 3D application list. 5.2.2 Installing two SLI-ready graphics cards The following pictures are for reference only. See Chapter 2 for multi-graphics card installation. 3. Ensure that allows you ...vary with models, but the installation steps remain the same. 1. Follow the installation procedures in this section. 5.2.1 Requirements • In SLI mode, you to Chapter 2 in this user manual for the locations of the PCIEX16 slots recommended for details. • We recommend that...
...Visit the NVIDIA zone website (http://www.nzone.com) for the latest certified graphics card and supported 3D application list. 5.2.2 Installing two SLI-ready graphics cards The following pictures are for reference only. See Chapter 2 for multi-graphics card installation. 3. Ensure that allows you ...vary with models, but the installation steps remain the same. 1. Follow the installation procedures in this section. 5.2.1 Requirements • In SLI mode, you to Chapter 2 in this user manual for the locations of the PCIEX16 slots recommended for details. • We recommend that...
User Manual
Page 131
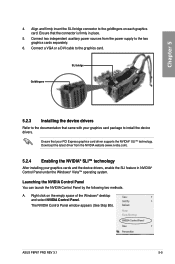
... auxiliary power sources from the NVIDIA website (www.nvidia.com). 5.2.4 Enabling the NVIDIA® SLI™ technology After installing your graphics cards and the device drivers, enable the SLI feature in place. 5. Right click on each graphics card. A. The NVIDIA Control Panel window... on the empty space of the Windows® desktop and select NVIDIA Control Panel. ASUS P8P67 PRO REV 3.1 5-5 Ensure that your graphics card package to install the device drivers. SLI bridge Goldfingers 5.2.3 Installing the device drivers Refer to the two graphics cards separately. 6....
... auxiliary power sources from the NVIDIA website (www.nvidia.com). 5.2.4 Enabling the NVIDIA® SLI™ technology After installing your graphics cards and the device drivers, enable the SLI feature in place. 5. Right click on each graphics card. A. The NVIDIA Control Panel window... on the empty space of the Windows® desktop and select NVIDIA Control Panel. ASUS P8P67 PRO REV 3.1 5-5 Ensure that your graphics card package to install the device drivers. SLI bridge Goldfingers 5.2.3 Installing the device drivers Refer to the two graphics cards separately. 6....
User Manual
Page 133
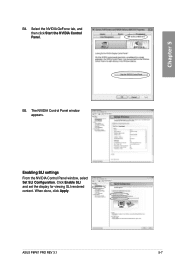
B4. The NVIDIA Control Panel window appears. Enabling SLI settings From the NVIDIA Control Panel window, select Set SLI Configuration. ASUS P8P67 PRO REV 3.1 5-7 Chapter 5 B5. Select the NVIDIA GeForce tab, and then click Start the NVIDIA Control Panel. Click Enable SLI and set the display for viewing SLI rendered content. When done, click Apply.
B4. The NVIDIA Control Panel window appears. Enabling SLI settings From the NVIDIA Control Panel window, select Set SLI Configuration. ASUS P8P67 PRO REV 3.1 5-7 Chapter 5 B5. Select the NVIDIA GeForce tab, and then click Start the NVIDIA Control Panel. Click Enable SLI and set the display for viewing SLI rendered content. When done, click Apply.


