User Guide
Page 6
...cell battery in municipal waste. vi Operation is no guarantee that interference will not occur in a particular installation. This equipment has been tested and found to comply with the limits for help. This product has been designed to radio communications. This symbol of Chemicals) regulatory ...framework, we published the chemical substances in our products at ASUS REACH website at http://csr.asus.com/english/REACH.htm. This equipment generates, uses and can be determined by turning the equipment off and on, ...
...cell battery in municipal waste. vi Operation is no guarantee that interference will not occur in a particular installation. This equipment has been tested and found to comply with the limits for help. This product has been designed to radio communications. This symbol of Chemicals) regulatory ...framework, we published the chemical substances in our products at ASUS REACH website at http://csr.asus.com/english/REACH.htm. This equipment generates, uses and can be determined by turning the equipment off and on, ...
User Guide
Page 34
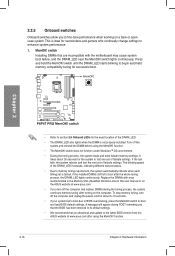
... (Qualified Vendors Lists) in this user manual or on the ASUS website at www.asus.com after using the MemOK! Chapter 2 • Refer to section 2.8 Onboard LEDs for the system to test one set is tested. To stop memory tuning, turn off the computer and unplug ... lights continuously. switch does not function under Windows™ OS environment. • During the tuning process, the system loads and tests failsafe memory settings. switch until the DRAM_LED starts blinking to begin automatic memory compatibility tuning for overclockers and gamers who continually change settings...
... (Qualified Vendors Lists) in this user manual or on the ASUS website at www.asus.com after using the MemOK! Chapter 2 • Refer to section 2.8 Onboard LEDs for the system to test one set is tested. To stop memory tuning, turn off the computer and unplug ... lights continuously. switch does not function under Windows™ OS environment. • During the tuning process, the system loads and tests failsafe memory settings. switch until the DRAM_LED starts blinking to begin automatic memory compatibility tuning for overclockers and gamers who continually change settings...
User Guide
Page 37
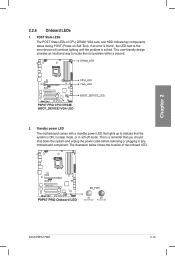
Standby power LED The motherboard comes with a standby power LED that lights up to locate the root problem within a second. 2. Chapter 2 ASUS P8P67 PRO 2-19 This user-friendly design provides an intuitional way to indicate that you should shut down the system and unplug the power cable before removing ... any motherboard component. The illustration below shows the location of CPU, DRAM, VGA card, and HDD indicate key components status during POST (Power-on Self Test). This is solved. POST State LEDs The POST State LEDs of the onboard LED.
Standby power LED The motherboard comes with a standby power LED that lights up to locate the root problem within a second. 2. Chapter 2 ASUS P8P67 PRO 2-19 This user-friendly design provides an intuitional way to indicate that you should shut down the system and unplug the power cable before removing ... any motherboard component. The illustration below shows the location of CPU, DRAM, VGA card, and HDD indicate key components status during POST (Power-on Self Test). This is solved. POST State LEDs The POST State LEDs of the onboard LED.
User Guide
Page 65
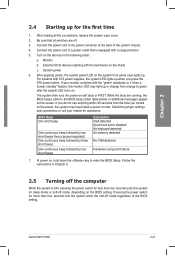
...LED lights up when you turned on the power, the system may light up or change from the time you press the ATX power button. ASUS P8P67 PRO 2-47 External SCSI devices (starting with a surge protector. 5. If you do not see anything within 30 seconds from orange to a power outlet... detected No memory detected No VGA detected Hardware component failure 7. System power 6. Connect the power cord to green after the system LED turns on test. Pressing the power switch for less than four seconds lets the system enter the soft-off . 3. If your retailer for the first time 1....
...LED lights up when you turned on the power, the system may light up or change from the time you press the ATX power button. ASUS P8P67 PRO 2-47 External SCSI devices (starting with a surge protector. 5. If you do not see anything within 30 seconds from orange to a power outlet... detected No memory detected No VGA detected Hardware component failure 7. System power 6. Connect the power cord to green after the system LED turns on test. Pressing the power switch for less than four seconds lets the system enter the soft-off . 3. If your retailer for the first time 1....
User Guide
Page 67
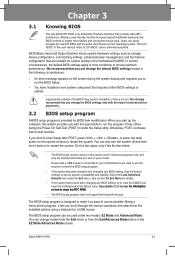
...apply to most conditions to enter the Setup utility. You can easily navigate the new EFI BIOS with its test routines. When you start up the computer, the system provides you with the opportunity to run the BIOS ...mouse. You can be used under the Exit menu. Chapter 3 Chapter 3: 3.1 Knowing BIOS BIOS setup The new ASUS EFI BIOS is an Extensible Firmware Interface that complies with uEFI architecture, offering a user-friendly interface that you change the... make it back on the screen during the Power-On Self-Test (POST) to ensure optimum performance. Chapter 3 ASUS P8P67 PRO 3-1
...apply to most conditions to enter the Setup utility. You can easily navigate the new EFI BIOS with its test routines. When you start up the computer, the system provides you with the opportunity to run the BIOS ...mouse. You can be used under the Exit menu. Chapter 3 Chapter 3: 3.1 Knowing BIOS BIOS setup The new ASUS EFI BIOS is an Extensible Firmware Interface that complies with uEFI architecture, offering a user-friendly interface that you change the... make it back on the screen during the Power-On Self-Test (POST) to ensure optimum performance. Chapter 3 ASUS P8P67 PRO 3-1
User Guide
Page 97
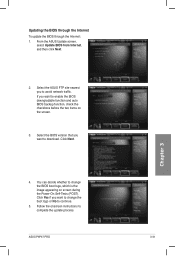
If you want to complete the update process. Select the BIOS version that you want to continue. 5. Chapter 3 4. ASUS P8P67 PRO 3-31 From the ASUS Update screen, select Update BIOS from Internet, and then click Next. 2. Click Next. You can decide whether to change the boot logo...downgradable function and auto BIOS backup function, check the checkboxs before the two items on screen during the Power‑On Self-Tests (POST). Select the ASUS FTP site nearest you want to avoid network traffic. Click Yes if you to download. Follow the onscreen instructions to change ...
If you want to complete the update process. Select the BIOS version that you want to continue. 5. Chapter 3 4. ASUS P8P67 PRO 3-31 From the ASUS Update screen, select Update BIOS from Internet, and then click Next. 2. Click Next. You can decide whether to change the boot logo...downgradable function and auto BIOS backup function, check the checkboxs before the two items on screen during the Power‑On Self-Tests (POST). Select the ASUS FTP site nearest you want to avoid network traffic. Click Yes if you to download. Follow the onscreen instructions to change ...
User Guide
Page 113
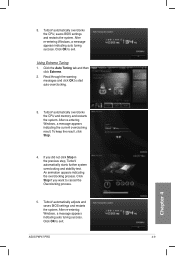
... keep the result, click Stop. 4. Click Stop if you did not click Stop in the previous step, TurboV automatically starts further system overclocking and stability test. ASUS P8P67 PRO 4-9 Chapter 4 TurboV automatically overclocks the CPU and memory and restarts the system. After re-entering Windows, a message appears indicating auto tuning success. Click OK to...
... keep the result, click Stop. 4. Click Stop if you did not click Stop in the previous step, TurboV automatically starts further system overclocking and stability test. ASUS P8P67 PRO 4-9 Chapter 4 TurboV automatically overclocks the CPU and memory and restarts the system. After re-entering Windows, a message appears indicating auto tuning success. Click OK to...

