User Guide
Page 6
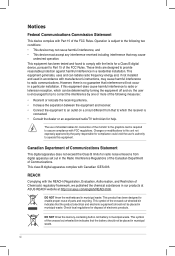
...substances in the Radio Interference Regulations of the Canadian Department of electronic products. REACH Complying with Canadian ICES-003. This equipment has been tested and found to assure compliance with Part 15 of parts and recycling. These limits are designed to enable proper reuse of the FCC ... that may cause harmful interference to an outlet on a circuit different from digital apparatus set out in our products at ASUS REACH website at http://csr.asus.com/english/REACH.htm. DO NOT throw the motherboard in municipal waste. DO NOT throw the mercury-containing button cell ...
...substances in the Radio Interference Regulations of the Canadian Department of electronic products. REACH Complying with Canadian ICES-003. This equipment has been tested and found to assure compliance with Part 15 of parts and recycling. These limits are designed to enable proper reuse of the FCC ... that may cause harmful interference to an outlet on a circuit different from digital apparatus set out in our products at ASUS REACH website at http://csr.asus.com/english/REACH.htm. DO NOT throw the motherboard in municipal waste. DO NOT throw the mercury-containing button cell ...
User Guide
Page 34
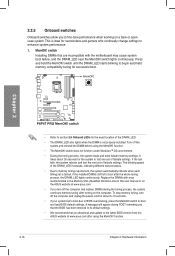
... you download and update to the latest BIOS version from the ASUS website at www.asus.com after the whole tuning process, the DRAM_LED lights continuously. Chapter 2 • Refer to section 2.8 Onboard LEDs for the system to test one set is ideal for successful boot. It takes about 5-10...tune performance when working on the computer. MemOK! Press and hold the MemOK! If the test fails, the system reboots and test the next set of the DRAM_LED increases, indicating different test processes. • Due to memory tuning requirement, the system automatically reboots when each timing ...
... you download and update to the latest BIOS version from the ASUS website at www.asus.com after the whole tuning process, the DRAM_LED lights continuously. Chapter 2 • Refer to section 2.8 Onboard LEDs for the system to test one set is ideal for successful boot. It takes about 5-10...tune performance when working on the computer. MemOK! Press and hold the MemOK! If the test fails, the system reboots and test the next set of the DRAM_LED increases, indicating different test processes. • Due to memory tuning requirement, the system automatically reboots when each timing ...
User Guide
Page 37
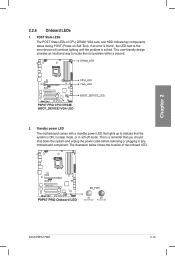
...the problem is solved. This is a reminder that the system is found , the LED next to locate the root problem within a second. 2. Chapter 2 ASUS P8P67 PRO 2-19 POST State LEDs The POST State LEDs of the onboard LED. The illustration below shows the location of CPU, DRAM, VGA card, and HDD... indicate key components status during POST (Power-on Self Test). 2.2.6 Onboard LEDs 1. Standby power LED The motherboard comes with a standby power LED that lights up to indicate that you should shut down the ...
...the problem is solved. This is a reminder that the system is found , the LED next to locate the root problem within a second. 2. Chapter 2 ASUS P8P67 PRO 2-19 POST State LEDs The POST State LEDs of the onboard LED. The illustration below shows the location of CPU, DRAM, VGA card, and HDD... indicate key components status during POST (Power-on Self Test). 2.2.6 Onboard LEDs 1. Standby power LED The motherboard comes with a standby power LED that lights up to indicate that you should shut down the ...
User Guide
Page 65
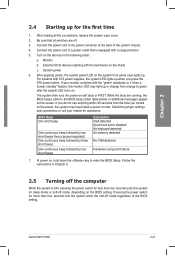
... One continuous beep followed by four short beeps Description VGA detected Quick boot set to the power connector at the back of the BIOS setting. ASUS P8P67 PRO 2-47 After making all switches are running, the BIOS beeps (refer to green after the system LED turns on. Be sure that is ON,..., the system power LED on the system front panel case lights up when you press the ATX power button. At power on self tests or POST. While the tests are off mode, depending on the BIOS setting. Monitor b. Chapter 2 Chapter 2 2.4 Starting up or change from the time you turned on the...
... One continuous beep followed by four short beeps Description VGA detected Quick boot set to the power connector at the back of the BIOS setting. ASUS P8P67 PRO 2-47 After making all switches are running, the BIOS beeps (refer to green after the system LED turns on. Be sure that is ON,..., the system power LED on the system front panel case lights up when you press the ATX power button. At power on self tests or POST. While the tests are off mode, depending on the BIOS setting. Monitor b. Chapter 2 Chapter 2 2.4 Starting up or change from the time you turned on the...
User Guide
Page 67
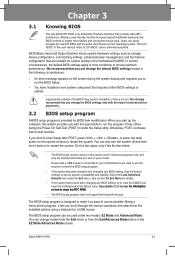
...• If the system becomes unstable after changing any BIOS setting, load the default settings to ensure system compatibility and stability. Chapter 3 ASUS P8P67 PRO 3-1 Otherwise, POST continues with the same smoothness as possible. Do this last option only if the first two failed. • The BIOS... section are needed for system startup in the following circumstances: • An error message appears on the screen during the Power-On Self-Test (POST) to "EFI BIOS" unless otherwise specified. Users can be used under the Exit menu. See section 3.9 Exit Menu for details...
...• If the system becomes unstable after changing any BIOS setting, load the default settings to ensure system compatibility and stability. Chapter 3 ASUS P8P67 PRO 3-1 Otherwise, POST continues with the same smoothness as possible. Do this last option only if the first two failed. • The BIOS... section are needed for system startup in the following circumstances: • An error message appears on the screen during the Power-On Self-Test (POST) to "EFI BIOS" unless otherwise specified. Users can be used under the Exit menu. See section 3.9 Exit Menu for details...
User Guide
Page 97
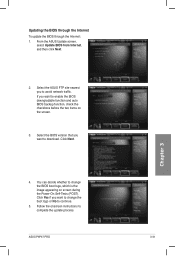
...two items on screen during the Power‑On Self-Tests (POST). Click Yes if you want to change the boot logo or No to complete the update process. Follow the onscreen instructions to continue. 5. Select the ASUS FTP site nearest you want to change the BIOS boot... logo, which is the image appearing on the screen. 3. Select the BIOS version that you to download. ASUS P8P67 PRO 3-31 Chapter 3 4. Click Next. Updating the BIOS through ...
...two items on screen during the Power‑On Self-Tests (POST). Click Yes if you want to change the boot logo or No to complete the update process. Follow the onscreen instructions to continue. 5. Select the ASUS FTP site nearest you want to change the BIOS boot... logo, which is the image appearing on the screen. 3. Select the BIOS version that you to download. ASUS P8P67 PRO 3-31 Chapter 3 4. Click Next. Updating the BIOS through ...
User Guide
Page 113
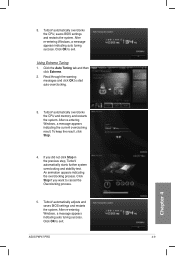
... appears indicating the overclocking process. Click Stop if you did not click Stop in the previous step, TurboV automatically starts further system overclocking and stability test. ASUS P8P67 PRO 4-9 Chapter 4 Using Extreme Tuning 1. After re-entering Windows, a message appears indicating auto tuning success. Click OK to start auto-overclocking. 3. Click OK to cancel the...
... appears indicating the overclocking process. Click Stop if you did not click Stop in the previous step, TurboV automatically starts further system overclocking and stability test. ASUS P8P67 PRO 4-9 Chapter 4 Using Extreme Tuning 1. After re-entering Windows, a message appears indicating auto tuning success. Click OK to start auto-overclocking. 3. Click OK to cancel the...

