
User Manual
Page 5
...ASUS Probe II 4-12 4.3.8 Audio configurations 4-13 4.4 RAID configurations 4-14 4.4.1 RAID definitions 4-14 4.4.2 Installing Serial ATA hard disks 4-15 4.4.3 Setting the RAID item in BIOS 4-15 4.4.4 Intel® Rapid Storage Technology Option ROM utility 4-15 4.5 Creating a RAID driver disk 4-19 4.5.1 Creating a RAID driver disk without entering the OS 4-19 4.5.2 Creating a RAID driver...5.1.3 Installing two CrossFireX™ graphics cards 5-2 5.1.4 Installing the device drivers 5-3 5.1.5 Enabling the ATI® CrossFireX™ technology 5-3 5.2 NVIDIA® SLI™...
...ASUS Probe II 4-12 4.3.8 Audio configurations 4-13 4.4 RAID configurations 4-14 4.4.1 RAID definitions 4-14 4.4.2 Installing Serial ATA hard disks 4-15 4.4.3 Setting the RAID item in BIOS 4-15 4.4.4 Intel® Rapid Storage Technology Option ROM utility 4-15 4.5 Creating a RAID driver disk 4-19 4.5.1 Creating a RAID driver disk without entering the OS 4-19 4.5.2 Creating a RAID driver...5.1.3 Installing two CrossFireX™ graphics cards 5-2 5.1.4 Installing the device drivers 5-3 5.1.5 Enabling the ATI® CrossFireX™ technology 5-3 5.2 NVIDIA® SLI™...
User Manual
Page 12
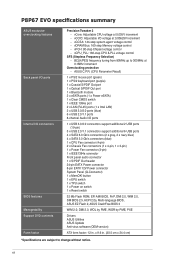
...Drivers ASUS Utilities ASUS Update Anti-virus software (OEM version) ATX form factor: 12 in . (30.5 cm x 24.4 cm) *Specifications are subject to 300MHz at 0.005V increment - xii vCCSA: 144-step system agent voltage control - BCLK/PEG frequency tuning from 80MHz up to change without notice. vPCH: 90-step Chipset voltage control - x 9.6 in . P8P67 EVO... specifications summary ASUS exclusive overclocking features Back panel I/O ports Internal I /O ports 1 x USB 3.0/2.0 connectors support ...
...Drivers ASUS Utilities ASUS Update Anti-virus software (OEM version) ATX form factor: 12 in . (30.5 cm x 24.4 cm) *Specifications are subject to 300MHz at 0.005V increment - xii vCCSA: 144-step system agent voltage control - BCLK/PEG frequency tuning from 80MHz up to change without notice. vPCH: 90-step Chipset voltage control - x 9.6 in . P8P67 EVO... specifications summary ASUS exclusive overclocking features Back panel I/O ports Internal I /O ports 1 x USB 3.0/2.0 connectors support ...
User Manual
Page 61
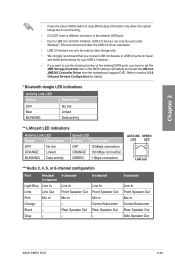
...Out Mic In Center/Subwoofer Rear Speaker Out - 8-channel Line In Front Speaker Out Mic In Center/Subwoofer Rear Speaker Out Side Speaker Out ASUS P8P67 EVO 2-43 Refer to section 3.5.6 Onboard Devices Configuration for your USB 3.0 devices. • If you want to use the hot-plug function ...SATA port. • Due to USB 3.0 controller limitation, USB 3.0 devices can only be used under Windows® OS environment and after the USB 3.0 driver installation. • USB 3.0 devices can only be used as data storage only. • We strongly recommend that you connect USB 3.0 devices to [Enabled...
...Out Mic In Center/Subwoofer Rear Speaker Out - 8-channel Line In Front Speaker Out Mic In Center/Subwoofer Rear Speaker Out Side Speaker Out ASUS P8P67 EVO 2-43 Refer to section 3.5.6 Onboard Devices Configuration for your USB 3.0 devices. • If you want to use the hot-plug function ...SATA port. • Due to USB 3.0 controller limitation, USB 3.0 devices can only be used under Windows® OS environment and after the USB 3.0 driver installation. • USB 3.0 devices can only be used as data storage only. • We strongly recommend that you connect USB 3.0 devices to [Enabled...

User Manual
Page 81
... 3.0 Gb/s devices. [Compatible] Set to create a RAID configuration from the SATA hard disk drives. Configuration options: [Enabled] [Disabled] ASUS P8P67 EVO 3-17 When read/write of your hard disk errors occur, this feature allows the hard disk to support 2 SATA 3Gb/s devices. Advanced Mode...Tweaker Advanced Advanced\ SATA Configuration > Monitor SATA Configuration SATA Mode AHCI Mode S.M.A.R.T. The AHCI allows the onboard storage driver to enable advanced Serial ATA features that increases storage performance on random workloads by allowing the drive to internally optimize ...
... 3.0 Gb/s devices. [Compatible] Set to create a RAID configuration from the SATA hard disk drives. Configuration options: [Enabled] [Disabled] ASUS P8P67 EVO 3-17 When read/write of your hard disk errors occur, this feature allows the hard disk to support 2 SATA 3Gb/s devices. Advanced Mode...Tweaker Advanced Advanced\ SATA Configuration > Monitor SATA Configuration SATA Mode AHCI Mode S.M.A.R.T. The AHCI allows the onboard storage driver to enable advanced Serial ATA features that increases storage performance on random workloads by allowing the drive to internally optimize ...

User Manual
Page 84
... ATA physical storage devices. [AHCI Mode] Set to [AHCI Mode] when you want to [Enabled] and install the JMicron JMB36X Controller Driver from the motherboard support DVD. Marvell Storage OPROM [Enabled] This item appears only when you set this item to use the AHCI (Advanced... Host Controller Interface). The AHCI allows the onboard storage driver to enable advanced Serial ATA features that you want the SATA hard disk drives to enable or disable the JMB storage controller. Configuration options...
... ATA physical storage devices. [AHCI Mode] Set to [AHCI Mode] when you want to [Enabled] and install the JMicron JMB36X Controller Driver from the motherboard support DVD. Marvell Storage OPROM [Enabled] This item appears only when you set this item to use the AHCI (Advanced... Host Controller Interface). The AHCI allows the onboard storage driver to enable advanced Serial ATA features that you want the SATA hard disk drives to enable or disable the JMB storage controller. Configuration options...

User Manual
Page 103
... shows the applications and other software that you can install to avail all motherboard features. The Drivers menu shows the available device drivers if the system detects installed devices. Install the necessary drivers to display the ASUS contact information. ASUS P8P67 EVO 4-1 Chapter 4: Chapter 4 Software support 4.1 Installing an operating system This motherboard supports Windows® XP/ 64...
... shows the applications and other software that you can install to avail all motherboard features. The Drivers menu shows the available device drivers if the system detects installed devices. Install the necessary drivers to display the ASUS contact information. ASUS P8P67 EVO 4-1 Chapter 4: Chapter 4 Software support 4.1 Installing an operating system This motherboard supports Windows® XP/ 64...

User Manual
Page 105
...simultaneously. ASUS P8P67 EVO 4-3 Chapter 4 Click to customize the interface settings Click to show the system information Click to update the motherboard BIOS Click to monitor sensors or CPU frequency Click to select a utility Shortcut to open the AI Suite II main menu bar. The Drivers installation ...tab appears if your computer 1. Click the icon to the Auto Tuning Mode under TurboV EVO • The Auto Tuning button appears only on your computer has enabled the Autorun feature...
...simultaneously. ASUS P8P67 EVO 4-3 Chapter 4 Click to customize the interface settings Click to show the system information Click to update the motherboard BIOS Click to monitor sensors or CPU frequency Click to select a utility Shortcut to open the AI Suite II main menu bar. The Drivers installation ...tab appears if your computer 1. Click the icon to the Auto Tuning Mode under TurboV EVO • The Auto Tuning button appears only on your computer has enabled the Autorun feature...

User Manual
Page 115
...software is correctly installed, you will find the Realtek HD Audio Manager icon on the icon to install the Realtek® Audio Driver from the support DVD that came with the motherboard package. 4.3.8 Audio configurations The Realtek® audio CODEC provides 8-channel audio... capability to the software manual in the support DVD or visit the ASUS website at www.asus.com for detailed software configuration. The software provides Jack-Detection function, S/PDIF Out support, and interrupt capability. ASUS P8P67 EVO 4-13 The CODEC also includes the Realtek® proprietary UAJ®...
...software is correctly installed, you will find the Realtek HD Audio Manager icon on the icon to install the Realtek® Audio Driver from the support DVD that came with the motherboard package. 4.3.8 Audio configurations The Realtek® audio CODEC provides 8-channel audio... capability to the software manual in the support DVD or visit the ASUS website at www.asus.com for detailed software configuration. The software provides Jack-Detection function, S/PDIF Out support, and interrupt capability. ASUS P8P67 EVO 4-13 The CODEC also includes the Realtek® proprietary UAJ®...

User Manual
Page 116
...drive and three new drives for this setup. RAID 10 is available only if you get all applications to create a RAID driver disk and load the RAID driver during OS installation. A RAID array over 2TB cannot be of three identical hard disk drives for this setup. The new ...as a data disk only. • If you want to install a Windows® operating system to a second drive. Refer to section 4.5 Creating a RAID driver disk for this setup. RAID 5 stripes both RAID 0 and RAID 1 configurations. With the RAID 10 configuration you are using Serial ATA hard disk drives.
...drive and three new drives for this setup. RAID 10 is available only if you get all applications to create a RAID driver disk and load the RAID driver during OS installation. A RAID array over 2TB cannot be of three identical hard disk drives for this setup. The new ...as a data disk only. • If you want to install a Windows® operating system to a second drive. Refer to section 4.5 Creating a RAID driver disk for this setup. RAID 5 stripes both RAID 0 and RAID 1 configurations. With the RAID 10 configuration you are using Serial ATA hard disk drives.

User Manual
Page 121
... around this OS limitation, refer to create a RAID driver disk. 7. Plug the USB floppy disk drive and insert a floppy disk. 3. Place the motherboard support DVD into the USB floppy disk drive, then press . 8. Chapter 4 ASUS P8P67 EVO 4-19 Save changes and exit BIOS. 6. When the... Make Disk menu appears, press to section 4.5.4 Using a USB floppy disk drive. 4.5.1 Creating a RAID driver disk without entering the OS To create a RAID driver disk without entering the OS: 1. ...
... around this OS limitation, refer to create a RAID driver disk. 7. Plug the USB floppy disk drive and insert a floppy disk. 3. Place the motherboard support DVD into the USB floppy disk drive, then press . 8. Chapter 4 ASUS P8P67 EVO 4-19 Save changes and exit BIOS. 6. When the... Make Disk menu appears, press to section 4.5.4 Using a USB floppy disk drive. 4.5.1 Creating a RAID driver disk without entering the OS To create a RAID driver disk without entering the OS: 1. ...

User Manual
Page 122
...support DVD into the USB floppy disk drive. 3. Chapter 4 4-20 Chapter 4: Software support party SCSI or RAID driver. 2. When prompted to select the SCSI adapter to complete the installation. During the OS installation, click Load Driver to allow you to press the F6 key to install third- To install the RAID... the optical drive, and then click Browse. 3. Follow the succeeding screen instructions to install, select the RAID driver for the corresponding OS version. 4. During the OS installation, the system prompts you to the USB flash drive. Click the name of the ...
...support DVD into the USB floppy disk drive. 3. Chapter 4 4-20 Chapter 4: Software support party SCSI or RAID driver. 2. When prompted to select the SCSI adapter to complete the installation. During the OS installation, click Load Driver to allow you to press the F6 key to install third- To install the RAID... the optical drive, and then click Browse. 3. Follow the succeeding screen instructions to install, select the RAID driver for the corresponding OS version. 4. During the OS installation, the system prompts you to the USB flash drive. Click the name of the ...

User Manual
Page 123
...the program for opening the oem file. or 3. Click Details tab. Double-click the file. A window appears, allowing you install the RAID driver from a floppy disk during the OS installation. Select Device Manager. Right-click My Computer on the Windows® desktop or start menu, and..., plug the USB floppy disk drive, and insert the floppy disk containing the RAID driver. 2. Refer to the floppy disk containing the RAID driver. To solve this issue, add the USB floppy disk drive's Vendor ID (VID) and Product ID (PID) to the steps below: 1. Chapter 4 ASUS P8P67 EVO 4-21
...the program for opening the oem file. or 3. Click Details tab. Double-click the file. A window appears, allowing you install the RAID driver from a floppy disk during the OS installation. Select Device Manager. Right-click My Computer on the Windows® desktop or start menu, and..., plug the USB floppy disk drive, and insert the floppy disk containing the RAID driver. 2. Refer to the floppy disk containing the RAID driver. To solve this issue, add the USB floppy disk drive's Vendor ID (VID) and Product ID (PID) to the steps below: 1. Chapter 4 ASUS P8P67 EVO 4-21

User Manual
Page 125
...that are ATI® certified. • Ensure that your system. Close all existing graphics card drivers before installing ATI CrossFireX graphics cards to your graphics card driver supports the ATI CrossFireX technology. For Windows XP, go to Control Panel > Add/Remove Programs. ...Control Panel > Programs and Features. 3. For Windows XP, select Add/Remove. To uninstall existing graphics card drivers: 1. For Windows Vista, select Uninstall. 5. ASUS P8P67 EVO 5-1 Download the latest driver from the AMD website (www.amd.com). • Ensure that your power supply unit (PSU) can ...
...that are ATI® certified. • Ensure that your system. Close all existing graphics card drivers before installing ATI CrossFireX graphics cards to your graphics card driver supports the ATI CrossFireX technology. For Windows XP, go to Control Panel > Add/Remove Programs. ...Control Panel > Programs and Features. 3. For Windows XP, select Add/Remove. To uninstall existing graphics card drivers: 1. For Windows Vista, select Uninstall. 5. ASUS P8P67 EVO 5-1 Download the latest driver from the AMD website (www.amd.com). • Ensure that your power supply unit (PSU) can ...

User Manual
Page 127
... PCI Express graphics card driver supports the ATI® CrossFireX™ technology. In the Catalyst Control Center window, click Graphics Settings > CrossFireX > Configure. 2. The Catalyst Control Center Setup Assistant appears when the system detects the existance of multi-graphics cards. Click Go to continue to exit the window. 2 3 4 ASUS P8P67 EVO 5-3 You can also...
... PCI Express graphics card driver supports the ATI® CrossFireX™ technology. In the Catalyst Control Center window, click Graphics Settings > CrossFireX > Configure. 2. The Catalyst Control Center Setup Assistant appears when the system detects the existance of multi-graphics cards. Click Go to continue to exit the window. 2 3 4 ASUS P8P67 EVO 5-3 You can also...

User Manual
Page 128
Download the latest driver from the NVIDIA website (www.nvidia.com). • Ensure that the cards are properly seated on the slots. 5-4 Chapter 5: Multiple GPU technology support The graphics ... details. • We recommend that you should have two identical SLI-ready graphics cards that are NVIDIA® certified. • Ensure that your graphics card driver supports the NVIDIA SLI technology. Chapter 5 5.2 NVIDIA® SLI™ technology The motherboard supports the NVIDIA® SLI™ (Scalable Link Interface) technology that allows...
Download the latest driver from the NVIDIA website (www.nvidia.com). • Ensure that the cards are properly seated on the slots. 5-4 Chapter 5: Multiple GPU technology support The graphics ... details. • We recommend that you should have two identical SLI-ready graphics cards that are NVIDIA® certified. • Ensure that your graphics card driver supports the NVIDIA SLI technology. Chapter 5 5.2 NVIDIA® SLI™ technology The motherboard supports the NVIDIA® SLI™ (Scalable Link Interface) technology that allows...

User Manual
Page 129
... of the Windows® desktop and select NVIDIA Control Panel. Ensure that came with your PCI Express graphics card driver supports the NVIDIA® SLI™ technology. ASUS P8P67 EVO 5-5 Connect a VGA or a DVI cable to the two graphics cards separately. 6. Right click on each graphics... card. Download the latest driver from the power supply to the graphics card. Launching the NVIDIA Control Panel You can ...
... of the Windows® desktop and select NVIDIA Control Panel. Ensure that came with your PCI Express graphics card driver supports the NVIDIA® SLI™ technology. ASUS P8P67 EVO 5-5 Connect a VGA or a DVI cable to the two graphics cards separately. 6. Right click on each graphics... card. Download the latest driver from the power supply to the graphics card. Launching the NVIDIA Control Panel You can ...


