User Manual
Page 12
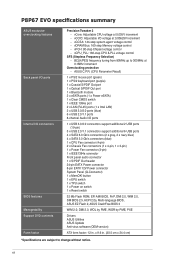
... BIOS 2.5, ACPI 2.0a, Multi-language BIOS, ASUS EZ Flash 2, ASUS CrashFree BIOS 3 WfM 2.0, DMI 2.0, WOL by PME, WOR by PME, PXE Drivers ASUS Utilities ASUS Update Anti-virus software (OEM version) ATX form factor: 12 in . (30.5 cm x 24.4 cm) *Specifications are subject to 300MHz at 0.005V increment - xii vPCH: 90-step Chipset voltage control - P8P67 EVO specifications summary ASUS...
... BIOS 2.5, ACPI 2.0a, Multi-language BIOS, ASUS EZ Flash 2, ASUS CrashFree BIOS 3 WfM 2.0, DMI 2.0, WOL by PME, WOR by PME, PXE Drivers ASUS Utilities ASUS Update Anti-virus software (OEM version) ATX form factor: 12 in . (30.5 cm x 24.4 cm) *Specifications are subject to 300MHz at 0.005V increment - xii vPCH: 90-step Chipset voltage control - P8P67 EVO specifications summary ASUS...

User Manual
Page 47
...reboot without turning off the system power. Connect the chassis power LED cable to this connector. The speaker allows you turn on the BIOS settings. System panel connector (20-8 pin PANEL) This connector supports several chassis-mounted functions. The system power LED lights up or flashes... the power switch for more than four seconds while the system is ON turns the system OFF. • Reset button (2-pin RESET) This 2-pin connector is for the system power LED. ASUS P8P67 EVO 2-29 Chapter 2 • System power LED (2-pin PLED) This 2-pin connector is for the chassis-mounted...
...reboot without turning off the system power. Connect the chassis power LED cable to this connector. The speaker allows you turn on the BIOS settings. System panel connector (20-8 pin PANEL) This connector supports several chassis-mounted functions. The system power LED lights up or flashes... the power switch for more than four seconds while the system is ON turns the system OFF. • Reset button (2-pin RESET) This 2-pin connector is for the system power LED. ASUS P8P67 EVO 2-29 Chapter 2 • System power LED (2-pin PLED) This 2-pin connector is for the chassis-mounted...
User Manual
Page 65
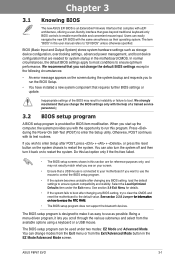
... you want to use as easy to use the mouse to control the BIOS setup program. • If the system becomes unstable after changing any BIOS setting, try to clear the CMOS and reset the motherboard to the default value. �S�e�e��s�e&#...8226; Ensure that a USB mouse is designed to make it lets you wish to enter Setup after changing any BIOS setting, load the default settings to boot. Chapter 3 ASUS P8P67 EVO 3-1 BIOS (Basic Input and Output System) stores system hardware settings such as their operating system. Press during the system ...
... you want to use as easy to use the mouse to control the BIOS setup program. • If the system becomes unstable after changing any BIOS setting, try to clear the CMOS and reset the motherboard to the default value. �S�e�e��s�e&#...8226; Ensure that a USB mouse is designed to make it lets you wish to enter Setup after changing any BIOS setting, load the default settings to boot. Chapter 3 ASUS P8P67 EVO 3-1 BIOS (Basic Input and Output System) stores system hardware settings such as their operating system. Press during the system ...

User Manual
Page 66
...(F5) Selects the boot device priority Power Saving mode Loads optimized default Displays the system properties of the BIOS setup program Clicks to decide the boot priority. EZ Mode Tuesday [10/19/2010] P8P67 EVO BIOS Version : 0240 CPU Type : Genuine Intel(R) CPU 0 @ 3.10GHz Total Memory : 512 MB (... program without saving the changes, saves the changes and resets the system, or enters the Advanced Mode EFI BIOS Utility - Selects the display language of the selected mode on the right hand side Normal mode ASUS Optimal mode Selects the boot device priority • The boot ...
...(F5) Selects the boot device priority Power Saving mode Loads optimized default Displays the system properties of the BIOS setup program Clicks to decide the boot priority. EZ Mode Tuesday [10/19/2010] P8P67 EVO BIOS Version : 0240 CPU Type : Genuine Intel(R) CPU 0 @ 3.10GHz Total Memory : 512 MB (... program without saving the changes, saves the changes and resets the system, or enters the Advanced Mode EFI BIOS Utility - Selects the display language of the selected mode on the right hand side Normal mode ASUS Optimal mode Selects the boot device priority • The boot ...

User Manual
Page 92
... the current BIOS settings to prevent the system boot failure! • We recommend that saved your BIOS settings, press , and then select Yes. • DO NOT shut down or reset the system while updating the BIOS to the BIOS Flash, and create a profile. Chapter 3 3-28 Chapter 3: BIOS setup Advanced Mode Exit Main Back Ai Tweaker Tool\ ASUS O.C.
... the current BIOS settings to prevent the system boot failure! • We recommend that saved your BIOS settings, press , and then select Yes. • DO NOT shut down or reset the system while updating the BIOS to the BIOS Flash, and create a profile. Chapter 3 3-28 Chapter 3: BIOS setup Advanced Mode Exit Main Back Ai Tweaker Tool\ ASUS O.C.

User Manual
Page 93
Select Yes to the BIOS items. You can access the EZ Mode from filesystem device This.... Select Yes to load the default values. Chapter 3 ASUS P8P67 EVO 3-29 Select Yes to discard changes and exit�. Launch EFI Shell from the Exit menu. ASUS EZ Mode This option allows you selected are finished making ...select this option or if you are saved. Save Changes & Reset Once you press , a confirmation window appears. Exit Load Optimized Defaults Save Changes & Reset Discard Changes & Exit ASUS EZ Mode Launch EFI Shell from filesystem device Load Optimized Defaults This...
Select Yes to the BIOS items. You can access the EZ Mode from filesystem device This.... Select Yes to load the default values. Chapter 3 ASUS P8P67 EVO 3-29 Select Yes to discard changes and exit�. Launch EFI Shell from the Exit menu. ASUS EZ Mode This option allows you selected are finished making ...select this option or if you are saved. Save Changes & Reset Once you press , a confirmation window appears. Exit Load Optimized Defaults Save Changes & Reset Discard Changes & Exit ASUS EZ Mode Launch EFI Shell from filesystem device Load Optimized Defaults This...

User Manual
Page 98
... system compatibility and stability, we recommend that allows you to enter BIOS Setup to restore the BIOS file when it to a USB flash drive. Turn on the ASUS official website. DO NOT shut down or reset the system while updating the BIOS to load default BIOS values. Doing so can cause system boot failure! If you...
... system compatibility and stability, we recommend that allows you to enter BIOS Setup to restore the BIOS file when it to a USB flash drive. Turn on the ASUS official website. DO NOT shut down or reset the system while updating the BIOS to load default BIOS values. Doing so can cause system boot failure! If you...

User Manual
Page 101
... Exit 3. D:\>bupdater /pc /g 2. When BIOS update is done, press to ensure system compatibility and stability. DO NOT shut down or reset the system while updating the BIOS to prevent system boot failure! • For BIOS Updater version 1.04 or later, the utility ...BIOS file if you to confirm BIOS update. At the FreeDOS prompt, type bupdater /pc /g and press . Press to switch between screen fields and use the keys to update BIOS? Select the Load Optimized Defaults item under the Exit menu. ASUS P8P67 EVO 3-37 Updating the BIOS file To update the BIOS file using BIOS...
... Exit 3. D:\>bupdater /pc /g 2. When BIOS update is done, press to ensure system compatibility and stability. DO NOT shut down or reset the system while updating the BIOS to prevent system boot failure! • For BIOS Updater version 1.04 or later, the utility ...BIOS file if you to confirm BIOS update. At the FreeDOS prompt, type bupdater /pc /g and press . Press to switch between screen fields and use the keys to update BIOS? Select the Load Optimized Defaults item under the Exit menu. ASUS P8P67 EVO 3-37 Updating the BIOS file To update the BIOS file using BIOS...

User Manual
Page 117
...Volume 2. Save your changes, and then exit the BIOS Setup. v10.0.0.1032 Copyright(C) 2003-10 Intel Corporation. All Rights Reserved. [ MAIN MENU ] 1. Exit RAID Volumes: None defined. Connect a SATA power cable to Non-RAID 4. Intel(R) Rapid Storage Technology - Reset Disks to the power connector on the system. ... 149.0GB 149.0GB Type/Status(Vol ID) Non-RAID Disk Non-RAID Disk Non-RAID Disk Non-RAID Disk Chapter 4 [↑↓]-Select ASUS P8P67 EVO [ESC]-Exit [ENTER]-Select Menu 4-15 Refer to [RAID Mode]. 4. Due to RAID mode, all SATA ports run at RAID mode together...
...Volume 2. Save your changes, and then exit the BIOS Setup. v10.0.0.1032 Copyright(C) 2003-10 Intel Corporation. All Rights Reserved. [ MAIN MENU ] 1. Exit RAID Volumes: None defined. Connect a SATA power cable to Non-RAID 4. Intel(R) Rapid Storage Technology - Reset Disks to the power connector on the system. ... 149.0GB 149.0GB Type/Status(Vol ID) Non-RAID Disk Non-RAID Disk Non-RAID Disk Non-RAID Disk Chapter 4 [↑↓]-Select ASUS P8P67 EVO [ESC]-Exit [ENTER]-Select Menu 4-15 Refer to [RAID Mode]. 4. Due to RAID mode, all SATA ports run at RAID mode together...


