

User Manual
Page 5
.......... 4-33 4.6.4 Using a USB floppy disk drive 4-34 Chapter 5: Multiple GPU technology support 5.1 ATI® CrossFireX™ technology 5-1 5.1.1 Requirements 5-1 5.1.2 Before you begin 5-1 5.1.3 Installing two CrossFireX™ graphics cards 5-2 5.1.4 Installing the device drivers 5-3 5.1.5 Enabling the ATI® CrossFireX™ technology 5-3 5.2 LucidLogix Virtu MVP 5-4 Installing LucidLogix Virtu MVP 5-4 Setting up your display 5-5 Configuring LucidLogix Virtu...
.......... 4-33 4.6.4 Using a USB floppy disk drive 4-34 Chapter 5: Multiple GPU technology support 5.1 ATI® CrossFireX™ technology 5-1 5.1.1 Requirements 5-1 5.1.2 Before you begin 5-1 5.1.3 Installing two CrossFireX™ graphics cards 5-2 5.1.4 Installing the device drivers 5-3 5.1.5 Enabling the ATI® CrossFireX™ technology 5-3 5.2 LucidLogix Virtu MVP 5-4 Installing LucidLogix Virtu MVP 5-4 Setting up your display 5-5 Configuring LucidLogix Virtu...
User Manual
Page 7
...Refer to install and configure multiple ATI® CrossFireX™ and NVIDIA® SLI™ graphics cards. Optional documentation Your product package may have to the ASUS contact information. 2. About this guide is organized This guide contains the following sources for additional ...user guide contains the information you have been added by your dealer. Refer to perform when installing system components. vii ASUS websites The ASUS website provides updated information on the motherboard. • Chapter 3: BIOS setup This chapter provides a detailed guide to navigating...
...Refer to install and configure multiple ATI® CrossFireX™ and NVIDIA® SLI™ graphics cards. Optional documentation Your product package may have to the ASUS contact information. 2. About this guide is organized This guide contains the following sources for additional ...user guide contains the information you have been added by your dealer. Refer to perform when installing system components. vii ASUS websites The ASUS website provides updated information on the motherboard. • Chapter 3: BIOS setup This chapter provides a detailed guide to navigating...

User Manual
Page 18
... Other special features LucidLogix® Virtu MVP™ LucidLogix® Virtu MVP featuring HyperFormance™ Technology boosts your discrete graphics card up to 10.8 Gbps of bandwidth over standard cables, providing billions of creating environment-friendly and energy-efficient products through product... design and innovation to meet certain energy efficiency requirement in line with the ASUS vision of colors and bi-directional communications, thus enabling the fastest refresh rates and the highest resolution digital display ...
... Other special features LucidLogix® Virtu MVP™ LucidLogix® Virtu MVP featuring HyperFormance™ Technology boosts your discrete graphics card up to 10.8 Gbps of bandwidth over standard cables, providing billions of creating environment-friendly and energy-efficient products through product... design and innovation to meet certain energy efficiency requirement in line with the ASUS vision of colors and bi-directional communications, thus enabling the fastest refresh rates and the highest resolution digital display ...

User Manual
Page 33
... - - Chapter 2 ASUS P8H77-M PRO 2-15 shared - - - - - - - - - - - - - - - - shared - - shared - - - - F G H - - - - - - - - - - - - - - - - - - - - - - See page 2-24 for this motherboard LAN Marvell 9172 PCIE x16_1 PCIE x16_2 PCIE x1_1 PCIE x1_2 Intel PCH SATA Controller HD Audio USB 2.0_1 USB 2.0_2 USB 3.0 A B C D E shared - - - - - - shared - - - - shared - - - • PCIe 3.0 support depends on the CPU type and requires a PCIe 3.0 VGA card. • In...
... - - Chapter 2 ASUS P8H77-M PRO 2-15 shared - - - - - - - - - - - - - - - - shared - - shared - - - - F G H - - - - - - - - - - - - - - - - - - - - - - See page 2-24 for this motherboard LAN Marvell 9172 PCIE x16_1 PCIE x16_2 PCIE x1_1 PCIE x1_2 Intel PCH SATA Controller HD Audio USB 2.0_1 USB 2.0_2 USB 3.0 A B C D E shared - - - - - - shared - - - - shared - - - • PCIe 3.0 support depends on the CPU type and requires a PCIe 3.0 VGA card. • In...

User Manual
Page 47
Chapter 2 2.3 Building your computer system 2.3.1 Additional tools and components to build a PC system 1 bag of screws Philips (cross) screwdriver PC chassis Power supply unit Intel LGA 1155 CPU Intel LGA 1155 compatible CPU Fan DIMM SATA hard disk drive SATA optical disc drive (optional) Graphics card (optional) The tools and components in the table above are not included in the motherboard package. ASUS P8H77-M PRO 2-29
Chapter 2 2.3 Building your computer system 2.3.1 Additional tools and components to build a PC system 1 bag of screws Philips (cross) screwdriver PC chassis Power supply unit Intel LGA 1155 CPU Intel LGA 1155 compatible CPU Fan DIMM SATA hard disk drive SATA optical disc drive (optional) Graphics card (optional) The tools and components in the table above are not included in the motherboard package. ASUS P8H77-M PRO 2-29
User Manual
Page 138
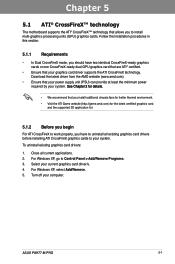
... provide at least the minimum power required by your graphics card driver supports the ATI CrossFireX technology. For Windows XP, go to install multi-graphics processing units (GPU) graphics cards. ASUS P8H77-M PRO 5-1 Turn off your current graphics card driver/s. 4. Select your computer. Close all existing graphics card drivers before installing ATI CrossFireX graphics cards to your system. For Windows XP, select Add/Remove...
... provide at least the minimum power required by your graphics card driver supports the ATI CrossFireX technology. For Windows XP, go to install multi-graphics processing units (GPU) graphics cards. ASUS P8H77-M PRO 5-1 Turn off your current graphics card driver/s. 4. Select your computer. Close all existing graphics card drivers before installing ATI CrossFireX graphics cards to your system. For Windows XP, select Add/Remove...

User Manual
Page 139
... but the installation steps remain the same. 1. Connect a VGA or a DVI cable to the two graphics cards separately. 6. Insert the two graphics card into the PCIE x16 slots. Ensure that the connector is firmly in this user manual for the locations ... two independent auxiliary power sources from the power supply to the graphics card. goldfingers 5-2 Chapter 5: Multiple GPU Technology Support Ensure that the cards are for multi-graphics card installation. 3. Chapter 5 5.1.3 Installing two CrossFireX™ graphics cards The following pictures are properly seated on each...
... but the installation steps remain the same. 1. Connect a VGA or a DVI cable to the two graphics cards separately. 6. Insert the two graphics card into the PCIE x16 slots. Ensure that the connector is firmly in this user manual for the locations ... two independent auxiliary power sources from the power supply to the graphics card. goldfingers 5-2 Chapter 5: Multiple GPU Technology Support Ensure that the cards are for multi-graphics card installation. 3. Chapter 5 5.1.3 Installing two CrossFireX™ graphics cards The following pictures are properly seated on each...

User Manual
Page 140
... the latest driver from the AMD website (www.amd.com). 5.1.5 Enabling the ATI® CrossFireX™ technology After installing your graphics card package to install the device drivers. You can also right-click the ATI icon in Windows environment. Enabling Dual CrossFireX technology 1. ... Catalyst Control Center: 1. From the Graphics Adapter list, select the graphics card to the Catalyst Control Center Advanced View window. Click Apply, and then click OK to exit the window. 2 3 4 ASUS P8H77-M PRO 5-3 Ensure that came with your graphics cards and the device drivers, enable the ...
... the latest driver from the AMD website (www.amd.com). 5.1.5 Enabling the ATI® CrossFireX™ technology After installing your graphics card package to install the device drivers. You can also right-click the ATI icon in Windows environment. Enabling Dual CrossFireX technology 1. ... Catalyst Control Center: 1. From the Graphics Adapter list, select the graphics card to the Catalyst Control Center Advanced View window. Click Apply, and then click OK to exit the window. 2 3 4 ASUS P8H77-M PRO 5-3 Ensure that came with your graphics cards and the device drivers, enable the ...
User Manual
Page 141
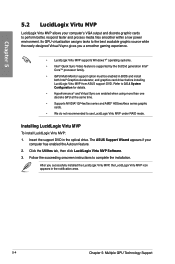
The ASUS Support Wizard appears if your computer's VGA output and discrete graphic cards to the best available graphic source while the newly-designed Virtual Vsync gives you successfully installed the LucidLogix Virtu MVP, the LucidLogix Virtu MVP... LucidLogix Virtu MVP To install LucidLogix Virtu MVP: 1. Insert the support DVD in BIOS and install both Intel® Graphics Accelerator, and graphics card driver before installing LucidLogix Virtu MVP from ASUS support DVD. After you a smoother gaming experience. • LucidLogix Virtu MVP supports Windows 7® operating systems. &#...
The ASUS Support Wizard appears if your computer's VGA output and discrete graphic cards to the best available graphic source while the newly-designed Virtual Vsync gives you successfully installed the LucidLogix Virtu MVP, the LucidLogix Virtu MVP... LucidLogix Virtu MVP To install LucidLogix Virtu MVP: 1. Insert the support DVD in BIOS and install both Intel® Graphics Accelerator, and graphics card driver before installing LucidLogix Virtu MVP from ASUS support DVD. After you a smoother gaming experience. • LucidLogix Virtu MVP supports Windows 7® operating systems. &#...
User Manual
Page 142
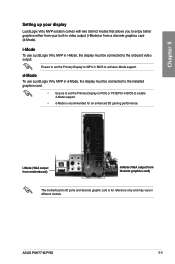
... gaming performance. d-Mode To use LucidLogix Virtu MVP in i-Mode, the display must be connected to the onboard video output. ASUS P8H77-M PRO 5-5 i-Mode (VGA output from motherboard) d-Mode (VGA output from a discrete graphics card (d-Mode). Chapter 5 Setting up your display LucidLogix Virtu MVP solution comes with two distinct modes that allows you to enjoy...
... gaming performance. d-Mode To use LucidLogix Virtu MVP in i-Mode, the display must be connected to the onboard video output. ASUS P8H77-M PRO 5-5 i-Mode (VGA output from motherboard) d-Mode (VGA output from a discrete graphics card (d-Mode). Chapter 5 Setting up your display LucidLogix Virtu MVP solution comes with two distinct modes that allows you to enjoy...


