
User Manual
Page 6
This equipment generates, uses and can be placed in our products at ASUS REACH website at http://csr.asus.com/english/REACH.htm. If this equipment. Changes or modifications to this unit not expressly approved by one or more of the following two ...shielded cables for connection of Communications Statement This digital apparatus does not exceed the Class B limits for help. Canadian Department of the monitor to the graphics card is connected. • Consult the dealer or an experienced radio/TV technician for radio noise emissions from that may cause undesired operation. This product...
This equipment generates, uses and can be placed in our products at ASUS REACH website at http://csr.asus.com/english/REACH.htm. If this equipment. Changes or modifications to this unit not expressly approved by one or more of the following two ...shielded cables for connection of Communications Statement This digital apparatus does not exceed the Class B limits for help. Canadian Department of the monitor to the graphics card is connected. • Consult the dealer or an experienced radio/TV technician for radio noise emissions from that may cause undesired operation. This product...
User Manual
Page 28
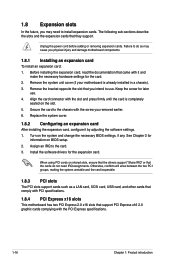
... the future, you may cause you physical injury and damage motherboard components. 1.8.1 Installing an expansion card To install an expansion card: 1. The following sub‑sections describe the slots and the expansion cards that support PCI Express x16 2.0 graphic cards complying with PCI specifications. 1.8.4 PCI Express x16 slots This motherboard has two PCI Express 2.0 x16...
... the future, you may cause you physical injury and damage motherboard components. 1.8.1 Installing an expansion card To install an expansion card: 1. The following sub‑sections describe the slots and the expansion cards that support PCI Express x16 2.0 graphic cards complying with PCI specifications. 1.8.4 PCI Express x16 slots This motherboard has two PCI Express 2.0 x16...
User Manual
Page 29
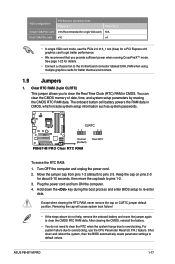
Move the jumper cap from pins 1-2 (default) to the motherboard connector labeled CHA_FAN when using multiple graphics cards for better thermal environment. 1.9 Jumpers 1. Except when clearing the RTC RAM, never remove the cap on pins 2-3 for about 5-10 seconds, then move the ...RAM Clear RTC To erase the RTC RAM: 1. ASUS P8H67-M PRO 1-17 Plug the power cord and turn ON the computer. 4. Shut down the key during the boot process and enter BIOS setup to default values. VGA configuration Single VGA/PCIe card Dual VGA/PCIe card PCI Express operating mode PCIe x16_1 x16 (Recommended for...
Move the jumper cap from pins 1-2 (default) to the motherboard connector labeled CHA_FAN when using multiple graphics cards for better thermal environment. 1.9 Jumpers 1. Except when clearing the RTC RAM, never remove the cap on pins 2-3 for about 5-10 seconds, then move the ...RAM Clear RTC To erase the RTC RAM: 1. ASUS P8H67-M PRO 1-17 Plug the power cord and turn ON the computer. 4. Shut down the key during the boot process and enter BIOS setup to default values. VGA configuration Single VGA/PCIe card Dual VGA/PCIe card PCI Express operating mode PCIe x16_1 x16 (Recommended for...
User Manual
Page 31
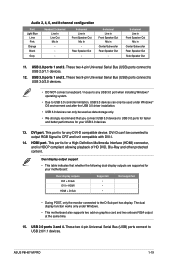
...2.0 ports 1 and 2. USB 3.0 ports 1 and 2. DVI-D can't be used under Windows. • This motherboard also supports two add-on graphics card and two onboard VGA output at the same time. 15. These two 4-pin Universal Serial Bus (USB) ports connect to USB 2.0/1.1 devices. 12....a keyboard / mouse to any DVI-D compatible device. This port is for your USB 3.0 devices. 13. USB 2.0 ports 3 and 4. HDMI port. DVI port. ASUS P8H67-M PRO 1-19 Rear Speaker Out - 6-channel Line in Front Speaker Out Mic in Center/Subwoofer Rear Speaker Out - 8-channel Line in Front Speaker Out Mic in...
...2.0 ports 1 and 2. USB 3.0 ports 1 and 2. DVI-D can't be used under Windows. • This motherboard also supports two add-on graphics card and two onboard VGA output at the same time. 15. These two 4-pin Universal Serial Bus (USB) ports connect to USB 2.0/1.1 devices. 12....a keyboard / mouse to any DVI-D compatible device. This port is for your USB 3.0 devices. 13. USB 2.0 ports 3 and 4. HDMI port. DVI port. ASUS P8H67-M PRO 1-19 Rear Speaker Out - 6-channel Line in Front Speaker Out Mic in Center/Subwoofer Rear Speaker Out - 8-channel Line in Front Speaker Out Mic in...


