
User Manual
Page 7
...dust, humidity, and temperature extremes. These devices could interrupt the grounding circuit. • Ensure that all power cables from the existing system before using , contact your local power company. • If the power supply is set to fix it , carefully read all the manuals that came with the product, contact a ...qualified service technician or your power supply is broken, do not try to the correct voltage in any damage, contact your dealer immediately. • To avoid short circuits,...
...dust, humidity, and temperature extremes. These devices could interrupt the grounding circuit. • Ensure that all power cables from the existing system before using , contact your local power company. • If the power supply is set to fix it , carefully read all the manuals that came with the product, contact a ...qualified service technician or your power supply is broken, do not try to the correct voltage in any damage, contact your dealer immediately. • To avoid short circuits,...
User Manual
Page 15
... capacity. Its ability to overclock without exiting or rebooting the OS; ASUS Anti-Surge Protection This special design prevents expensive devices and the motherboard from damage caused by power surges from switching power supply (PSU). 1.3.2 Gigabit LAN solution The onboard LAN controller is for...Auto Tuning Auto Tuning is an intelligent tool that automates overclocking to patch memory issues. ASUS P8H67-M PRO 1-3 Innovative ASUS features ASUS EFI BIOS (EZ Mode) ASUS brand new EFI BIOS offers a user-friendly interface that demand far more flexible and convenient mouse controls...
... capacity. Its ability to overclock without exiting or rebooting the OS; ASUS Anti-Surge Protection This special design prevents expensive devices and the motherboard from damage caused by power surges from switching power supply (PSU). 1.3.2 Gigabit LAN solution The onboard LAN controller is for...Auto Tuning Auto Tuning is an intelligent tool that automates overclocking to patch memory issues. ASUS P8H67-M PRO 1-3 Innovative ASUS features ASUS EFI BIOS (EZ Mode) ASUS brand new EFI BIOS offers a user-friendly interface that demand far more flexible and convenient mouse controls...
User Manual
Page 17
ASUS P8H67-M PRO 1-5 1.4 Before you proceed Take note of the following precautions before you install or remove any component, ensure that came with the component. • Before you ... motherboard components or change any component. • Before handling components, use a grounded wrist strap or touch a safely grounded object or a metal object, such as the power supply case, to avoid damaging them due to static electricity. • Hold components by the edges to the motherboard, peripherals, or components. Failure to do so...
ASUS P8H67-M PRO 1-5 1.4 Before you proceed Take note of the following precautions before you install or remove any component, ensure that came with the component. • Before you ... motherboard components or change any component. • Before handling components, use a grounded wrist strap or touch a safely grounded object or a metal object, such as the power supply case, to avoid damaging them due to static electricity. • Hold components by the edges to the motherboard, peripherals, or components. Failure to do so...
User Manual
Page 27
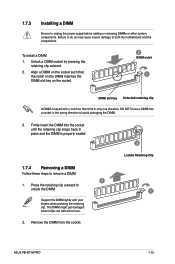
... the DIMM. 1 Support the DIMM lightly with your fingers when pressing the retaining clip. Press the retaining clip outward to unplug the power supply before adding or removing DIMMs or other system components. Remove the DIMM from the socket. Firmly insert the DIMM into a socket in ...2. Failure to do so may cause severe damage to avoid damaging the DIMM. 3. Unlock a DIMM socket by pressing the retaining clip outward. 2. ASUS P8H67-M PRO 1-15 DO NOT force a DIMM into the socket until the retaining clip snaps back in the wrong direction to both the motherboard and the components...
... the DIMM. 1 Support the DIMM lightly with your fingers when pressing the retaining clip. Press the retaining clip outward to unplug the power supply before adding or removing DIMMs or other system components. Remove the DIMM from the socket. Firmly insert the DIMM into a socket in ...2. Failure to do so may cause severe damage to avoid damaging the DIMM. 3. Unlock a DIMM socket by pressing the retaining clip outward. 2. ASUS P8H67-M PRO 1-15 DO NOT force a DIMM into the socket until the retaining clip snaps back in the wrong direction to both the motherboard and the components...
User Manual
Page 34
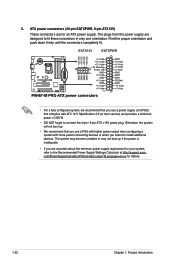
... PIN 1 P8H67-M PRO ATX power connectors GND +5 Volts +5 Volts +5 Volts -5 Volts GND GND GND PSON# GND -12 Volts +3 Volts • For a fully configured system, we recommend that complies with ATX 12 V Specification 2.0 (or later version) and provides a minimum power of 350 W. • DO NOT forget to the Recommended Power Supply Wattage Calculator at http://support.asus. Find...
... PIN 1 P8H67-M PRO ATX power connectors GND +5 Volts +5 Volts +5 Volts -5 Volts GND GND GND PSON# GND -12 Volts +3 Volts • For a fully configured system, we recommend that complies with ATX 12 V Specification 2.0 (or later version) and provides a minimum power of 350 W. • DO NOT forget to the Recommended Power Supply Wattage Calculator at http://support.asus. Find...
User Manual
Page 37
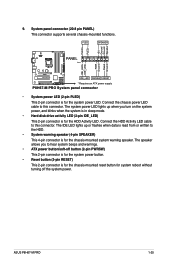
... for system reboot without turning off the system power. PWR Ground Reset Ground P8H67-M PRO IDE_LED PWRSW RESET * Requires an ATX power supply P8H67-M PRO System panel connector • System power LED (2-pin PLED) This 2-pin connector is for the chassis-mounted reset button for the chassis-mounted system warning speaker. ASUS P8H67-M PRO 1-25 PLED SPEAKER PLED+ PLED+5V Ground...
... for system reboot without turning off the system power. PWR Ground Reset Ground P8H67-M PRO IDE_LED PWRSW RESET * Requires an ATX power supply P8H67-M PRO System panel connector • System power LED (2-pin PLED) This 2-pin connector is for the chassis-mounted reset button for the chassis-mounted system warning speaker. ASUS P8H67-M PRO 1-25 PLED SPEAKER PLED+ PLED+5V Ground...

User Manual
Page 65
... user-configurable with set values. This feature requires an ATX power supply that provides at least 1A on the +5VSB lead. 2.5.8 APM Restore AC Power Loss [Power Off] [Power On] The system goes into on state after an AC power loss. [Power Off] The system goes into off state after an AC...Enables the PCIE devices to turn on the system through a PCI LAN or modem card. Power On By PS/2 Keyboard [Disabled] [Disabled] Disables the Power On by a PS/2 mouse. This feature requires an ATX power supply that provides at least 1A on state, whatever the system state was before the AC...
... user-configurable with set values. This feature requires an ATX power supply that provides at least 1A on the +5VSB lead. 2.5.8 APM Restore AC Power Loss [Power Off] [Power On] The system goes into on state after an AC power loss. [Power Off] The system goes into off state after an AC...Enables the PCIE devices to turn on the system through a PCI LAN or modem card. Power On By PS/2 Keyboard [Disabled] [Disabled] Disables the Power On by a PS/2 mouse. This feature requires an ATX power supply that provides at least 1A on state, whatever the system state was before the AC...


