
User Manual
Page 4
... Onboard LEDs 1-28 1.13 Software support 1-29 1.13.1 Installing an operating system 1-29 1.13.2 Support DVD information 1-29 Chapter 2: BIOS information 2.1 Managing and updating your BIOS 2-1 2.1.1 ASUS Update utility 2-1 2.1.2 ASUS EZ Flash 2 2-2 2.1.3 ASUS CrashFree BIOS 3 utility 2-3 2.1.4 ASUS BIOS Updater 2-4 2.2 BIOS setup program 2-7 2.3 Main menu 2-11 2.3.1 System Language 2-11 2.3.2 System Date 2-11 2.3.3 System Time 2-11 2.3.4 Security 2-11 2.4 Ai Tweaker menu...
... Onboard LEDs 1-28 1.13 Software support 1-29 1.13.1 Installing an operating system 1-29 1.13.2 Support DVD information 1-29 Chapter 2: BIOS information 2.1 Managing and updating your BIOS 2-1 2.1.1 ASUS Update utility 2-1 2.1.2 ASUS EZ Flash 2 2-2 2.1.3 ASUS CrashFree BIOS 3 utility 2-3 2.1.4 ASUS BIOS Updater 2-4 2.2 BIOS setup program 2-7 2.3 Main menu 2-11 2.3.1 System Language 2-11 2.3.2 System Date 2-11 2.3.3 System Time 2-11 2.3.4 Security 2-11 2.4 Ai Tweaker menu...
User Manual
Page 7
...the power supply is organized This guide contains the following parts: • Chapter 1: Product introduction This chapter describes the features of the BIOS parameters are not sure about the voltage of the electrical outlet you need when installing and configuring the motherboard. About this guide is ...broken, do not try to change system settings through the BIOS Setup menus. Detailed descriptions of the motherboard and the new technology it , carefully read all cables are correctly connected and the ...
...the power supply is organized This guide contains the following parts: • Chapter 1: Product introduction This chapter describes the features of the BIOS parameters are not sure about the voltage of the electrical outlet you need when installing and configuring the motherboard. About this guide is ...broken, do not try to change system settings through the BIOS Setup menus. Detailed descriptions of the motherboard and the new technology it , carefully read all cables are correctly connected and the ...

User Manual
Page 10
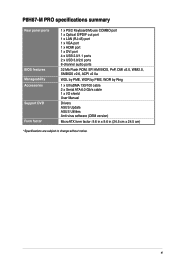
ASUS Protect 3.0 technology - P8H67-M PRO specifications summary Audio USB ASUS Special features Internal connectors ALC892 8-channel High Definition Audio CODEC supports - Jack-detection, Multi-streaming, and Anti-POP technologies - Optical S/PDIF out ports at the back panel) 100% All High-quality Conductive Polymer Capacitors ASUS Exclusive Overclocking Features: - Turbo V - Auto Tuning* (Adopt Fast Mode) ASUS Hybrid Switches...
ASUS Protect 3.0 technology - P8H67-M PRO specifications summary Audio USB ASUS Special features Internal connectors ALC892 8-channel High Definition Audio CODEC supports - Jack-detection, Multi-streaming, and Anti-POP technologies - Optical S/PDIF out ports at the back panel) 100% All High-quality Conductive Polymer Capacitors ASUS Exclusive Overclocking Features: - Turbo V - Auto Tuning* (Adopt Fast Mode) ASUS Hybrid Switches...
User Manual
Page 11
...P8H67-M PRO specifications summary Rear panel ports BIOS features Manageability Accessories Support DVD Form factor 1 x PS/2 Keyboard/Mouse COMBO port 1 x Optical S/PDIF out port 1 x LAN (RJ-45) port 1 x VGA port 1 x HDMI port 1 x DVI port 4 x USB 2.0/1.1 ports 2 x USB 3.0/2.0 ports 8-channel audio ports 32 Mb Flash ROM, EFI AMI BIOS..., PnP, DMI v2.0, WfM2.0, SMBIOS v2.6, ACPI v2 0a WOL by PME, WOR by PME, WOR by Ring 1 x UltraDMA 133/100 cable 2 x Serial ATA 6.0 Gb/s cable 1 x I/O shield User Manual Drivers ASUS Update ASUS Utilities Anti-virus software (OEM ...
...P8H67-M PRO specifications summary Rear panel ports BIOS features Manageability Accessories Support DVD Form factor 1 x PS/2 Keyboard/Mouse COMBO port 1 x Optical S/PDIF out port 1 x LAN (RJ-45) port 1 x VGA port 1 x HDMI port 1 x DVI port 4 x USB 2.0/1.1 ports 2 x USB 3.0/2.0 ports 8-channel audio ports 32 Mb Flash ROM, EFI AMI BIOS..., PnP, DMI v2.0, WfM2.0, SMBIOS v2.6, ACPI v2 0a WOL by PME, WOR by PME, WOR by Ring 1 x UltraDMA 133/100 cable 2 x Serial ATA 6.0 Gb/s cable 1 x I/O shield User Manual Drivers ASUS Update ASUS Utilities Anti-virus software (OEM ...
User Manual
Page 15
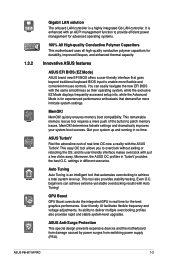
... for experienced performance enthusiasts that goes beyond traditional keyboard BIOS input to enable more intricate system settings. It is for durability, improved lifespan, and enhanced thermal capacity. MemOK! ASUS P8H67-M PRO 1-3 Auto Tuning Auto Tuning is a highly integrated ...Gb LAN controller. MemOK! User-friendly UI facilitates flexible frequency and voltage adjustments. Innovative ASUS features ASUS EFI BIOS (EZ Mode) ASUS brand new EFI BIOS offers a user-friendly interface...
... for experienced performance enthusiasts that goes beyond traditional keyboard BIOS input to enable more intricate system settings. It is for durability, improved lifespan, and enhanced thermal capacity. MemOK! ASUS P8H67-M PRO 1-3 Auto Tuning Auto Tuning is a highly integrated ...Gb LAN controller. MemOK! User-friendly UI facilitates flexible frequency and voltage adjustments. Innovative ASUS features ASUS EFI BIOS (EZ Mode) ASUS brand new EFI BIOS offers a user-friendly interface...
User Manual
Page 16
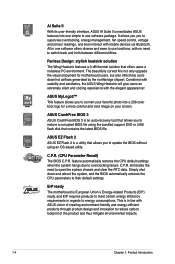
...cools down and reboot the system, and the BIOS automatically restores the CPU parameters to overclocking failure. ASUS EZ Flash 2 ASUS EZ Flash 2 is an auto-recovery tool that allows you to restore a corrupted BIOS file using the bundled support DVD or USB flash...the system hangs due to their default settings. Simply shut down hot airflows generated by the northbridge chipset. ASUS CrashFree BIOS 3 ASUS CrashFree BIOS 3 is a utility that contains the latest BIOS file. C.P.R. Fanless Design: stylish heatsink solution The Wing Heatsink features a 0-dB thermal solution that offers ...
...cools down and reboot the system, and the BIOS automatically restores the CPU parameters to overclocking failure. ASUS EZ Flash 2 ASUS EZ Flash 2 is an auto-recovery tool that allows you to restore a corrupted BIOS file using the bundled support DVD or USB flash...the system hangs due to their default settings. Simply shut down hot airflows generated by the northbridge chipset. ASUS CrashFree BIOS 3 ASUS CrashFree BIOS 3 is a utility that contains the latest BIOS file. C.P.R. Fanless Design: stylish heatsink solution The Wing Heatsink features a 0-dB thermal solution that offers ...
User Manual
Page 28
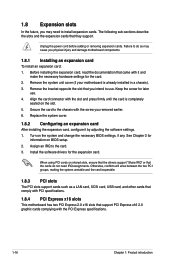
...the expansion cards that the cards do so may need IRQ assignments. Assign an IRQ to install expansion cards. When using PCI cards on BIOS setup. 2. Unplug the power cord before adding or removing expansion cards. Remove the system unit cover (if your motherboard is completely seated... on the system and change the necessary BIOS settings, if any. Otherwise, conflicts will arise between the two PCI groups, making the system unstable and the card inoperable. 1.8.3 PCI slots...
...the expansion cards that the cards do so may need IRQ assignments. Assign an IRQ to install expansion cards. When using PCI cards on BIOS setup. 2. Unplug the power cord before adding or removing expansion cards. Remove the system unit cover (if your motherboard is completely seated... on the system and change the necessary BIOS settings, if any. Otherwise, conflicts will arise between the two PCI groups, making the system unstable and the card inoperable. 1.8.3 PCI slots...
User Manual
Page 29
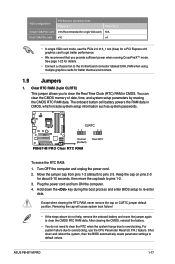
...) This jumper allows you provide sufficient power when running CrossFireX™ mode. Shut down the key during the boot process and enter BIOS setup to overclocking. Move the jumper cap from pins 1-2 (default) to the motherboard connector labeled CHA_FAN when using multiple graphics cards ... data in CMOS. Turn OFF the computer and unplug the power cord. 2. CLRTC 12 23 P8H67-M PRO Normal (Default) P8H67-M PRO Clear RTC RAM Clear RTC To erase the RTC RAM: 1. ASUS P8H67-M PRO 1-17 You can clear the CMOS memory of date, time, and system setup parameters by erasing...
...) This jumper allows you provide sufficient power when running CrossFireX™ mode. Shut down the key during the boot process and enter BIOS setup to overclocking. Move the jumper cap from pins 1-2 (default) to the motherboard connector labeled CHA_FAN when using multiple graphics cards ... data in CMOS. Turn OFF the computer and unplug the power cord. 2. CLRTC 12 23 P8H67-M PRO Normal (Default) P8H67-M PRO Clear RTC RAM Clear RTC To erase the RTC RAM: 1. ASUS P8H67-M PRO 1-17 You can clear the CMOS memory of date, time, and system setup parameters by erasing...
User Manual
Page 32
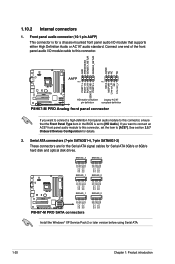
... out_R NC Line out_L PORT1 L PORT1 R PORT2 R SENSE_SEND PORT2 L P8H67-M PRO HD-audio-compliant Legacy AC'97 pin definition compliant definition P8H67-M PRO Analog front panel connector If you want to connect a high-definition front ...BIOS is for a chassis-mounted front panel audio I /O module cable to [AC97]. SATA3G_3 SATA3G_4 GND RSATA_TXP3 RSATA_TXN3 GND RSATA_RXP3 RSATA_RXN3 GND GND RSATA_TXP4 RSATA_TXN4 GND RSATA_RXP4 RSATA_RXN4 GND SATA3G_1 SATA3G_2 GND RSATA_TXP1 RSATA_TXN1 GND RSATA_RXP1 RSATA_RXN1 GND GND RSATA_TXP2 RSATA_TXN2 GND RSATA_RXP2 RSATA_RXN2 GND P8H67-M PRO...
... out_R NC Line out_L PORT1 L PORT1 R PORT2 R SENSE_SEND PORT2 L P8H67-M PRO HD-audio-compliant Legacy AC'97 pin definition compliant definition P8H67-M PRO Analog front panel connector If you want to connect a high-definition front ...BIOS is for a chassis-mounted front panel audio I /O module cable to [AC97]. SATA3G_3 SATA3G_4 GND RSATA_TXP3 RSATA_TXN3 GND RSATA_RXP3 RSATA_RXN3 GND GND RSATA_TXP4 RSATA_TXN4 GND RSATA_RXP4 RSATA_RXN4 GND SATA3G_1 SATA3G_2 GND RSATA_TXP1 RSATA_TXN1 GND RSATA_RXP1 RSATA_RXN1 GND GND RSATA_TXP2 RSATA_TXN2 GND RSATA_RXP2 RSATA_RXN2 GND P8H67-M PRO...
User Manual
Page 39
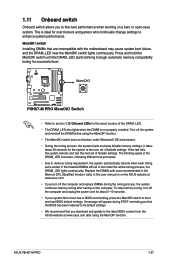
...switch allows you to fine-tune performance when working on the computer. switch until the DRAM_LED starts blinking to boot and load BIOS default settings. P8H67-M PRO P8H67-M PRO MemOK! If the test fails, the system reboots and test the next set of the DRAM_LED increases, indicating different test processes... replace DIMMs during the tuning process, the system continues memory tuning after turning on a bare or open-case system. ASUS P8H67-M PRO 1-27 switch Installing DIMMs that you turn off the system and reinstall the DIMM before using the MemOK! function. • The MemOK!...
...switch allows you to fine-tune performance when working on the computer. switch until the DRAM_LED starts blinking to boot and load BIOS default settings. P8H67-M PRO P8H67-M PRO MemOK! If the test fails, the system reboots and test the next set of the DRAM_LED increases, indicating different test processes... replace DIMMs during the tuning process, the system continues memory tuning after turning on a bare or open-case system. ASUS P8H67-M PRO 1-27 switch Installing DIMMs that you turn off the system and reinstall the DIMM before using the MemOK! function. • The MemOK!...
User Manual
Page 43
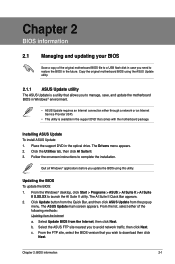
...before you update the BIOS using the ASUS Update utility. 2.1.1 ASUS Update utility The ASUS Update is a utility that allows you to manage, save, and update the motherboard BIOS in Windows® environment. • ASUS Update requires an Internet connection either of the original motherboard BIOS file to a USB... flash disk in case you need to restore the BIOS in the future. From the Windows® desktop...
...before you update the BIOS using the ASUS Update utility. 2.1.1 ASUS Update utility The ASUS Update is a utility that allows you to manage, save, and update the motherboard BIOS in Windows® environment. • ASUS Update requires an Internet connection either of the original motherboard BIOS file to a USB... flash disk in case you need to restore the BIOS in the future. From the Windows® desktop...
User Manual
Page 44
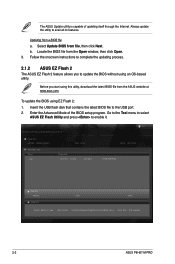
... USB port. 2. Insert the USB flash disk that contains the latest BIOS file to update the BIOS without using an OS‑based utility. ASUSTek EZ Flash 2 BIOS ROM Utility V00.75 Flash Info MODEL: P8H67-M PRO File Path: fs0:\ Drive fs0:\ VER: 0224 Folder Info 10/11...Move [Esc] Exit [F2] Backup 2-2 ASUS P8H67-M PRO Follow the onscreen instructions to complete the updating process. 2.1.2 ASUS EZ Flash 2 The ASUS EZ Flash 2 feature allows you start using EZ Flash 2: 1. Always update the utility to enable it. Locate the BIOS file from a BIOS file a. Go to the Tool menu to...
... USB port. 2. Insert the USB flash disk that contains the latest BIOS file to update the BIOS without using an OS‑based utility. ASUSTek EZ Flash 2 BIOS ROM Utility V00.75 Flash Info MODEL: P8H67-M PRO File Path: fs0:\ Drive fs0:\ VER: 0224 Folder Info 10/11...Move [Esc] Exit [F2] Backup 2-2 ASUS P8H67-M PRO Follow the onscreen instructions to complete the updating process. 2.1.2 ASUS EZ Flash 2 The ASUS EZ Flash 2 feature allows you start using EZ Flash 2: 1. Always update the utility to enable it. Locate the BIOS file from a BIOS file a. Go to the Tool menu to...
User Manual
Page 45
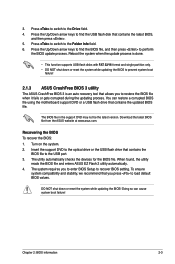
... process. To ensure system compatibility and stability, we recommend that contains the BIOS file to prevent system boot failure! 2.1.3 ASUS CrashFree BIOS 3 utility The ASUS CrashFree BIOS 3 is an auto recovery tool that contains the latest BIOS, and then press . 5. Doing so can restore a corrupted BIOS file using the motherboard support DVD or a USB flash drive that...
... process. To ensure system compatibility and stability, we recommend that contains the BIOS file to prevent system boot failure! 2.1.3 ASUS CrashFree BIOS 3 utility The ASUS CrashFree BIOS 3 is an auto recovery tool that contains the latest BIOS, and then press . 5. Doing so can restore a corrupted BIOS file using the motherboard support DVD or a USB flash drive that...
User Manual
Page 46
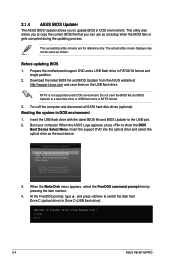
...the item number. 4. Turn off the computer and disconnect all SATA hard disk drives (optional). Welcome to show the BIOS Boot Device Select Menu. When the ASUS Logo appears, press to FreeDOS (http://www.freedos.org)! The succeeding utility screens are for reference only. NTFS is ...not supported under DOS environment. Boot your computer. Insert the USB flash drive with the latest BIOS file and BIOS Updater to update BIOS in NTFS format. 3. 2.1.4 ASUS BIOS Updater The ASUS BIOS Updater allows you to the USB port. 2. C:\>d: D:\> 2-4 ASUS P8H67-M PRO
...the item number. 4. Turn off the computer and disconnect all SATA hard disk drives (optional). Welcome to show the BIOS Boot Device Select Menu. When the ASUS Logo appears, press to FreeDOS (http://www.freedos.org)! The succeeding utility screens are for reference only. NTFS is ...not supported under DOS environment. Boot your computer. Insert the USB flash drive with the latest BIOS file and BIOS Updater to update BIOS in NTFS format. 3. 2.1.4 ASUS BIOS Updater The ASUS BIOS Updater allows you to the USB port. 2. C:\>d: D:\> 2-4 ASUS P8H67-M PRO
User Manual
Page 47
... with no more than eight alphanumeric characters for the filename and three alphanumeric characters for DOS V1.07 Current ROM BOARD: P8H67-M PRO VER: 0217 DATE: 09/25/2010 Update ROM BOARD: Unknown VER: Unknown DATE: Unknown PATH: A:\ BIOS backup is not write-protected and has at least 4096KB free space to continue.
... with no more than eight alphanumeric characters for the filename and three alphanumeric characters for DOS V1.07 Current ROM BOARD: P8H67-M PRO VER: 0217 DATE: 09/25/2010 Update ROM BOARD: Unknown VER: Unknown DATE: Unknown PATH: A:\ BIOS backup is not write-protected and has at least 4096KB free space to continue.
User Manual
Page 48
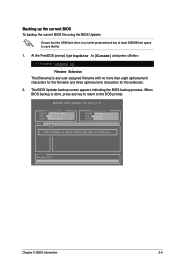
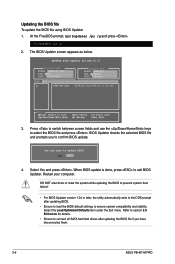
... and prompts you to update BIOS? Are you have disconnected them. 2-6 ASUS P8H67-M PRO At the FreeDOS prompt, type bupdater /pc /g and press . Restart your computer. Refer to section 2.9 Exit menu for DOS V1.07 Current ROM BOARD: P8H67-M PRO VER: 0217 DATE: 09/25/2010 Update ROM BOARD: Unknown VER: Unknown DATE: Unknown PATH: A:\ A: P8H67MP...
... and prompts you to update BIOS? Are you have disconnected them. 2-6 ASUS P8H67-M PRO At the FreeDOS prompt, type bupdater /pc /g and press . Restart your computer. Refer to section 2.9 Exit menu for DOS V1.07 Current ROM BOARD: P8H67-M PRO VER: 0217 DATE: 09/25/2010 Update ROM BOARD: Unknown VER: Unknown DATE: Unknown PATH: A:\ A: P8H67MP...
User Manual
Page 49
...the system chassis. • Press the power button to turn the system off then back on how to erase the RTC RAM. • The BIOS setup program does not support the bluetooth devices. Using the power button, reset button, or the ++ keys to force reset from the operating system.... • The BIOS setup screens shown in using the first two options. Do this motherboard apply for most conditions to ensure optimum performance. Select the Load Optimized Defaults...
...the system chassis. • Press the power button to turn the system off then back on how to erase the RTC RAM. • The BIOS setup program does not support the bluetooth devices. Using the power button, reset button, or the ++ keys to force reset from the operating system.... • The BIOS setup screens shown in using the first two options. Do this motherboard apply for most conditions to ensure optimum performance. Select the Load Optimized Defaults...
User Manual
Page 50
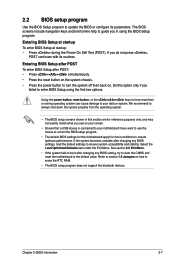
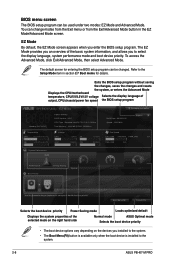
... priority Power Saving mode Loads optimized default Displays the system properties of output, CPU/chassis/power fan speed the BIOS setup program EFI BIOS Utility - EZ Mode Monday [9/27/2010] P8H67-M PRO BIOS Version : 0217 CPU Type : Genuine Intel(R) CPU 0 @ 3.10GHz Total Memory : 1024 MB (DDR3 1333MHz... Quiet Performance Boot Priority Energy Saving Normal Use the mouse to drag or keyboard to navigate to the system. 2-8 ASUS P8H67-M PRO BIOS menu screen The BIOS setup program can be used under two modes: EZ Mode and Advanced Mode. You can change modes from the Exit...
... priority Power Saving mode Loads optimized default Displays the system properties of output, CPU/chassis/power fan speed the BIOS setup program EFI BIOS Utility - EZ Mode Monday [9/27/2010] P8H67-M PRO BIOS Version : 0217 CPU Type : Genuine Intel(R) CPU 0 @ 3.10GHz Total Memory : 1024 MB (DDR3 1333MHz... Quiet Performance Boot Priority Energy Saving Normal Use the mouse to drag or keyboard to navigate to the system. 2-8 ASUS P8H67-M PRO BIOS menu screen The BIOS setup program can be used under two modes: EZ Mode and Advanced Mode. You can change modes from the Exit...
User Manual
Page 51
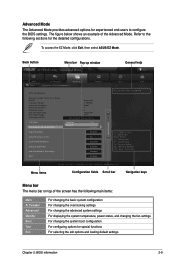
... special functions For selecting the exit options and loading default settings Chapter 2: BIOS information 2-9 Back button Menu bar Pop-up window EFI BIOS Utility - To access the EZ Mode, click Exit, then select ASUS EZ Mode. Refer to configure the BIOS settings. Advanced Mode General help Exit Main Back Ai Tweaker Advanced Advanced\ CPU...
... special functions For selecting the exit options and loading default settings Chapter 2: BIOS information 2-9 Back button Menu bar Pop-up window EFI BIOS Utility - To access the EZ Mode, click Exit, then select ASUS EZ Mode. Refer to configure the BIOS settings. Advanced Mode General help Exit Main Back Ai Tweaker Advanced Advanced\ CPU...
User Manual
Page 52
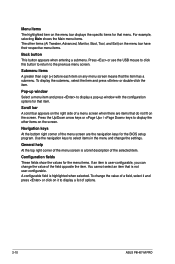
Scroll bar A scroll bar appears on the right side of options. 2-10 ASUS P8H67-M PRO Use the navigation keys to select items in the menu and change the value of the selected item. Press the Up/Down arrow keys or / ... right corner of the menu screen is not user-configurable. Menu items The highlighted item on the menu bar displays the specific items for the BIOS setup program. General help At the top right corner of the menu screen are items that do not fit on the screen. A configurable field is...
Scroll bar A scroll bar appears on the right side of options. 2-10 ASUS P8H67-M PRO Use the navigation keys to select items in the menu and change the value of the selected item. Press the Up/Down arrow keys or / ... right corner of the menu screen is not user-configurable. Menu items The highlighted item on the menu bar displays the specific items for the BIOS setup program. General help At the top right corner of the menu screen are items that do not fit on the screen. A configurable field is...


