User Manual
Page 11
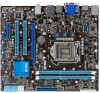
... any motherboard settings. • Unplug the power cord from the power supply. Failure to do so may cause severe damage to page x for buying an ASUS® P8H67-M LE Series motherboard! Refer to the motherboard, peripherals, or components. Chapter 1 Product introduction Thank you install motherboard components or change any of the items is... it on a grounded antistatic pad or in your retailer. 1.1 Before you proceed Take note of the following precautions before you for the list of accessories. ASUS P8H67-M LE Series 1-1
... any motherboard settings. • Unplug the power cord from the power supply. Failure to do so may cause severe damage to page x for buying an ASUS® P8H67-M LE Series motherboard! Refer to the motherboard, peripherals, or components. Chapter 1 Product introduction Thank you install motherboard components or change any of the items is... it on a grounded antistatic pad or in your retailer. 1.1 Before you proceed Take note of the following precautions before you for the list of accessories. ASUS P8H67-M LE Series 1-1
User Manual
Page 13
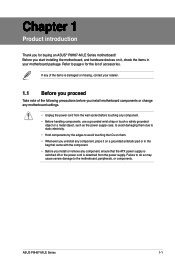
... Central Processing Unit (CPU) This motherboard comes with two Double Data Rate 3 (DDR3) Dual Inline Memory Modules (DIMM) sockets. ASUS will process Return Merchandise Authorization (RMA) requests only if the motherboard comes with the cap on the socket and the socket contacts are... CPU installation/removal, or misplacement/loss/incorrect removal of the DDR3 DIMM sockets: DIMM_A1 DIMM_B1 P8H67-M LX Channel Channel A Channel B Sockets DIMM_A1 DIMM_B1 P8H67-M LX 240-pin DDR3 DIMM sockets ASUS P8H67-M LE Series 1-3 A DDR3 module has the same physical dimensions as a DDR2 DIMM but is ...
... Central Processing Unit (CPU) This motherboard comes with two Double Data Rate 3 (DDR3) Dual Inline Memory Modules (DIMM) sockets. ASUS will process Return Merchandise Authorization (RMA) requests only if the motherboard comes with the cap on the socket and the socket contacts are... CPU installation/removal, or misplacement/loss/incorrect removal of the DDR3 DIMM sockets: DIMM_A1 DIMM_B1 P8H67-M LX Channel Channel A Channel B Sockets DIMM_A1 DIMM_B1 P8H67-M LX 240-pin DDR3 DIMM sockets ASUS P8H67-M LE Series 1-3 A DDR3 module has the same physical dimensions as a DDR2 DIMM but is ...
User Manual
Page 15
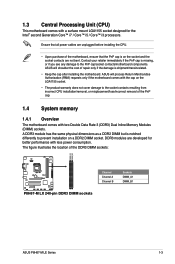
...;• - - •• 9 - •• - - •• 7-7-7-20 - •• - - •• - - •• - - •• - - •• - - 9 - - - - - Size SS/ Chip DS Brand Chip No. ASUS P8H67-M LE Series 1-5 GEIL - Hynix HYNIX Hynix HMT112U6TFR8A-H9 HMT325U6BFR8C-H9 HMT125U6TFR8A-H9 1GB SS HYNIX H5TC1G83TFRH9A 2GB SS HYNIX H5TQ2G83BFRH9C 2GB DS HYNIX H5TC1G83TFRH9A HYNIX HMT351U6BFR8C...
...;• - - •• 9 - •• - - •• 7-7-7-20 - •• - - •• - - •• - - •• - - •• - - 9 - - - - - Size SS/ Chip DS Brand Chip No. ASUS P8H67-M LE Series 1-5 GEIL - Hynix HYNIX Hynix HMT112U6TFR8A-H9 HMT325U6BFR8C-H9 HMT125U6TFR8A-H9 1GB SS HYNIX H5TC1G83TFRH9A 2GB SS HYNIX H5TQ2G83BFRH9C 2GB DS HYNIX H5TC1G83TFRH9A HYNIX HMT351U6BFR8C...

User Manual
Page 17
... you removed earlier. 6. Remove the system unit cover (if your motherboard is completely seated on the system and change the necessary BIOS settings, if any. ASUS P8H67-M LE Series 1-7 1.5 Expansion slots In the future, you may cause you physical injury and damage motherboard components. 1.5.1 Installing an expansion card To install an expansion card...
... you removed earlier. 6. Remove the system unit cover (if your motherboard is completely seated on the system and change the necessary BIOS settings, if any. ASUS P8H67-M LE Series 1-7 1.5 Expansion slots In the future, you may cause you physical injury and damage motherboard components. 1.5.1 Installing an expansion card To install an expansion card...
User Manual
Page 19
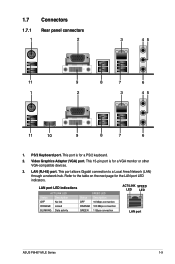
... BLINKING Data activity SPEED LED Status Description OFF 10 Mbps connection ORANGE 100 Mbps connection GREEN 1 Gbps connection ACT/LINK SPEED LED LED LAN port ASUS P8H67-M LE Series 1-9 LAN (RJ-45) port. 1.7 1.7.1 1 Connectors Rear panel connectors 2 3 45 11 9 8 7 6 1 2 3 45 11 10 9 8 7 6 1. Video Graphics Adapter (VGA) port. PS/2 Keyboard port. This port is...
... BLINKING Data activity SPEED LED Status Description OFF 10 Mbps connection ORANGE 100 Mbps connection GREEN 1 Gbps connection ACT/LINK SPEED LED LED LAN port ASUS P8H67-M LE Series 1-9 LAN (RJ-45) port. 1.7 1.7.1 1 Connectors Rear panel connectors 2 3 45 11 9 8 7 6 1 2 3 45 11 10 9 8 7 6 1. Video Graphics Adapter (VGA) port. PS/2 Keyboard port. This port is...
User Manual
Page 21
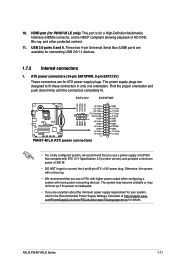
...Definition Multimedia Interface (HDMI) connector, and is for ATX power supply plugs. EATX12V EATXPWR +12V DC +12V DC +12V DC +12V DC P8H67-M LX GND GND GND GND +3 Volts +12 Volts +12 Volts +5V Standby Power OK PIN 1 GND +5 Volts GND +5 Volts GND +3 ...not boot up . • We recommend that complies with more power-consuming devices. ASUS P8H67-M LE Series 1-11 10. HDMI port (for details. com/PowerSupplyCalculator/PSCalculator.aspx?SLanguage=en-us for P8H67-M LE only). Find the proper orientation and push down firmly until the connectors completely fit. This...
...Definition Multimedia Interface (HDMI) connector, and is for ATX power supply plugs. EATX12V EATXPWR +12V DC +12V DC +12V DC +12V DC P8H67-M LX GND GND GND GND +3 Volts +12 Volts +12 Volts +5V Standby Power OK PIN 1 GND +5 Volts GND +5 Volts GND +3 ...not boot up . • We recommend that complies with more power-consuming devices. ASUS P8H67-M LE Series 1-11 10. HDMI port (for details. com/PowerSupplyCalculator/PSCalculator.aspx?SLanguage=en-us for P8H67-M LE only). Find the proper orientation and push down firmly until the connectors completely fit. This...
User Manual
Page 23
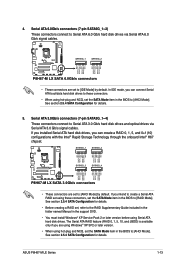
... drives. The Serial ATA RAID feature (RAID 0, 1, 5, 10, and JBOD) is available only if you intend to [AHCI Mode]. ASUS P8H67-M LE Series 1-13 If you installed Serial ATA hard disk drives, you can create a RAID 0, 1, 5, and 0+1(10) configurations with the ...RSATA_TXP1 RSATA_TXN1 GND RSATA_RXP1 RSATA_RXN1 GND GND RSATA_TXP2 RSATA_TXN2 GND RSATA_RXP2 RSATA_RXN2 GND P8H67-M LX SATA3G_3 SATA3G_4 GND RSATA_TXP3 RSATA_TXN3 GND RSATA_RXP3 RSATA_RXN3 GND GND RSATA_TXP4 RSATA_TXN4 GND RSATA_RXP4 RSATA_RXN4 GND P8H67-M LX SATA 3.0Gb/s connectors • These connectors are set to...
... drives. The Serial ATA RAID feature (RAID 0, 1, 5, 10, and JBOD) is available only if you intend to [AHCI Mode]. ASUS P8H67-M LE Series 1-13 If you installed Serial ATA hard disk drives, you can create a RAID 0, 1, 5, and 0+1(10) configurations with the ...RSATA_TXP1 RSATA_TXN1 GND RSATA_RXP1 RSATA_RXN1 GND GND RSATA_TXP2 RSATA_TXN2 GND RSATA_RXP2 RSATA_RXN2 GND P8H67-M LX SATA3G_3 SATA3G_4 GND RSATA_TXP3 RSATA_TXN3 GND RSATA_RXP3 RSATA_RXN3 GND GND RSATA_TXP4 RSATA_TXN4 GND RSATA_RXP4 RSATA_RXN4 GND P8H67-M LX SATA 3.0Gb/s connectors • These connectors are set to...
User Manual
Page 25
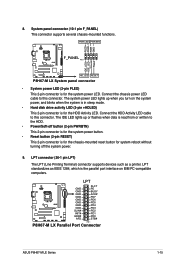
... SLIN# INIT# ERR# AFD SLCT PE BUSY ACK# PD7 PD6 PD5 PD4 PD3 PD2 PD1 PD0 STB# PIN 1 P8H67-M LX Parallel Port Connector ASUS P8H67-M LE Series 1-15 Ground Reset P8H67-M LX F_PANEL PIN 1 HD_LED RESET P8H67-M LX System panel connector • System power LED (2-pin PLED) This 2-pin connector is the parallel port interface on...
... SLIN# INIT# ERR# AFD SLCT PE BUSY ACK# PD7 PD6 PD5 PD4 PD3 PD2 PD1 PD0 STB# PIN 1 P8H67-M LX Parallel Port Connector ASUS P8H67-M LE Series 1-15 Ground Reset P8H67-M LX F_PANEL PIN 1 HD_LED RESET P8H67-M LX System panel connector • System power LED (2-pin PLED) This 2-pin connector is the parallel port interface on...
User Manual
Page 27
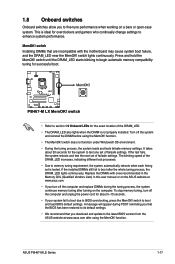
...performance when working on the computer. switch Installing DIMMs that the BIOS has been restored to the latest BIOS version from the ASUS website at www.asus.com. • If you download and update to its default settings. • We recommend that you turn off the system... ones recommended in the Memory QVL (Qualified Vendors Lists) in this user manual or on the ASUS website at www.asus.com after the whole tuning process, the DRAM_LED lights continuously. ASUS P8H67-M LE Series 1-17 switch • Refer to memory tuning requirement, the system automatically reboots when each ...
...performance when working on the computer. switch Installing DIMMs that the BIOS has been restored to the latest BIOS version from the ASUS website at www.asus.com. • If you download and update to its default settings. • We recommend that you turn off the system... ones recommended in the Memory QVL (Qualified Vendors Lists) in this user manual or on the ASUS website at www.asus.com after the whole tuning process, the DRAM_LED lights continuously. ASUS P8H67-M LE Series 1-17 switch • Refer to memory tuning requirement, the system automatically reboots when each ...
User Manual
Page 29
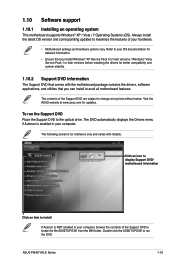
...maximize the features of your computer, browse the contents of the Support DVD are subject to locate the file ASSETUP.EXE from the BIN folder. ASUS P8H67-M LE Series 1-19 1.10 Software support 1.10.1 Installing an operating system This motherboard supports Windows® XP / Vista / 7 Operating Systems (OS...). The contents of the Support DVD to change at www.asus.com for reference only and varies with the motherboard package contains the drivers, software applications, and utilities that comes with models.
...maximize the features of your computer, browse the contents of the Support DVD are subject to locate the file ASSETUP.EXE from the BIN folder. ASUS P8H67-M LE Series 1-19 1.10 Software support 1.10.1 Installing an operating system This motherboard supports Windows® XP / Vista / 7 Operating Systems (OS...). The contents of the Support DVD to change at www.asus.com for reference only and varies with the motherboard package contains the drivers, software applications, and utilities that comes with models.

User Manual
Page 30
...click AI Suite II. 3. Follow the onscreen instructions to launch the AI Suite II utility. From the Windows® desktop, click Start > Programs > ASUS > AI Suite II > AI Suite II X.XX.XX to complete the installation. b. Updating the BIOS To update the BIOS: 1. The AI Suite II... an Internet connection either of the original motherboard BIOS file to a USB flash disk in case you need to download then click Next. 2-1 ASUS P8H67-M LE Series Chapter 2 BIOS information 2.1 Managing and updating your BIOS Save a copy of the following methods: Updating from the Internet a. Place the ...
...click AI Suite II. 3. Follow the onscreen instructions to launch the AI Suite II utility. From the Windows® desktop, click Start > Programs > ASUS > AI Suite II > AI Suite II X.XX.XX to complete the installation. b. Updating the BIOS To update the BIOS: 1. The AI Suite II... an Internet connection either of the original motherboard BIOS file to a USB flash disk in case you need to download then click Next. 2-1 ASUS P8H67-M LE Series Chapter 2 BIOS information 2.1 Managing and updating your BIOS Save a copy of the following methods: Updating from the Internet a. Place the ...

User Manual
Page 32
... USB port. 2. At the FreeDOS prompt, type d: and press to switch the disk from the ASUS website at http://support.asus.com and save the BIOS file and BIOS Updater to boot using defaults 3. The actual utility screen...the boot device. NTFS is not supported under DOS environment. Welcome to Drive D (USB flash drive). 2.1.3 ASUS BIOS Updater The ASUS BIOS Updater allows you can use as a backup when the BIOS fails or gets corrupted during the updating process...menu appears, select the FreeDOS command prompt item by pressing the item number. 4. C:\>d: D:\> 2-3 ASUS P8H67-M LE Series
... USB port. 2. At the FreeDOS prompt, type d: and press to switch the disk from the ASUS website at http://support.asus.com and save the BIOS file and BIOS Updater to boot using defaults 3. The actual utility screen...the boot device. NTFS is not supported under DOS environment. Welcome to Drive D (USB flash drive). 2.1.3 ASUS BIOS Updater The ASUS BIOS Updater allows you can use as a backup when the BIOS fails or gets corrupted during the updating process...menu appears, select the FreeDOS command prompt item by pressing the item number. 4. C:\>d: D:\> 2-3 ASUS P8H67-M LE Series
User Manual
Page 34
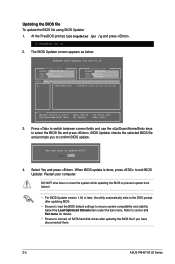
...BIOS Updater version 1.04 or later, the utility automatically exits to the DOS prompt after updating the BIOS file if you have disconnected them. 2-5 ASUS P8H67-M LE Series At the FreeDOS prompt, type bupdater /pc /g and press . Yes No 4. Select the Load Optimized Defaults item under the Exit menu. ...update BIOS? Refer to exit BIOS Updater. When BIOS update is done, press to section 2.9 Exit menu for DOS V1.18 Current ROM BOARD: P8H67-M LE VER: 0218 DATE: 10/26/2010 Update ROM BOARD: Unknown VER: Unknown DATE: Unknown PATH: A:\ A: P8H67MLE.ROM 8388608 2010-11-22 ...
...BIOS Updater version 1.04 or later, the utility automatically exits to the DOS prompt after updating the BIOS file if you have disconnected them. 2-5 ASUS P8H67-M LE Series At the FreeDOS prompt, type bupdater /pc /g and press . Yes No 4. Select the Load Optimized Defaults item under the Exit menu. ...update BIOS? Refer to exit BIOS Updater. When BIOS update is done, press to section 2.9 Exit menu for DOS V1.18 Current ROM BOARD: P8H67-M LE VER: 0218 DATE: 10/26/2010 Update ROM BOARD: Unknown VER: Unknown DATE: Unknown PATH: A:\ A: P8H67MLE.ROM 8388608 2010-11-22 ...

User Manual
Page 35
... The BIOS setup screens shown in using the first two options. Select the Load Optimized Defaults item under the Exit menu. ASUS P8H67-M LE Series motherboards include P8H67-M LE and P8H67-M LX two models. Chapter 2: BIOS information 2-6 Entering BIOS Setup after POST To enter BIOS Setup after changing any BIOS ... properly from what you failed to ensure system compatibility and stability. Entering BIOS Setup at startup To enter BIOS Setup at www.asus.com to download the latest BIOS file for information on your data or system. Using the power button, reset button, or ...
... The BIOS setup screens shown in using the first two options. Select the Load Optimized Defaults item under the Exit menu. ASUS P8H67-M LE Series motherboards include P8H67-M LE and P8H67-M LX two models. Chapter 2: BIOS information 2-6 Entering BIOS Setup after POST To enter BIOS Setup after changing any BIOS ... properly from what you failed to ensure system compatibility and stability. Entering BIOS Setup at startup To enter BIOS Setup at www.asus.com to download the latest BIOS file for information on your data or system. Using the power button, reset button, or ...
User Manual
Page 36
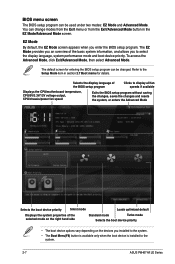
... 1 Selects the boot device priority Silent mode Loads optimized default Displays the system properties of the basic system information, and allows you to the system. 2-7 ASUS P8H67-M LE Series Refer to the Setup Mode item in the EZ Mode/Advanced Mode screen. EZ Mode By default, the EZ Mode screen appears when you...
... 1 Selects the boot device priority Silent mode Loads optimized default Displays the system properties of the basic system information, and allows you to the system. 2-7 ASUS P8H67-M LE Series Refer to the Setup Mode item in the EZ Mode/Advanced Mode screen. EZ Mode By default, the EZ Mode screen appears when you...

User Manual
Page 38
... System Language English System Date System Time Access Level [Mon 11/22/2010] [16:46:15] Administrator > Security Boot Tool Choose the system default language 2-9 ASUS P8H67-M LE Series Navigation keys At the bottom right corner of options. 2.3 Main menu The Main menu screen appears when you can change the settings. A configurable field...
... System Language English System Date System Time Access Level [Mon 11/22/2010] [16:46:15] Administrator > Security Boot Tool Choose the system default language 2-9 ASUS P8H67-M LE Series Navigation keys At the bottom right corner of options. 2.3 Main menu The Main menu screen appears when you can change the settings. A configurable field...
User Manual
Page 40
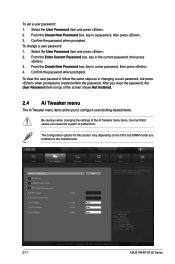
... via SPD. →←: Select Screen ↑↓: Select Item Enter: Select +/-: Change Opt. To set a user password: 1. After you to create/confirm the password. ASUS P8H67-M LE Series From the Create New Password box, key in the current password, then press . 3. Confirm the password when prompted. Confirm the password when prompted. Select...
... via SPD. →←: Select Screen ↑↓: Select Item Enter: Select +/-: Change Opt. To set a user password: 1. After you to create/confirm the password. ASUS P8H67-M LE Series From the Create New Password box, key in the current password, then press . 3. Confirm the password when prompted. Confirm the password when prompted. Select...

User Manual
Page 42
... better cooling system to Intel CPU specification, DIMMs with a 0.005V interval. According to work stably under high voltage settings. 2-13 ASUS P8H67-M LE Series The values range from -0.635V to set the CPU voltage. The values range from 1.20V to adjust the value. The values... color, indicating the risk levels of high voltage settings. • The system may make the system unstable. 2.4.7 VCCIO Voltage [Auto] (for P8H67-M LE only) Allows you install the DIMMs with the voltage requirement below 1.65V. 2.4.6 [+] [-] CPU Offset Mode Sign [+] To offset the voltage by...
... better cooling system to Intel CPU specification, DIMMs with a 0.005V interval. According to work stably under high voltage settings. 2-13 ASUS P8H67-M LE Series The values range from -0.635V to set the CPU voltage. The values range from 1.20V to adjust the value. The values... color, indicating the risk levels of high voltage settings. • The system may make the system unstable. 2.4.7 VCCIO Voltage [Auto] (for P8H67-M LE only) Allows you install the DIMMs with the voltage requirement below 1.65V. 2.4.6 [+] [-] CPU Offset Mode Sign [+] To offset the voltage by...
User Manual
Page 44
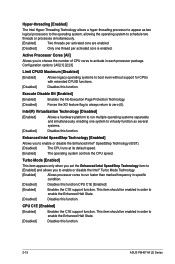
... one system to virtually function as several systems. [Disabled] Disables this function. This item should be enabled in specific condition. [Disabled] Disables this function. 2-15 ASUS P8H67-M LE Series
... one system to virtually function as several systems. [Disabled] Disables this function. This item should be enabled in specific condition. [Disabled] Disables this function. 2-15 ASUS P8H67-M LE Series
User Manual
Page 46
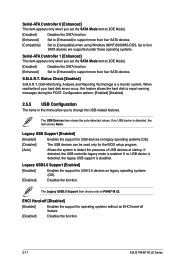
... Enables the support for USB devices on legacy operating systems (OS). [Disabled] The USB devices can be used only for USB 3.0 devices on P8H67-M LE. If no USB device is disabled. Legacy USB3.0 Support [Enabled] [Enabled] Enables the support for the BIOS setup program. [Auto] Allows the...] [Enabled] Enables the support for operating systems without an EHCI hand‑off feature. [Disabled] Disables the function. 2-17 ASUS P8H67-M LE Series The Legacy USB3.0 Support item shows only on legacy operating systems (OS). [Disabled] Disables the function.
... Enables the support for USB devices on legacy operating systems (OS). [Disabled] The USB devices can be used only for USB 3.0 devices on P8H67-M LE. If no USB device is disabled. Legacy USB3.0 Support [Enabled] [Enabled] Enables the support for the BIOS setup program. [Auto] Allows the...] [Enabled] Enables the support for operating systems without an EHCI hand‑off feature. [Disabled] Disables the function. 2-17 ASUS P8H67-M LE Series The Legacy USB3.0 Support item shows only on legacy operating systems (OS). [Disabled] Disables the function.


