
User Manual
Page 7
...to fix it may become wet. • Place the product on it, carefully read all the manuals that your power supply is set to the correct voltage in any damage, contact your local power company. • If the power supply is broken, do not try to or from the system, ensure that the... power cables for the devices are unplugged before the signal cables are unplugged. • Seek professional assistance before you are not...
...to fix it may become wet. • Place the product on it, carefully read all the manuals that your power supply is set to the correct voltage in any damage, contact your local power company. • If the power supply is broken, do not try to or from the system, ensure that the... power cables for the devices are unplugged before the signal cables are unplugged. • Seek professional assistance before you are not...
User Manual
Page 17
ASUS P8H67-M EVO 2-1 Failure to do so may cause severe damage to avoid touching the ICs on them. • Whenever you uninstall any component, place it on a grounded antistatic pad or in the bag that came with the component. • Before you install or remove any component, ensure that the ATX power supply... is switched off or the power cord is detached from the power supply. Chapter 2: Chapter 2 2.1 Before you proceed Hardware information Take note of the following precautions ...
ASUS P8H67-M EVO 2-1 Failure to do so may cause severe damage to avoid touching the ICs on them. • Whenever you uninstall any component, place it on a grounded antistatic pad or in the bag that came with the component. • Before you install or remove any component, ensure that the ATX power supply... is switched off or the power cord is detached from the power supply. Chapter 2: Chapter 2 2.1 Before you proceed Hardware information Take note of the following precautions ...
User Manual
Page 33
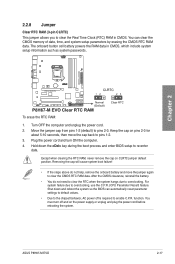
Move the jumper cap from pins 1-2 (default) to enable C.P.R. Except when clearing the RTC RAM, never remove the cap on the power supply or unplug and plug the power cord before rebooting the system. ASUS P8H67-M EVO 2-17 Chapter 2 To erase the RTC RAM: 1. function. You must turn ON the computer. 4. Shut down the key during the...
Move the jumper cap from pins 1-2 (default) to enable C.P.R. Except when clearing the RTC RAM, never remove the cap on the power supply or unplug and plug the power cord before rebooting the system. ASUS P8H67-M EVO 2-17 Chapter 2 To erase the RTC RAM: 1. function. You must turn ON the computer. 4. Shut down the key during the...
User Manual
Page 41
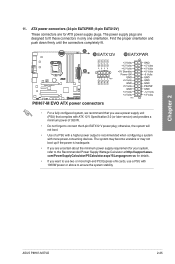
ASUS P8H67-M EVO 2-25 Chapter 2 11. otherwise, the system will not boot. • Use of 350 W. • Do not forget to ensure the system stability. The power supply plugs are designed to the Recommended Power Supply Wattage Calculator at http://support.asus. The system may become unstable or may not boot up if the power is recommended when configuring a system...
ASUS P8H67-M EVO 2-25 Chapter 2 11. otherwise, the system will not boot. • Use of 350 W. • Do not forget to ensure the system stability. The power supply plugs are designed to the Recommended Power Supply Wattage Calculator at http://support.asus. The system may become unstable or may not boot up if the power is recommended when configuring a system...
User Manual
Page 43
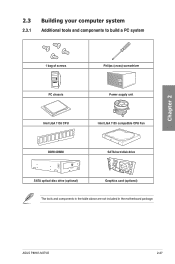
Chapter 2 2.3 Building your computer system 2.3.1 Additional tools and components to build a PC system 1 bag of screws Philips (cross) screwdriver PC chassis Power supply unit Intel LGA 1155 CPU Intel LGA 1155 compatible CPU Fan DDR3 DIMM SATA hard disk drive SATA optical disc drive (optional) Graphics card (optional) The tools and components in the table above are not included in the motherboard package. ASUS P8H67-M EVO 2-27
Chapter 2 2.3 Building your computer system 2.3.1 Additional tools and components to build a PC system 1 bag of screws Philips (cross) screwdriver PC chassis Power supply unit Intel LGA 1155 CPU Intel LGA 1155 compatible CPU Fan DDR3 DIMM SATA hard disk drive SATA optical disc drive (optional) Graphics card (optional) The tools and components in the table above are not included in the motherboard package. ASUS P8H67-M EVO 2-27
User Manual
Page 61
... by three short beeps One continuous beep followed by four short beeps Description VGA detected Quick boot set to enter the BIOS Setup. ASUS P8H67-M EVO 2-45 Turn on self tests or POST. External SCSI devices (starting with ATX power supplies, the system LED lights up or change from the time you press the ATX...
... by three short beeps One continuous beep followed by four short beeps Description VGA detected Quick boot set to enter the BIOS Setup. ASUS P8H67-M EVO 2-45 Turn on self tests or POST. External SCSI devices (starting with ATX power supplies, the system LED lights up or change from the time you press the ATX...

User Manual
Page 83
.... IRQ=4] [IO=2E8h; Power On By PCI [Disabled] [Disabled] Disables the PME to enable or disable the serial port (COM). This feature requires an ATX power supply that provides at least 1A on state, whatever the system state was before the AC power loss. ASUS P8H67-M EVO 3-21 IRQ=4] Allows you ...to when power is re-applied after an AC power loss. [Last State] The system goes into either ...
.... IRQ=4] [IO=2E8h; Power On By PCI [Disabled] [Disabled] Disables the PME to enable or disable the serial port (COM). This feature requires an ATX power supply that provides at least 1A on state, whatever the system state was before the AC power loss. ASUS P8H67-M EVO 3-21 IRQ=4] Allows you ...to when power is re-applied after an AC power loss. [Last State] The system goes into either ...

User Manual
Page 123
... list. 5.1.2 Before you begin For ATI CrossFireX to work properly, you to your system. Turn off your current graphics card driver/s. 4. ASUS P8H67-M EVO 5-1 For Windows XP, go to Control Panel > Add/Remove Programs. For Windows Vista, go to uninstall all current applications. 2. For .... • Visit the ATI Game website (http://game.amd.com) for details. • We recommend that your power supply unit (PSU) can provide at least the minimum power required by your system. Chapter 5 Chapter 5: 5.1 ATI® CrossFireX™ technology support ATI® CrossFireX™...
... list. 5.1.2 Before you begin For ATI CrossFireX to work properly, you to your system. Turn off your current graphics card driver/s. 4. ASUS P8H67-M EVO 5-1 For Windows XP, go to Control Panel > Add/Remove Programs. For Windows Vista, go to uninstall all current applications. 2. For .... • Visit the ATI Game website (http://game.amd.com) for details. • We recommend that your power supply unit (PSU) can provide at least the minimum power required by your system. Chapter 5 Chapter 5: 5.1 ATI® CrossFireX™ technology support ATI® CrossFireX™...

User Manual
Page 124
... that the connector is firmly in this user manual for the locations of the PCIEX16 slots recommended for reference only. Connect two independent auxiliary power sources from the power supply to the graphics card. CrossFireX bridge (bundled with models, but the installation steps remain the same. 1. Prepare two CrossFireX-ready graphics cards. 2. Align...
... that the connector is firmly in this user manual for the locations of the PCIEX16 slots recommended for reference only. Connect two independent auxiliary power sources from the power supply to the graphics card. CrossFireX bridge (bundled with models, but the installation steps remain the same. 1. Prepare two CrossFireX-ready graphics cards. 2. Align...


