User Manual
Page 2
... any warranty. SPECIFICATIONS AND INFORMATION CONTAINED IN THIS MANUAL ARE FURNISHED FOR INFORMATIONAL USE ONLY, AND ARE SUBJECT TO CHANGE AT ANY TIME WITHOUT NOTICE, AND SHOULD NOT BE CONSTRUED AS A COMMITMENT BY ASUS. ASUS ASSUMES NO RESPONSIBILITY OR LIABILITY FOR ANY ERRORS OR INACCURACIES THAT MAY APPEAR IN THIS MANUAL, INCLUDING THE PRODUCTS AND SOFTWARE DESCRIBED IN IT...
... any warranty. SPECIFICATIONS AND INFORMATION CONTAINED IN THIS MANUAL ARE FURNISHED FOR INFORMATIONAL USE ONLY, AND ARE SUBJECT TO CHANGE AT ANY TIME WITHOUT NOTICE, AND SHOULD NOT BE CONSTRUED AS A COMMITMENT BY ASUS. ASUS ASSUMES NO RESPONSIBILITY OR LIABILITY FOR ANY ERRORS OR INACCURACIES THAT MAY APPEAR IN THIS MANUAL, INCLUDING THE PRODUCTS AND SOFTWARE DESCRIBED IN IT...
User Manual
Page 5
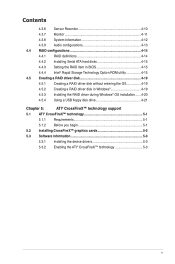
... Recorder 4-10 4.3.7 Monitor 4-11 4.3.8 System Information 4-12 4.3.9 Audio configurations 4-13 4.4 RAID configurations 4-14 4.4.1 RAID definitions 4-14 4.4.2 Installing Serial ATA hard disks 4-15 4.4.3 Setting the RAID item in BIOS 4-15 4.4.4 Intel® Rapid Storage Technology Option ROM utility 4-15 4.5 Creating a RAID driver disk 4-19 4.5.1 Creating a RAID driver disk without entering the OS 4-19 4.5.2 Creating a RAID driver disk in Windows 4-19 4.5.3 Installing the RAID driver during Windows® OS installation....... 4-20 4.5.4 Using a USB floppy disk drive 4-21 Chapter...
... Recorder 4-10 4.3.7 Monitor 4-11 4.3.8 System Information 4-12 4.3.9 Audio configurations 4-13 4.4 RAID configurations 4-14 4.4.1 RAID definitions 4-14 4.4.2 Installing Serial ATA hard disks 4-15 4.4.3 Setting the RAID item in BIOS 4-15 4.4.4 Intel® Rapid Storage Technology Option ROM utility 4-15 4.5 Creating a RAID driver disk 4-19 4.5.1 Creating a RAID driver disk without entering the OS 4-19 4.5.2 Creating a RAID driver disk in Windows 4-19 4.5.3 Installing the RAID driver during Windows® OS installation....... 4-20 4.5.4 Using a USB floppy disk drive 4-21 Chapter...
User Manual
Page 12
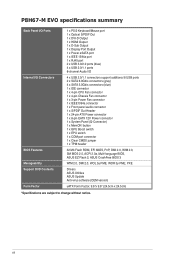
xii button 1 x GPU Boost switch 1 x EPU switch 1 x COM port connector 1 x Clear CMOS jumper 1 x TPM header 32 Mb Flash ROM, EFI MIOS, PnP, DMI 2.0, WfM 2.0, SM BIOS 2.5, ACPI 2.0a, Multi-language BIOS, ASUS EZ Flash 2, ASUS CrashFree BIOS 3 WfM 2.0, DMI 2.0, WOL by PME, WOR by PME, PXE Drivers ASUS Utilities ASUS Update Anti-virus software (OEM version) uATX Form Factor, 9.6"x 9.6" (24.5cm x 24.5cm) *Specifications are subject to change without notice. P8H67-M EVO specifications summary Back Panel I/O Ports Internal I/O Connectors BIOS Features Manageability Support DVD Contents Form Factor...
xii button 1 x GPU Boost switch 1 x EPU switch 1 x COM port connector 1 x Clear CMOS jumper 1 x TPM header 32 Mb Flash ROM, EFI MIOS, PnP, DMI 2.0, WfM 2.0, SM BIOS 2.5, ACPI 2.0a, Multi-language BIOS, ASUS EZ Flash 2, ASUS CrashFree BIOS 3 WfM 2.0, DMI 2.0, WOL by PME, WOR by PME, PXE Drivers ASUS Utilities ASUS Update Anti-virus software (OEM version) uATX Form Factor, 9.6"x 9.6" (24.5cm x 24.5cm) *Specifications are subject to change without notice. P8H67-M EVO specifications summary Back Panel I/O Ports Internal I/O Connectors BIOS Features Manageability Support DVD Contents Form Factor...
User Manual
Page 16
... utility saves users the cost and hassle of Q-Slot and Q-DIMM design speed up and simplify the DIY process! This unique module eliminates the trouble of connecting the system panel cables one at the back I/O provides smart setup and hot-plug functions. Power eSATA on the Go The motherboard supports hard drives based on external devices. Easily backup photos, videos and other entertainment contents on the Serial ATA (SATA) 3Gb/s storage specification...
... utility saves users the cost and hassle of Q-Slot and Q-DIMM design speed up and simplify the DIY process! This unique module eliminates the trouble of connecting the system panel cables one at the back I/O provides smart setup and hot-plug functions. Power eSATA on the Go The motherboard supports hard drives based on external devices. Easily backup photos, videos and other entertainment contents on the Serial ATA (SATA) 3Gb/s storage specification...
User Manual
Page 28
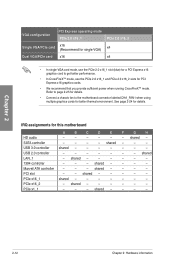
... a chassis fan to get better performance. • In CrossFireX™ mode, use the PCIe 2.0 x16_1 and PCIe 2.0 x16_2 slots for PCI Express x16 graphics cards. • We recommend that you provide sufficient power when running CrossFireX™ mode. Marvell ATA controller - - - shared - - - - shared - - - - - - shared - USB 3.0 controller shared - - - - - - - shared - - - - shared - - - - 2-12 Chapter 2: Hardware information See page 2-24 for this motherboard A B C D E F G H HD audio - - - - - - PCIe x16_2 - Chapter 2 VGA configuration...
... a chassis fan to get better performance. • In CrossFireX™ mode, use the PCIe 2.0 x16_1 and PCIe 2.0 x16_2 slots for PCI Express x16 graphics cards. • We recommend that you provide sufficient power when running CrossFireX™ mode. Marvell ATA controller - - - shared - - - - shared - - - - - - shared - USB 3.0 controller shared - - - - - - - shared - - - - shared - - - - 2-12 Chapter 2: Hardware information See page 2-24 for this motherboard A B C D E F G H HD audio - - - - - - PCIe x16_2 - Chapter 2 VGA configuration...
User Manual
Page 29
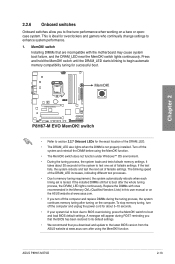
... properly installed. ASUS P8H67-M EVO 2-13 Turn off the computer and unplug the power cord for about 30 seconds for overclockers and gamers who continually change settings to enhance system performance. 1. To stop memory tuning, turn off the computer and replace DIMMs during POST reminding you to fine-tune performance when working on a bare or opencase system. switch Installing DIMMs that you download and update to the latest BIOS version...
... properly installed. ASUS P8H67-M EVO 2-13 Turn off the computer and unplug the power cord for about 30 seconds for overclockers and gamers who continually change settings to enhance system performance. 1. To stop memory tuning, turn off the computer and replace DIMMs during POST reminding you to fine-tune performance when working on a bare or opencase system. switch Installing DIMMs that you download and update to the latest BIOS version...
User Manual
Page 56
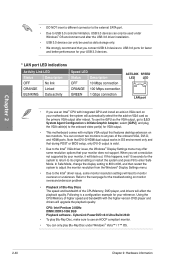
... install an add-on VGA card on your monitor, it will automatically select the the add-on two monitors. Chapter 2 • DO NOT insert a different connector to the external SATA port. • Due to USB 3.0 controller limitation, USB 3.0 devices can only be used as data storage only. • We strongly recommend that you connect USB 3.0 devices to enter Safe Mode. You can connect two monitors to the onboard video port(s) for your USB 3.0 devices. * LAN port LED indications Activity Link LED...
... install an add-on VGA card on your monitor, it will automatically select the the add-on two monitors. Chapter 2 • DO NOT insert a different connector to the external SATA port. • Due to USB 3.0 controller limitation, USB 3.0 devices can only be used as data storage only. • We strongly recommend that you connect USB 3.0 devices to enter Safe Mode. You can connect two monitors to the onboard video port(s) for your USB 3.0 devices. * LAN port LED indications Activity Link LED...
User Manual
Page 63
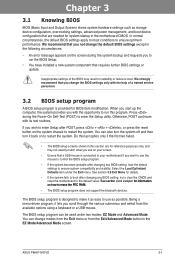
... settings such as possible. ASUS P8H67-M EVO 3-1 In normal circumstances, the default BIOS settings apply to most conditions to enter the Setup utility. Do this last option only if the first two failed. • The BIOS setup screens shown in the EZ Mode/Advanced Mode screen. When you start up the computer, the system provides you change modes from the Exit menu or from the available options using a keyboard or a USB mouse. You can be used...
... settings such as possible. ASUS P8H67-M EVO 3-1 In normal circumstances, the default BIOS settings apply to most conditions to enter the Setup utility. Do this last option only if the first two failed. • The BIOS setup screens shown in the EZ Mode/Advanced Mode screen. When you start up the computer, the system provides you change modes from the Exit menu or from the available options using a keyboard or a USB mouse. You can be used...
User Manual
Page 65
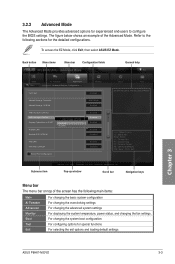
...the overclocking settings For changing the advanced system settings For displaying the system temperature, power status, and changing the fan settings. Back button Menu items Menu bar Configuration fields EFI BIOS Utility - 3.2.2 Advanced Mode The Advanced Mode provides advanced options for the detailed configurations. To access the EZ Mode, click Exit, then select ASUS EZ Mode. Advanced Mode General help Exit Main Back Ai Tweaker Advanced Advanced\ Onboard Devices Configuration > Monitor VIA 1394 Enabled Marvell Storage Controller AHCI Mode Marvell Storage OPROM Enabled...
...the overclocking settings For changing the advanced system settings For displaying the system temperature, power status, and changing the fan settings. Back button Menu items Menu bar Configuration fields EFI BIOS Utility - 3.2.2 Advanced Mode The Advanced Mode provides advanced options for the detailed configurations. To access the EZ Mode, click Exit, then select ASUS EZ Mode. Advanced Mode General help Exit Main Back Ai Tweaker Advanced Advanced\ Onboard Devices Configuration > Monitor VIA 1394 Enabled Marvell Storage Controller AHCI Mode Marvell Storage OPROM Enabled...
User Manual
Page 69
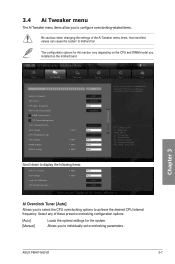
...menu The Ai Tweaker menu items allow you to individually set overclocking parameters. EFI BIOS Utility - Advanced Mode Exit Main Ai Tweaker Advanced Monitor Ai Overclock Tuner Auto Memory Frequency Auto GPU Boost Disabled iGPU Max. Scroll down to achieve the desired CPU internal frequency. Ai Overclock Tuner [Auto] Allows you installed on the CPU and DIMM model you to select the CPU overclocking options to display the following items: CPU PLL Voltage 1.800V Auto PCH Voltage 1.050V Auto Load-Line Calibration Auto CPU Spread Spectrum Auto Version...
...menu The Ai Tweaker menu items allow you to individually set overclocking parameters. EFI BIOS Utility - Advanced Mode Exit Main Ai Tweaker Advanced Monitor Ai Overclock Tuner Auto Memory Frequency Auto GPU Boost Disabled iGPU Max. Scroll down to achieve the desired CPU internal frequency. Ai Overclock Tuner [Auto] Allows you installed on the CPU and DIMM model you to select the CPU overclocking options to display the following items: CPU PLL Voltage 1.800V Auto PCH Voltage 1.050V Auto Load-Line Calibration Auto CPU Spread Spectrum Auto Version...

User Manual
Page 71
... SpeedStep Technology item to [Enabled] and allows you set the Enhanced Intel SpeedStep Technology and Turbo Mode items to run faster than marked frequency in specific condition. [Disabled] Disables this function. Long Duration Maintained [Auto] Use the and keys to adjust the value. Some of the following three items appear only when you to enable or disable the Intel® Turbo Mode Technology. [Enabled] Allows processor cores to [Enabled]. CPU Offset Mode Sign...
... SpeedStep Technology item to [Enabled] and allows you set the Enhanced Intel SpeedStep Technology and Turbo Mode items to run faster than marked frequency in specific condition. [Disabled] Disables this function. Long Duration Maintained [Auto] Use the and keys to adjust the value. Some of the following three items appear only when you to enable or disable the Intel® Turbo Mode Technology. [Enabled] Allows processor cores to [Enabled]. CPU Offset Mode Sign...
User Manual
Page 81
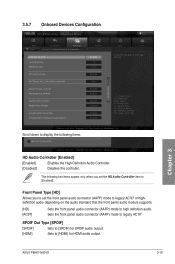
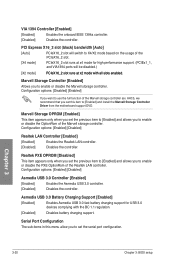
... legacy AC'97 SPDIF Out Type [SPDIF] [SPDIF] Sets to [SPDIF] for SPDIF audio output. [HDMI] Sets to display the following two items appear only when you to set the HD Audio Controller item to high definition audio. Chapter 3 ASUS P8H67-M EVO 3-19 Scroll down to [HDMI] for HDMI audio output. Copyright (C) 2010 American Megatrends, Inc. Advanced Mode Exit Main Back Ai Tweaker Advanced Advanced\ Onboard Devices Configuration > Monitor HD Audio Controller Enabled Front Panel Type HD SPDIF Out Type SPDIF VIA 1394 Controller Enabled PCI Express X16_2 slot...
... legacy AC'97 SPDIF Out Type [SPDIF] [SPDIF] Sets to [SPDIF] for SPDIF audio output. [HDMI] Sets to display the following two items appear only when you to set the HD Audio Controller item to high definition audio. Chapter 3 ASUS P8H67-M EVO 3-19 Scroll down to [HDMI] for HDMI audio output. Copyright (C) 2010 American Megatrends, Inc. Advanced Mode Exit Main Back Ai Tweaker Advanced Advanced\ Onboard Devices Configuration > Monitor HD Audio Controller Enabled Front Panel Type HD SPDIF Out Type SPDIF VIA 1394 Controller Enabled PCI Express X16_2 slot...
User Manual
Page 82
...Asmedia USB 3.0 Battery Charging Support [Enabled] [Enabled] Enables Asmedia USB 3.0 fast battery charging support for high performance support. (PCIEx1_1, and VIA1394 ports will switch to use the full function of the Marvell storage controller. Configuration options: [Disabled] [Enabled] If you set the serial port configuration. Realtek PXE OPROM [Disabled] This item appears only when you set the previous item to [Enabled] and allows you to set this menu allow you to [Enabled] and install the Marvell Storage Controller Driver from the motherboard support DVD. Serial Port...
...Asmedia USB 3.0 Battery Charging Support [Enabled] [Enabled] Enables Asmedia USB 3.0 fast battery charging support for high performance support. (PCIEx1_1, and VIA1394 ports will switch to use the full function of the Marvell storage controller. Configuration options: [Disabled] [Enabled] If you set the serial port configuration. Realtek PXE OPROM [Disabled] This item appears only when you set the previous item to [Enabled] and allows you to set this menu allow you to [Enabled] and install the Marvell Storage Controller Driver from the motherboard support DVD. Serial Port...
User Manual
Page 93
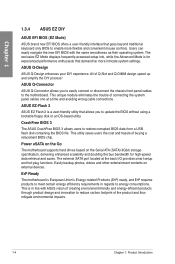
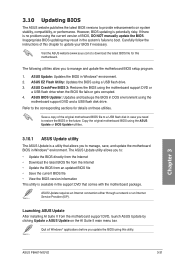
... disk in case you to provide enhancements on system stability, compatibility, or performance. Chapter 3 ASUS P8H67-M EVO 3-31 However, BIOS updating is no problem using the ASUS Update or BIOS Updater utilities. 3.10.1 ASUS Update utility The ASUS Update is a utility that comes with the motherboard package. Inappropriate BIOS updating may result in the system's failure to the corresponding sections for this motherboard. ASUS EZ Flash Utility: Updates the BIOS using the motherboard support DVD or a USB flash drive when the BIOS file fails or gets corrupted. 4. Refer to boot...
... disk in case you to provide enhancements on system stability, compatibility, or performance. Chapter 3 ASUS P8H67-M EVO 3-31 However, BIOS updating is no problem using the ASUS Update or BIOS Updater utilities. 3.10.1 ASUS Update utility The ASUS Update is a utility that comes with the motherboard package. Inappropriate BIOS updating may result in the system's failure to the corresponding sections for this motherboard. ASUS EZ Flash Utility: Updates the BIOS using the motherboard support DVD or a USB flash drive when the BIOS file fails or gets corrupted. 4. Refer to boot...
User Manual
Page 97
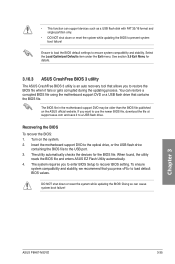
... enter BIOS Setup to recover BIOS setting. Recovering the BIOS To recover the BIOS: 1. When found, the utility reads the BIOS file and enters ASUS EZ Flash Utility automatically. 4. DO NOT shut down or reset the system while updating the BIOS to load default BIOS values. The system requires you press to prevent system boot failure! Doing so can restore a corrupted BIOS file using the motherboard support DVD or a USB flash drive that allows you want to use the newer BIOS file, download the file at support.asus...
... enter BIOS Setup to recover BIOS setting. Recovering the BIOS To recover the BIOS: 1. When found, the utility reads the BIOS file and enters ASUS EZ Flash Utility automatically. 4. DO NOT shut down or reset the system while updating the BIOS to load default BIOS values. The system requires you press to prevent system boot failure! Doing so can restore a corrupted BIOS file using the motherboard support DVD or a USB flash drive that allows you want to use the newer BIOS file, download the file at support.asus...
User Manual
Page 98
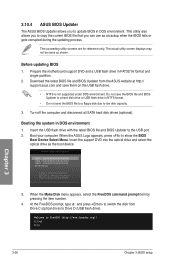
... to the USB port. 2. Please select boot device: SATA: XXXXXXXXXXXXXXXX USB XXXXXXXXXXXXXXXXX UEFI: XXXXXXXXXXXXXXXX Enter Setup ↑ and ↓ to move selection ENTER to select boot device ESC to update BIOS in NTFS format. • Do not save them on the USB flash drive. • NTFS is not supported under DOS environment. The succeeding utility screens are for reference only. 3.10.4 ASUS BIOS Updater The ASUS BIOS Updater allows you to boot using defaults 3. Prepare the motherboard support DVD and a USB flash drive in DOS...
... to the USB port. 2. Please select boot device: SATA: XXXXXXXXXXXXXXXX USB XXXXXXXXXXXXXXXXX UEFI: XXXXXXXXXXXXXXXX Enter Setup ↑ and ↓ to move selection ENTER to select boot device ESC to update BIOS in NTFS format. • Do not save them on the USB flash drive. • NTFS is not supported under DOS environment. The succeeding utility screens are for reference only. 3.10.4 ASUS BIOS Updater The ASUS BIOS Updater allows you to boot using defaults 3. Prepare the motherboard support DVD and a USB flash drive in DOS...
User Manual
Page 101
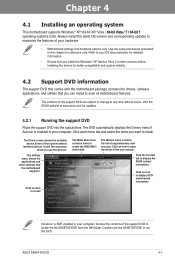
... the user manual. ASUS P8H67-M EVO 4-1 Use the setup procedures presented in your OS documentation for detailed information. • Ensure that you can install to locate the file ASSETUP.EXE from the BIN folder. The contents of supplementary user manuals. The Utilities menu shows the applications and other software that you install the Windows® XP Service Pack 2 or later versions before installing the drivers for updates. 4.2.1 Running the support DVD Place the support DVD into...
... the user manual. ASUS P8H67-M EVO 4-1 Use the setup procedures presented in your OS documentation for detailed information. • Ensure that you can install to locate the file ASSETUP.EXE from the BIN folder. The contents of supplementary user manuals. The Utilities menu shows the applications and other software that you install the Windows® XP Service Pack 2 or later versions before installing the drivers for updates. 4.2.1 Running the support DVD Place the support DVD into...
User Manual
Page 115
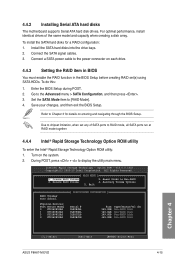
... Setup. Connect a SATA power cable to chipset limitation, when set (s) using SATA HDDs. Go to [RAID Mode]. 4. Intel(R) Rapid Storage Technology - v10.0.0.1032 Copyright(C) 2003-10 Intel Corporation. Exit RAID Volumes: None defined. To do this: 1. Option ROM - Set the SATA Mode item to the Advanced menu > SATA Configuration, and then press . 3. Save your changes, and then exit the BIOS Setup. Due to the power connector on the system. 2. Reset Disks to display the utility main menu. All Rights Reserved. [ MAIN MENU ] 1. Recovery Volume Options 5. Connect...
... Setup. Connect a SATA power cable to chipset limitation, when set (s) using SATA HDDs. Go to [RAID Mode]. 4. Intel(R) Rapid Storage Technology - v10.0.0.1032 Copyright(C) 2003-10 Intel Corporation. Exit RAID Volumes: None defined. To do this: 1. Option ROM - Set the SATA Mode item to the Advanced menu > SATA Configuration, and then press . 3. Save your changes, and then exit the BIOS Setup. Due to the power connector on the system. 2. Reset Disks to display the utility main menu. All Rights Reserved. [ MAIN MENU ] 1. Recovery Volume Options 5. Connect...
User Manual
Page 119
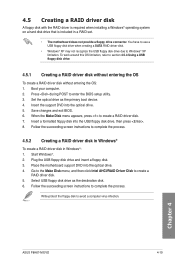
... Intel AHCI/RAID Driver Disk to enter the BIOS setup utility. 3. Chapter 4 ASUS P8H67-M EVO 4-19 Boot your computer. 2. Write-protect the floppy disk to complete the process. Set the optical drive as the destination disk. 6. Follow the succeeding screen instructions to avoid a computer virus infection. To work around this OS limitation, refer to complete the process. 4.5.2 Creating a RAID driver disk in Windows® To create a RAID driver disk in a RAID set. • The motherboard does not provide a floppy drive connector. Insert the support DVD...
... Intel AHCI/RAID Driver Disk to enter the BIOS setup utility. 3. Chapter 4 ASUS P8H67-M EVO 4-19 Boot your computer. 2. Write-protect the floppy disk to complete the process. Set the optical drive as the destination disk. 6. Follow the succeeding screen instructions to avoid a computer virus infection. To work around this OS limitation, refer to complete the process. 4.5.2 Creating a RAID driver disk in Windows® To create a RAID driver disk in a RAID set. • The motherboard does not provide a floppy drive connector. Insert the support DVD...
User Manual
Page 120
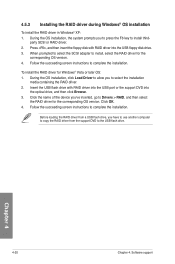
... Drivers > RAID, and then select the RAID driver for Windows® Vista or later OS: 1. Follow the succeeding screen instructions to install third- Click the name of the device you to press the F6 key to complete the installation. Insert the USB flash drive with RAID driver into the optical drive, and then click Browse. 3. Press , and then insert the floppy disk with RAID driver into the USB port or the support DVD into the USB floppy disk drive...
... Drivers > RAID, and then select the RAID driver for Windows® Vista or later OS: 1. Follow the succeeding screen instructions to install third- Click the name of the device you to press the F6 key to complete the installation. Insert the USB flash drive with RAID driver into the optical drive, and then click Browse. 3. Press , and then insert the floppy disk with RAID driver into the USB port or the support DVD into the USB floppy disk drive...


