User Manual
Page 4
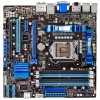
... Devices Configuration 3-19 3.5.8 APM 3-21 3.6 Monitor menu 3-23 3.7 Boot menu 3-26 3.8 Tools menu 3-28 3.8.1 ASUS EZ Flash Utility 3-28 3.8.2 ASUS O.C. Profile 3-28 3.9 Exit menu 3-30 3.10 Updating BIOS 3-31 3.10.1 ASUS Update utility 3-31 3.10.2 ASUS EZ Flash Utility 3-34 3.10.3 ASUS CrashFree BIOS 3 utility 3-35 3.10.4 ASUS BIOS Updater 3-36 Chapter 4: Software support 4.1 Installing an operating...
... Devices Configuration 3-19 3.5.8 APM 3-21 3.6 Monitor menu 3-23 3.7 Boot menu 3-26 3.8 Tools menu 3-28 3.8.1 ASUS EZ Flash Utility 3-28 3.8.2 ASUS O.C. Profile 3-28 3.9 Exit menu 3-30 3.10 Updating BIOS 3-31 3.10.1 ASUS Update utility 3-31 3.10.2 ASUS EZ Flash Utility 3-34 3.10.3 ASUS CrashFree BIOS 3 utility 3-35 3.10.4 ASUS BIOS Updater 3-36 Chapter 4: Software support 4.1 Installing an operating...
User Manual
Page 15
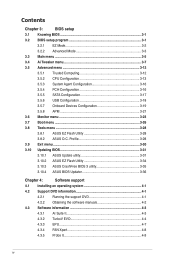
... controller. It allows users to supervise overclocking, energy management, fan speed conrol, voltage and sensor readings, and even interact with the elegant appearance! ASUS P8H67-M EVO 1-3 quickly ensures memory boot compatibility. This motherboard also features an extra 2-phase power dedicated to suit system performance scenarios as well. AI Suite II With its user-friendly...
... controller. It allows users to supervise overclocking, energy management, fan speed conrol, voltage and sensor readings, and even interact with the elegant appearance! ASUS P8H67-M EVO 1-3 quickly ensures memory boot compatibility. This motherboard also features an extra 2-phase power dedicated to suit system performance scenarios as well. AI Suite II With its user-friendly...
User Manual
Page 29
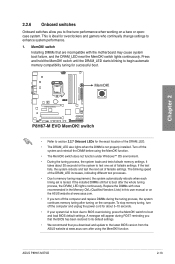
... seconds for about 5-10 seconds. • If your system fail to boot due to boot after using the MemOK! function. If the installed DIMMs still fail to BIOS overclocking, press the MemOK! ASUS P8H67-M EVO 2-13 switch does not function under Windows™ OS environment. •... During the tuning process, the system loads and tests failsafe memory settings. switch until the DRAM_LED starts blinking to boot and load BIOS default settings.
... seconds for about 5-10 seconds. • If your system fail to boot due to boot after using the MemOK! function. If the installed DIMMs still fail to BIOS overclocking, press the MemOK! ASUS P8H67-M EVO 2-13 switch does not function under Windows™ OS environment. •... During the tuning process, the system loads and tests failsafe memory settings. switch until the DRAM_LED starts blinking to boot and load BIOS default settings.
User Manual
Page 33
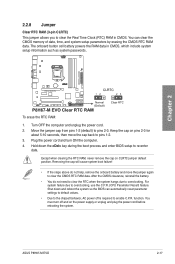
... • If the steps above do not need to clear the RTC when the system hangs due to overclocking. Shut down the key during the boot process and enter BIOS setup to re-enter data. Turn OFF the computer and unplug the power cord. 2. Except when clearing the RTC RAM, never... cap on pins 2-3 for about 5-10 seconds, then move the jumper again to the chipset behavior, AC power off and on CLRTC jumper default position. ASUS P8H67-M EVO 2-17 The onboard button cell battery powers the RAM data in CMOS. Chapter 2 To erase the RTC RAM: 1. Move the jumper cap from pins 1-2 (...
... • If the steps above do not need to clear the RTC when the system hangs due to overclocking. Shut down the key during the boot process and enter BIOS setup to re-enter data. Turn OFF the computer and unplug the power cord. 2. Except when clearing the RTC RAM, never... cap on pins 2-3 for about 5-10 seconds, then move the jumper again to the chipset behavior, AC power off and on CLRTC jumper default position. ASUS P8H67-M EVO 2-17 The onboard button cell battery powers the RAM data in CMOS. Chapter 2 To erase the RTC RAM: 1. Move the jumper cap from pins 1-2 (...
User Manual
Page 41
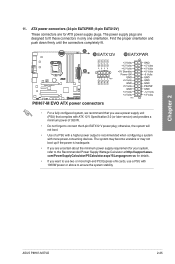
...system will not boot. • Use of 350 W. • Do not forget to connect the 8-pin EATX12 V power plug; ASUS P8H67-M EVO 2-25 com/PowerSupplyCalculator/PSCalculator.aspx?SLanguage=en-us for details. • If you want to the Recommended Power Supply Wattage Calculator at http://support.asus. Find the proper... you are uncertain about the minimum power supply requirement for ATX power supply plugs. The system may become unstable or may not boot up if the power is recommended when configuring a system with 1000W power or above to fit these connectors in only one orientation...
...system will not boot. • Use of 350 W. • Do not forget to connect the 8-pin EATX12 V power plug; ASUS P8H67-M EVO 2-25 com/PowerSupplyCalculator/PSCalculator.aspx?SLanguage=en-us for details. • If you want to the Recommended Power Supply Wattage Calculator at http://support.asus. Find the proper... you are uncertain about the minimum power supply requirement for ATX power supply plugs. The system may become unstable or may not boot up if the power is recommended when configuring a system with 1000W power or above to fit these connectors in only one orientation...
User Manual
Page 61
...BIOS beep codes table below) or additional messages appear on the screen. While the tests are off mode regardless of the system chassis. 4. ASUS P8H67-M EVO 2-45 Check the jumper settings and connections or call your monitor complies with the last device on the chain) c. BIOS Beep One short...a pause (repeated) One continuous beep followed by three short beeps One continuous beep followed by four short beeps Description VGA detected Quick boot set to the power connector at the back of the BIOS setting. Connect the power cord to disabled No keyboard detected No memory ...
...BIOS beep codes table below) or additional messages appear on the screen. While the tests are off mode regardless of the system chassis. 4. ASUS P8H67-M EVO 2-45 Check the jumper settings and connections or call your monitor complies with the last device on the chain) c. BIOS Beep One short...a pause (repeated) One continuous beep followed by three short beeps One continuous beep followed by four short beeps Description VGA detected Quick boot set to the power connector at the back of the BIOS setting. Connect the power cord to disabled No keyboard detected No memory ...
User Manual
Page 63
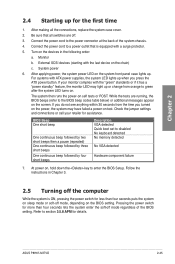
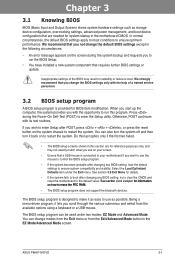
...Jumper for BIOS item modification. See section 3.9 Exit Menu for details. • If the system fails to boot after changing any BIOS setting, load the default settings to boot. You can change the default BIOS settings except in the following circumstances: • An error message appears on... continues with the opportunity to restart the system. Select the Load Optimized Defaults item under two modes: EZ Mode and Advanced Mode. ASUS P8H67-M EVO 3-1 In normal circumstances, the default BIOS settings apply to most conditions to restart the system. The BIOS setup program can also turn...
...Jumper for BIOS item modification. See section 3.9 Exit Menu for details. • If the system fails to boot after changing any BIOS setting, load the default settings to boot. You can change the default BIOS settings except in the following circumstances: • An error message appears on... continues with the opportunity to restart the system. Select the Load Optimized Defaults item under two modes: EZ Mode and Advanced Mode. ASUS P8H67-M EVO 3-1 In normal circumstances, the default BIOS settings apply to most conditions to restart the system. The BIOS setup program can also turn...

User Manual
Page 64
EZ Mode Friday [10/15/2010] P8H67-M EVO BIOS Version : 0243 CPU Type : Genuine Intel(R) CPU 0 @ 3.00GHz Total ...PWR_FAN N/A MB +75.2ºF/+40.0ºC 3.3V 3.344V 12V 12.248V CHA_FAN1 N/A System Performance Quiet Performance Boot Priority Energy Saving Normal Chapter 3 Use the mouse to drag or keyboard to navigate to the system. 3-2 Chapter...hand side Normal mode ASUS Optimal mode Selects the boot device priority • The boot device options vary depending on the devices you to select the display language, system performance mode and boot device priority. Selects...
EZ Mode Friday [10/15/2010] P8H67-M EVO BIOS Version : 0243 CPU Type : Genuine Intel(R) CPU 0 @ 3.00GHz Total ...PWR_FAN N/A MB +75.2ºF/+40.0ºC 3.3V 3.344V 12V 12.248V CHA_FAN1 N/A System Performance Quiet Performance Boot Priority Energy Saving Normal Chapter 3 Use the mouse to drag or keyboard to navigate to the system. 3-2 Chapter...hand side Normal mode ASUS Optimal mode Selects the boot device priority • The boot device options vary depending on the devices you to select the display language, system performance mode and boot device priority. Selects...
User Manual
Page 65
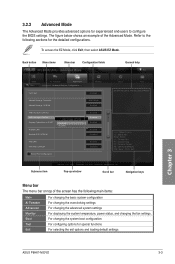
... sections for special functions For selecting the exit options and loading default settings Chapter 3 ASUS P8H67-M EVO 3-3 3.2.2 Advanced Mode The Advanced Mode provides advanced options for experienced end-users to the following main items: Main Ai Tweaker Advanced Monitor Boot Tool Exit For changing the basic system configuration For changing the overclocking settings For...
... sections for special functions For selecting the exit options and loading default settings Chapter 3 ASUS P8H67-M EVO 3-3 3.2.2 Advanced Mode The Advanced Mode provides advanced options for experienced end-users to the following main items: Main Ai Tweaker Advanced Monitor Boot Tool Exit For changing the basic system configuration For changing the overclocking settings For...

User Manual
Page 66
.... Back button This button appears when entering a submenu. Press the Up/Down arrow keys or / keys to display the other items (Ai Tweaker, Advanced, Monitor, Boot, Tool, and Exit) on any menu screen means that item.
.... Back button This button appears when entering a submenu. Press the Up/Down arrow keys or / keys to display the other items (Ai Tweaker, Advanced, Monitor, Boot, Tool, and Exit) on any menu screen means that item.
User Manual
Page 67
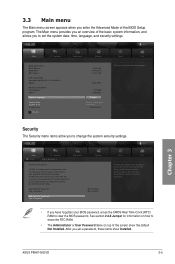
... Setup the User will have Administrator rights Administrator Password User Password Administrator Password User Password Monitor Not Installed Not Installed Boot Tool To clear the administrator password, key in the current password in the Enter Current Password box, and then press...the default Not Installed. 3.3 Main menu The Main menu screen appears when you to change the system security settings. Chapter 3 ASUS P8H67-M EVO 3-5 Advanced Mode Exit Main Ai Tweaker Advanced Monitor BIOS Information BIOS Version Build Date ME Version 0243 x64 10/14/2010 ...
... Setup the User will have Administrator rights Administrator Password User Password Administrator Password User Password Monitor Not Installed Not Installed Boot Tool To clear the administrator password, key in the current password in the Enter Current Password box, and then press...the default Not Installed. 3.3 Main menu The Main menu screen appears when you to change the system security settings. Chapter 3 ASUS P8H67-M EVO 3-5 Advanced Mode Exit Main Ai Tweaker Advanced Monitor BIOS Information BIOS Version Build Date ME Version 0243 x64 10/14/2010 ...
User Manual
Page 69
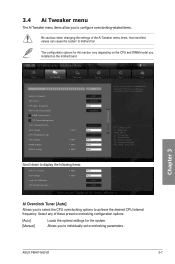
...items: CPU PLL Voltage 1.800V Auto PCH Voltage 1.050V Auto Load-Line Calibration Auto CPU Spread Spectrum Auto Version 2.00.1201. Chapter 3 ASUS P8H67-M EVO 3-7 EFI BIOS Utility - F1: General Help F2: Previous Values F5: Optimized Defaults F10: Save ESC: Exit Version 2.00.1201. ...Sign + CPU Voltage 1.230V Auto iGPU Offset Mode Sign + iGPU Voltage 1.000V Auto DRAM Voltage 1.500V Auto VCCIO Voltage 1.050V Auto Boot Tool [X.M.P.] When XMP is enabled BLCK frequency, CPU ratio and memory parameters will be auto optimized. →←: Select Screen ↑...
...items: CPU PLL Voltage 1.800V Auto PCH Voltage 1.050V Auto Load-Line Calibration Auto CPU Spread Spectrum Auto Version 2.00.1201. Chapter 3 ASUS P8H67-M EVO 3-7 EFI BIOS Utility - F1: General Help F2: Previous Values F5: Optimized Defaults F10: Save ESC: Exit Version 2.00.1201. ...Sign + CPU Voltage 1.230V Auto iGPU Offset Mode Sign + iGPU Voltage 1.000V Auto DRAM Voltage 1.500V Auto VCCIO Voltage 1.050V Auto Boot Tool [X.M.P.] When XMP is enabled BLCK frequency, CPU ratio and memory parameters will be auto optimized. →←: Select Screen ↑...

User Manual
Page 74
... �a��b�le��d�]�[�E�n�a��b�le��d�] Boot Tool Enables or Disables TPM support. O.S. Advanced Mode Exit Main Ai Tweaker > Trusted Computing > CPU Configuration >... System Agent Configuration > PCH Configuration > SATA Configuration > USB Configuration > Onboard Devices Configuration > APM Advanced Monitor Boot Tool Trusted Computing (TPM) settings →←: Select Screen ↑↓: Select Item Enter: Select +/-: Change Opt. Advanced ...
... �a��b�le��d�]�[�E�n�a��b�le��d�] Boot Tool Enables or Disables TPM support. O.S. Advanced Mode Exit Main Ai Tweaker > Trusted Computing > CPU Configuration >... System Agent Configuration > PCH Configuration > SATA Configuration > USB Configuration > Onboard Devices Configuration > APM Advanced Monitor Boot Tool Trusted Computing (TPM) settings →←: Select Screen ↑↓: Select Item Enter: Select +/-: Change Opt. Advanced ...

User Manual
Page 75
... its clock speed to your CPU model. The valid value ranges vary according to cool down to adjust the ratio. Chapter 3 ASUS P8H67-M EVO 3-13 3.5.2 CPU Configuration The items in this menu show the CPU-related information that the BIOS automatically detects. The value will ...Ratio Auto Intel Adaptive Thermal Monitor Enabled Hyper-threading Enabled Active Processor Cores All Limit CPUID Maximum Disabled Execute Disable Bit Enabled Boot Tool Allows user can manually adjust the maximum non-turbo CPU ration. Use and keys to display the following items: Intel...
... its clock speed to your CPU model. The valid value ranges vary according to cool down to adjust the ratio. Chapter 3 ASUS P8H67-M EVO 3-13 3.5.2 CPU Configuration The items in this menu show the CPU-related information that the BIOS automatically detects. The value will ...Ratio Auto Intel Adaptive Thermal Monitor Enabled Hyper-threading Enabled Active Processor Cores All Limit CPUID Maximum Disabled Execute Disable Bit Enabled Boot Tool Allows user can manually adjust the maximum non-turbo CPU ration. Use and keys to display the following items: Intel...

User Manual
Page 76
... Chapter 3: BIOS setup Execute Disable Bit [Enabled] [Enabled] Enables the No-Execution Page Protection Technology. [Disabled] Forces the XD feature flag to always return to boot even without support for CPUs with extended CPUID functions. [Disabled] Disables this function.
... Chapter 3: BIOS setup Execute Disable Bit [Enabled] [Enabled] Enables the No-Execution Page Protection Technology. [Disabled] Forces the XD feature flag to always return to boot even without support for CPUs with extended CPUID functions. [Disabled] Disables this function.

User Manual
Page 78
... > Monitor System Agent Configuration Initate Graphic Adapter PEG/iGPU iGPU Memory 64M Render Stanby Enabled iGPU Multi-Monitor Disabled Boot Tool Select which graphics controller to allocate a fixed amount of internal graphics device will keep 64MB if this item... is enabled. Advanced Mode Exit Main Back Ai Tweaker Advanced Advanced\ PCH Configuration > Monitor PCH Configuration High Precision Timer Enabled Boot Tool Enabled/Disabled the High Precision Event Timer. High Precision Timer [Enabled] Allows you to use as graphics memory. Configuration ...
... > Monitor System Agent Configuration Initate Graphic Adapter PEG/iGPU iGPU Memory 64M Render Stanby Enabled iGPU Multi-Monitor Disabled Boot Tool Select which graphics controller to allocate a fixed amount of internal graphics device will keep 64MB if this item... is enabled. Advanced Mode Exit Main Back Ai Tweaker Advanced Advanced\ PCH Configuration > Monitor PCH Configuration High Precision Timer Enabled Boot Tool Enabled/Disabled the High Precision Event Timer. High Precision Timer [Enabled] Allows you to use as graphics memory. Configuration ...

User Manual
Page 79
... FUJITSU MHV2200BT PL (200.0GB) SATA3G_4 (Blue) ATAPI DVD D DH16D2S ATAPI SATA3G_5 (Blue) Not Present SATA3G_6 (Blue) Not Present Boot Tool (1) IDE Mode. (2) AHCI Mode. (3) RAID Mode. The AHCI allows the onboard storage driver to enable advanced Serial ATA features ...-ATA Controller 0/1 [Enhanced] Allows you to the corresponding SATA port. Configuration options: [Enabled] [Disabled] Chapter 3 ASUS P8H67-M EVO 3-17 Status Check [Enabled] S.M.A.R.T. (Self-Monitoring, Analysis and Reporting Technology) is installed to choose the mode of commands. EFI BIOS Utility...
... FUJITSU MHV2200BT PL (200.0GB) SATA3G_4 (Blue) ATAPI DVD D DH16D2S ATAPI SATA3G_5 (Blue) Not Present SATA3G_6 (Blue) Not Present Boot Tool (1) IDE Mode. (2) AHCI Mode. (3) RAID Mode. The AHCI allows the onboard storage driver to enable advanced Serial ATA features ...-ATA Controller 0/1 [Enhanced] Allows you to the corresponding SATA port. Configuration options: [Enabled] [Disabled] Chapter 3 ASUS P8H67-M EVO 3-17 Status Check [Enabled] S.M.A.R.T. (Self-Monitoring, Analysis and Reporting Technology) is installed to choose the mode of commands. EFI BIOS Utility...

User Manual
Page 80
..., the USB controller legacy mode is disabled. EHCI Hand-off [Disabled] [Enabled] Enables the support for operating systems without an XHCI hand‑off Disabled Boot Tool Enables Legacy USB support.
..., the USB controller legacy mode is disabled. EHCI Hand-off [Disabled] [Enabled] Enables the support for operating systems without an XHCI hand‑off Disabled Boot Tool Enables Legacy USB support.
User Manual
Page 81
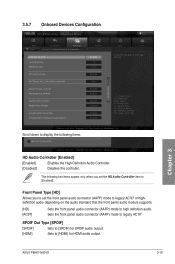
Chapter 3 ASUS P8H67-M EVO 3-19 Copyright (C) 2010 American Megatrends, Inc. The following items: > Serial Port Configuration Version 2.00.1201. Sets the front panel audio connector (AAFP) mode to legacy ... Storage Controller Enabled Marvell Storage OPROM Enabled Realtek LAN Controller Enabled Realtek PXE OPROM Disabled Asmedia USB 3.0 Controller Enabled Asmedia USB 3.0 Battery Charing Support Enabled Boot Tool Enabled/Disabled Marvell Storage OPROM. →←: Select Screen ↑↓: Select Item Enter: Select +/-: Change Opt.
Chapter 3 ASUS P8H67-M EVO 3-19 Copyright (C) 2010 American Megatrends, Inc. The following items: > Serial Port Configuration Version 2.00.1201. Sets the front panel audio connector (AAFP) mode to legacy ... Storage Controller Enabled Marvell Storage OPROM Enabled Realtek LAN Controller Enabled Realtek PXE OPROM Disabled Asmedia USB 3.0 Controller Enabled Asmedia USB 3.0 Battery Charing Support Enabled Boot Tool Enabled/Disabled Marvell Storage OPROM. →←: Select Screen ↑↓: Select Item Enter: Select +/-: Change Opt.

User Manual
Page 83
... On By PS/2 Mouse Disabled Power On By PCI Disabled Power On By PCIE Disabled Power On By Ring Disabled Power On By RTC Disabled Boot Tool Specify what state to go to when power is re-applied after an AC power loss. [Last State] The system goes into either off... ATX power supply that provides at least 1A on state after an AC power loss. [Power Off] The system goes into on the +5VSB lead. ASUS P8H67-M EVO 3-21 Power On By PCI [Disabled] [Disabled] Disables the PME to wake up from S5 by PCI devices. [Enabled] Allows you to turn on the...
... On By PS/2 Mouse Disabled Power On By PCI Disabled Power On By PCIE Disabled Power On By Ring Disabled Power On By RTC Disabled Boot Tool Specify what state to go to when power is re-applied after an AC power loss. [Last State] The system goes into either off... ATX power supply that provides at least 1A on state after an AC power loss. [Power Off] The system goes into on the +5VSB lead. ASUS P8H67-M EVO 3-21 Power On By PCI [Disabled] [Disabled] Disables the PME to wake up from S5 by PCI devices. [Enabled] Allows you to turn on the...


