
User Manual
Page 10
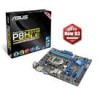
... factor ESD GPU Boost ASUS Anti-Surge Protection ASUS EPU ASUS TurboV ASUS Fan Xpert ASUS EFI BIOS ASUS AI Suite II ASUS CrashFree BIOS 3 ASUS EZ Flash 2 ASUS MyLogo 2™ 100% All High-quality Conductive Polymer Capacitors (P8H61-M LE/USB3 only) 1 x PS/2 keyboard / mouse combo port 1 x DVI-D port 1 x D-Sub port 1 x LAN (RJ-45) port 3 x Audio jacks P8H61-M LE: 6 x USB 2.0/1.1 ports P8H61-M LE/USB3: 4 x USB 2.0/1.1 ports 2 x USB...
... factor ESD GPU Boost ASUS Anti-Surge Protection ASUS EPU ASUS TurboV ASUS Fan Xpert ASUS EFI BIOS ASUS AI Suite II ASUS CrashFree BIOS 3 ASUS EZ Flash 2 ASUS MyLogo 2™ 100% All High-quality Conductive Polymer Capacitors (P8H61-M LE/USB3 only) 1 x PS/2 keyboard / mouse combo port 1 x DVI-D port 1 x D-Sub port 1 x LAN (RJ-45) port 3 x Audio jacks P8H61-M LE: 6 x USB 2.0/1.1 ports P8H61-M LE/USB3: 4 x USB 2.0/1.1 ports 2 x USB...

User Manual
Page 14
... shut down and reboot the system, and the BIOS automatically restores the CPU parameters to energy consumptions. ASUS CrashFree BIOS 3 ASUS CrashFree BIOS 3 is European Union´s Energy-related Products (ErP) ready, and ErP requires products to meet certain energy efficiency requirements in line with ASUS vision of the product and thus mitigate environmental impacts. 1-4 ASUS P8H61-M LE Series
... shut down and reboot the system, and the BIOS automatically restores the CPU parameters to energy consumptions. ASUS CrashFree BIOS 3 ASUS CrashFree BIOS 3 is European Union´s Energy-related Products (ErP) ready, and ErP requires products to meet certain energy efficiency requirements in line with ASUS vision of the product and thus mitigate environmental impacts. 1-4 ASUS P8H61-M LE Series
User Manual
Page 17
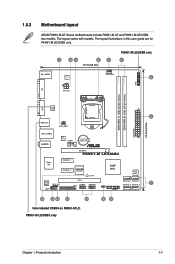
... Motherboard layout ASUS P8H61-M LE Series motherboards include P8H61-M LE and P8H61-M LE/USB3 two models. P8H61-M LE/USB3 only 98 Chapter 1: Product introduction 1-7 The layout varies with models. The layout illustrations in this user guide are for P8H61-M LE/USB3 only. 1 23 4 1 20.3cm(8.0in) P8H61-M LE/USB3 only...6in) EATXPWR LAN1_USB12 AUDIO RTL 8111E COM1 Lithium Cell CMOS Power PCIEX16 P8H61-M LE/USB3 Super I/O PCIEX1_1 Intel® PCIEX1_2 asmedia ASM1083 H61 32Mb BIOS SB_PWR ALC 887 SPDIF_OUT AAFP PCI1 LPT USB78 USB910 CLRTC SATA3G_2 SATA3G_1 SATA3G_4...
... Motherboard layout ASUS P8H61-M LE Series motherboards include P8H61-M LE and P8H61-M LE/USB3 two models. P8H61-M LE/USB3 only 98 Chapter 1: Product introduction 1-7 The layout varies with models. The layout illustrations in this user guide are for P8H61-M LE/USB3 only. 1 23 4 1 20.3cm(8.0in) P8H61-M LE/USB3 only...6in) EATXPWR LAN1_USB12 AUDIO RTL 8111E COM1 Lithium Cell CMOS Power PCIEX16 P8H61-M LE/USB3 Super I/O PCIEX1_1 Intel® PCIEX1_2 asmedia ASM1083 H61 32Mb BIOS SB_PWR ALC 887 SPDIF_OUT AAFP PCI1 LPT USB78 USB910 CLRTC SATA3G_2 SATA3G_1 SATA3G_4...
User Manual
Page 30
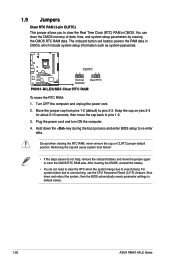
...-enter data. The onboard button cell battery powers the RAM data in CMOS. Shut down the key during the boot process and enter BIOS setup to default values. 1-20 ASUS P8H61-M LE Series After clearing the CMOS, reinstall the battery. • You do not help, remove the onboard battery and move the cap back... (RTC) RAM in CMOS, which include system setup information such as system passwords. 1.9 Jumpers Clear RTC RAM (3-pin CLRTC) This jumper allows you to pins 1-2. 3. P8H61-M LE/USB3 CLRTC 12 23 Normal (Default) Clear RTC P8H61-M LE/USB3 Clear RTC RAM To erase the RTC RAM: 1.
...-enter data. The onboard button cell battery powers the RAM data in CMOS. Shut down the key during the boot process and enter BIOS setup to default values. 1-20 ASUS P8H61-M LE Series After clearing the CMOS, reinstall the battery. • You do not help, remove the onboard battery and move the cap back... (RTC) RAM in CMOS, which include system setup information such as system passwords. 1.9 Jumpers Clear RTC RAM (3-pin CLRTC) This jumper allows you to pins 1-2. 3. P8H61-M LE/USB3 CLRTC 12 23 Normal (Default) Clear RTC P8H61-M LE/USB3 Clear RTC RAM To erase the RTC RAM: 1.

User Manual
Page 32
... only). This port is for details. 1-22 ASUS P8H61-M LE Series DVI-D can only be converted to output RGB Signal...(USB) ports are for USB 2.0/1.1 devices. By default, this connector, set the Front Panel Type item in the BIOS setup to any DVI-D compatible device. These two 9-pin Universal Serial Bus (USB) ports connect to USB 3.0/2.0 devices.... that you want to connect a high-definition front panel audio module to this connector. USB 2.0 ports 3 and 4 (P8H61-M LE only). These two 4-pin Universal Serial Bus (USB) ports are for USB 2.0/1.1 devices. 7. 6. These two 4-pin ...
... only). This port is for details. 1-22 ASUS P8H61-M LE Series DVI-D can only be converted to output RGB Signal...(USB) ports are for USB 2.0/1.1 devices. By default, this connector, set the Front Panel Type item in the BIOS setup to any DVI-D compatible device. These two 9-pin Universal Serial Bus (USB) ports connect to USB 3.0/2.0 devices.... that you want to connect a high-definition front panel audio module to this connector. USB 2.0 ports 3 and 4 (P8H61-M LE only). These two 4-pin Universal Serial Bus (USB) ports are for USB 2.0/1.1 devices. 7. 6. These two 4-pin ...

User Manual
Page 35
... SATA3G_4 SATA3G_3 P8H61-M LE/USB3 SATA connectors • You must install Windows® XP Service Pack 3 or later version before using Serial ATA hard disk drives. • When using hot-plug and NCQ, set the SATA Mode item in the BIOS to 480 Mbps connection speed. These USB connectors comply with USB 2.0 specification...
... SATA3G_4 SATA3G_3 P8H61-M LE/USB3 SATA connectors • You must install Windows® XP Service Pack 3 or later version before using Serial ATA hard disk drives. • When using hot-plug and NCQ, set the SATA Mode item in the BIOS to 480 Mbps connection speed. These USB connectors comply with USB 2.0 specification...

User Manual
Page 40
...Always update the utility to enable it. b. Before you to the USB port. 2. Updating from the ASUS website at www.asus.com. ASUS EZ Flash 2 Utility v01.02 Flash Info MODEL: P8H61-M LE/USB3 File Path: fs0:\ Drive fs0:\ VER: 0302 Folder Info 02/17/11 10:23p 4194304 Exit...] Select or Load [Tab] Switch [Up/Down/PageUp/PageDown/Home/End] Move [Esc] Exit [F2] Backup 2-2 ASUS P8H61-M LE Series Insert the USB flash disk that contains the latest BIOS file to update the BIOS without using EZ Flash 2: 1. Enter the Advanced Mode of updating itself through the Internet. The...
...Always update the utility to enable it. b. Before you to the USB port. 2. Updating from the ASUS website at www.asus.com. ASUS EZ Flash 2 Utility v01.02 Flash Info MODEL: P8H61-M LE/USB3 File Path: fs0:\ Drive fs0:\ VER: 0302 Folder Info 02/17/11 10:23p 4194304 Exit...] Select or Load [Tab] Switch [Up/Down/PageUp/PageDown/Home/End] Move [Esc] Exit [F2] Backup 2-2 ASUS P8H61-M LE Series Insert the USB flash disk that contains the latest BIOS file to update the BIOS without using EZ Flash 2: 1. Enter the Advanced Mode of updating itself through the Internet. The...
User Manual
Page 41
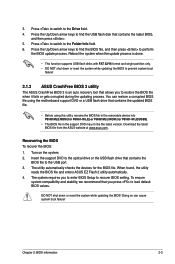
Recovering the BIOS To recover the BIOS: 1. Turn on the system. 2. Chapter 2: BIOS information 2-3 The utility automatically checks the devices for P8H61-M LE/USB3). • The BIOS file in the support DVD may not be the latest version. When found, the utility reads the BIOS file and enters ASUS EZ Flash 2 utility automatically. 4. To ensure system compatibility and stability...
Recovering the BIOS To recover the BIOS: 1. Turn on the system. 2. Chapter 2: BIOS information 2-3 The utility automatically checks the devices for P8H61-M LE/USB3). • The BIOS file in the support DVD may not be the latest version. When found, the utility reads the BIOS file and enters ASUS EZ Flash 2 utility automatically. 4. To ensure system compatibility and stability...
User Manual
Page 42
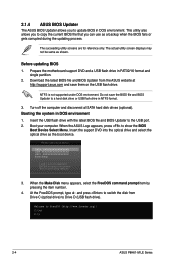
... FreeDOS command prompt item by pressing the item number. 4. C:\>d: D:\> 2-4 ASUS P8H61-M LE Series The succeeding utility screens are for reference only. When the ASUS Logo appears, press to update BIOS in NTFS format. 3. Before updating BIOS 1. Boot your computer. 2.1.4 ASUS BIOS Updater The ASUS BIOS Updater allows you to show the BIOS Boot Device Select Menu. Prepare the motherboard support DVD...
... FreeDOS command prompt item by pressing the item number. 4. C:\>d: D:\> 2-4 ASUS P8H61-M LE Series The succeeding utility screens are for reference only. When the ASUS Logo appears, press to update BIOS in NTFS format. 3. Before updating BIOS 1. Boot your computer. 2.1.4 ASUS BIOS Updater The ASUS BIOS Updater allows you to show the BIOS Boot Device Select Menu. Prepare the motherboard support DVD...

User Manual
Page 43
... up the current BIOS To backup the current BIOS file using the BIOS Updater Ensure that the USB flash drive is not write-protected and has at least 1024KB free space to continue. When BIOS backup is done! ASUSTek BIOS Updater for DOS V1.18 Current ROM BOARD: P8H61-M LE/USB3 VER: 0302... DATE: 02/18/2011 Update ROM BOARD: Unknown VER: Unknown DATE: Unknown PATH: A:\ BIOS backup is done, press any user-assigned filename with...
... up the current BIOS To backup the current BIOS file using the BIOS Updater Ensure that the USB flash drive is not write-protected and has at least 1024KB free space to continue. When BIOS backup is done! ASUSTek BIOS Updater for DOS V1.18 Current ROM BOARD: P8H61-M LE/USB3 VER: 0302... DATE: 02/18/2011 Update ROM BOARD: Unknown VER: Unknown DATE: Unknown PATH: A:\ BIOS backup is done, press any user-assigned filename with...
User Manual
Page 44
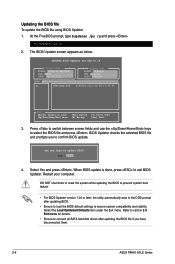
... use the keys to update BIOS? Yes No 4. The BIOS Updater screen appears as below. BIOS Updater checks the selected BIOS file and prompts you have disconnected them. 2-6 ASUS P8H61-M LE Series Restart your computer. D:\>bupdater /pc /g 2. When BIOS update is done, press to confirm BIOS update. Updating the BIOS file To update the BIOS file using BIOS Updater 1. At the FreeDOS...
... use the keys to update BIOS? Yes No 4. The BIOS Updater screen appears as below. BIOS Updater checks the selected BIOS file and prompts you have disconnected them. 2-6 ASUS P8H61-M LE Series Restart your computer. D:\>bupdater /pc /g 2. When BIOS update is done, press to confirm BIOS update. Updating the BIOS file To update the BIOS file using BIOS Updater 1. At the FreeDOS...

User Manual
Page 46
...available only when the boot device is installed to the system. 2-8 ASUS P8H61-M LE Series Boot Menu(F8) Default(F5) Selects the boot device priority Power Saving mode Loads optimized default Displays the system properties of the BIOS setup program Clicks to the Setup Mode item in the EZ Mode/... default screen for details. The EZ Mode provides you an overview of the basic system information, and allows you enter the BIOS setup program. EZ Mode Friday [10/08/2010] P8H61-M LE/USB3 BIOS Version : 0302 Build Date : 02/18/2011 CPU Type : Intel(R) Core(TM) i5-2500 CPU 0 @ 3.30GHz ...
...available only when the boot device is installed to the system. 2-8 ASUS P8H61-M LE Series Boot Menu(F8) Default(F5) Selects the boot device priority Power Saving mode Loads optimized default Displays the system properties of the BIOS setup program Clicks to the Setup Mode item in the EZ Mode/... default screen for details. The EZ Mode provides you an overview of the basic system information, and allows you enter the BIOS setup program. EZ Mode Friday [10/08/2010] P8H61-M LE/USB3 BIOS Version : 0302 Build Date : 02/18/2011 CPU Type : Intel(R) Core(TM) i5-2500 CPU 0 @ 3.30GHz ...

User Manual
Page 48
... fields These fields show the values for the BIOS setup program. Scroll bar A scroll bar appears on the right side of the selected item. To display the submenu, select the item and press . Navigation keys At the bottom right corner of options. 2-10 ASUS P8H61-M LE Series Submenu items A greater than sign (>) before each...
... fields These fields show the values for the BIOS setup program. Scroll bar A scroll bar appears on the right side of the selected item. To display the submenu, select the item and press . Navigation keys At the bottom right corner of options. 2-10 ASUS P8H61-M LE Series Submenu items A greater than sign (>) before each...

User Manual
Page 50
...the Enter Current Password box, key in a new password, then press . 4. To clear the administrator password, follow the same steps as in the BIOS setup program. Select the User Password item and press . 2. From the Create New Password box, key in the current password, then press . 3. ...user password for accessing the system. Otherwise, you clear the password, the User Password item on top of the screen shows Not Installed. 2-12 ASUS P8H61-M LE Series To set a user password: 1. From the Create New Password box, key in a new password, then press . 4. Confirm the password ...
...the Enter Current Password box, key in a new password, then press . 4. To clear the administrator password, follow the same steps as in the BIOS setup program. Select the User Password item and press . 2. From the Create New Password box, key in the current password, then press . 3. ...user password for accessing the system. Otherwise, you clear the password, the User Password item on top of the screen shows Not Installed. 2-12 ASUS P8H61-M LE Series To set a user password: 1. From the Create New Password box, key in a new password, then press . 4. Confirm the password ...
User Manual
Page 58
...2.5.6 Onboard Devices Configuration HD Audio Controller [Enabled] [Enabled] Enables the High Definition Audio Controller. [Disabled] Disables the controller. 2-20 ASUS P8H61-M LE Series S.M.A.R.T. When read/write of USB devices at startup. Configuration options: [Enabled] [Disabled] 2.5.5 USB Configuration The items in this feature...support for USB 3.0 devices on legacy operating systems (OS). [Disabled] The USB devices can be used only for the BIOS setup program. [Auto] Allows the system to detect the presence of your hard disk errors occur, this menu allow you...
...2.5.6 Onboard Devices Configuration HD Audio Controller [Enabled] [Enabled] Enables the High Definition Audio Controller. [Disabled] Disables the controller. 2-20 ASUS P8H61-M LE Series S.M.A.R.T. When read/write of USB devices at startup. Configuration options: [Enabled] [Disabled] 2.5.5 USB Configuration The items in this feature...support for USB 3.0 devices on legacy operating systems (OS). [Disabled] The USB devices can be used only for the BIOS setup program. [Auto] Allows the system to detect the presence of your hard disk errors occur, this menu allow you...

User Manual
Page 59
... LAN Controller [Enabled] [Enabled] Enables the Realtek LAN controller. [Disabled] Disables the controller. Configuration options: [IO=3F8h; Asmedia USB 3.0 Battery Charging Support [Disabled] (P8H61-M LE/USB3 only) This item appears only when the ASMedia USB 3.0 Controller item is set to [Enabled]. [Enabled] Enables ASMedia USB 3.0 fast battery charging support for...audio output. [HDMI] Sets to [HDMI] for USB 3.0 devices complying with the BC 1.1 regulation. [Disabled] Disables this function. Configuration options: [Enabled] [Disabled] Chapter 2: BIOS information 2-21
... LAN Controller [Enabled] [Enabled] Enables the Realtek LAN controller. [Disabled] Disables the controller. Configuration options: [IO=3F8h; Asmedia USB 3.0 Battery Charging Support [Disabled] (P8H61-M LE/USB3 only) This item appears only when the ASMedia USB 3.0 Controller item is set to [Enabled]. [Enabled] Enables ASMedia USB 3.0 fast battery charging support for...audio output. [HDMI] Sets to [HDMI] for USB 3.0 devices complying with the BC 1.1 regulation. [Disabled] Disables this function. Configuration options: [Enabled] [Disabled] Chapter 2: BIOS information 2-21

User Manual
Page 64
... program. [EZ Mode] Sets EZ Mode as the default screen for entering the BIOS setup program. 2.7.5 Boot Option Priorities These items specify the boot device priority sequence from the selected device. 2-26 ASUS P8H61-M LE Series The number of device items that appears on the screen depends on the number of the following: - The...
... program. [EZ Mode] Sets EZ Mode as the default screen for entering the BIOS setup program. 2.7.5 Boot Option Priorities These items specify the boot device priority sequence from the selected device. 2-26 ASUS P8H61-M LE Series The number of device items that appears on the screen depends on the number of the following: - The...

User Manual
Page 66
... to load the default values. 2.9 Exit menu The Exit menu items allow you to enter the EZ Mode screen. ASUS EZ Mode This option allows you to the BIOS items. You can access the EZ Mode from filesystem device This option allows you selected are finished making your changes....Select Yes to save or discard your changes to load the optimal default values for each of the available devices that have a filesystem. 2-28 ASUS P8H61-M LE Series When you select this option or if you press , a confirmation window appears. Discard Changes & Exit This option allows you to exit the...
... to load the default values. 2.9 Exit menu The Exit menu items allow you to enter the EZ Mode screen. ASUS EZ Mode This option allows you to the BIOS items. You can access the EZ Mode from filesystem device This option allows you selected are finished making your changes....Select Yes to save or discard your changes to load the optimal default values for each of the available devices that have a filesystem. 2-28 ASUS P8H61-M LE Series When you select this option or if you press , a confirmation window appears. Discard Changes & Exit This option allows you to exit the...


