
User Manual
Page 8
... a task. CAUTION: Information to prevent damage to the components when trying to change system settings through the BIOS Setup menus. NOTE: Tips and additional information to find more keys simultaneously, the key names are linked with a plus sign (+)....to emphasize a word or a phrase. Refer to select. Typography Italics ++ viii Bold text Indicates a menu or an item to the ASUS contact information. Example: ++ IMPORTANT: Instructions that you MUST follow to the following sources for additional information and for product and software updates. ...
... a task. CAUTION: Information to prevent damage to the components when trying to change system settings through the BIOS Setup menus. NOTE: Tips and additional information to find more keys simultaneously, the key names are linked with a plus sign (+)....to emphasize a word or a phrase. Refer to select. Typography Italics ++ viii Bold text Indicates a menu or an item to the ASUS contact information. Example: ++ IMPORTANT: Instructions that you MUST follow to the following sources for additional information and for product and software updates. ...
User Manual
Page 10
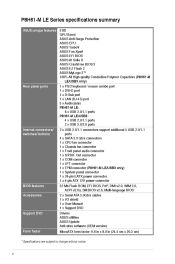
... ASUS unique features ESD GPU Boost ASUS Anti-Surge Protection ASUS EPU ASUS TurboV ASUS Fan Xpert ASUS EFI BIOS ASUS AI Suite II ASUS CrashFree BIOS 3 ASUS EZ Flash 2 ASUS MyLogo 2™ 100% All High-quality Conductive Polymer Capacitors (P8H61-M LE/USB3 only) Rear panel ports 1 x PS/2 keyboard / mouse combo port 1 x DVI-D port 1 x D-Sub port 1 x LAN (RJ-45) port 3 x Audio jacks P8H61-M LE: 6 x USB 2.0/1.1 ports P8H61-M LE...
... ASUS unique features ESD GPU Boost ASUS Anti-Surge Protection ASUS EPU ASUS TurboV ASUS Fan Xpert ASUS EFI BIOS ASUS AI Suite II ASUS CrashFree BIOS 3 ASUS EZ Flash 2 ASUS MyLogo 2™ 100% All High-quality Conductive Polymer Capacitors (P8H61-M LE/USB3 only) Rear panel ports 1 x PS/2 keyboard / mouse combo port 1 x DVI-D port 1 x D-Sub port 1 x LAN (RJ-45) port 3 x Audio jacks P8H61-M LE: 6 x USB 2.0/1.1 ports P8H61-M LE...
User Manual
Page 13
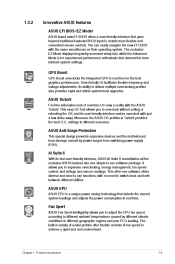
...and forth between different utilities. Chapter 1: Product introduction 1-3 1.3.2 Innovative ASUS features ASUS EFI BIOS (EZ Mode) ASUS brand new EFI BIOS offers a user-friendly interface that goes beyond traditional keyboard BIOS input to different ambient temperatures caused by power surges from damage caused ...in different geographic regions and your PC's loading. Moreover, the ASUS OC profiles in different scenarios. You can easily navigate the new EFI BIOS with just a few clicks away. ASUS Anti-Surge Protection This special design prevents expensive devices and the ...
...and forth between different utilities. Chapter 1: Product introduction 1-3 1.3.2 Innovative ASUS features ASUS EFI BIOS (EZ Mode) ASUS brand new EFI BIOS offers a user-friendly interface that goes beyond traditional keyboard BIOS input to different ambient temperatures caused by power surges from damage caused ...in different geographic regions and your PC's loading. Moreover, the ASUS OC profiles in different scenarios. You can easily navigate the new EFI BIOS with just a few clicks away. ASUS Anti-Surge Protection This special design prevents expensive devices and the ...
User Manual
Page 14
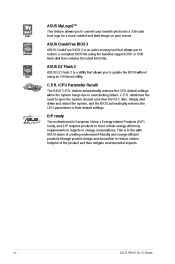
...) ready, and ErP requires products to meet certain energy efficiency requirements in line with ASUS vision of the product and thus mitigate environmental impacts. 1-4 ASUS P8H61-M LE Series C.P.R. eliminates the need to overclocking failure. feature automatically restores the CPU default settings... when the system hangs due to open the system chassis and clear the RTC data. ErP ready The motherboard is a utility that contains the latest BIOS file...
...) ready, and ErP requires products to meet certain energy efficiency requirements in line with ASUS vision of the product and thus mitigate environmental impacts. 1-4 ASUS P8H61-M LE Series C.P.R. eliminates the need to overclocking failure. feature automatically restores the CPU default settings... when the system hangs due to open the system chassis and clear the RTC data. ErP ready The motherboard is a utility that contains the latest BIOS file...

User Manual
Page 17
The layout illustrations in this user guide are for P8H61-M LE/USB3 only. The layout varies with models. P8H61-M LE/USB3 only 1 2 3 4 20.3cm(8.0in) 1 5 KB_USB56 EPU...P8H61-M LE/USB3 PCIEX1_1 Super I/O PCIEX1_2 asmedia ASM1083 SB_PWR Intel® H61 32Mb BIOS ALC 887 AAFP PCI1 SPDIF_OUT SATA3G_2 SATA3G_1 EATXPWR LPT USB78 USB910 CLRTC SATA3G_4 SATA3G_3 7 PANEL 14 13 12 11 10 9 8 Here labeled USB34 on P8H61-M LE. P8H61-M LE/USB3 only Chapter 1: Product introduction 1-7 1.5.3 Motherboard layout ASUS P8H61-M LE Series motherboards include P8H61-M LE and P8H61-M LE...
The layout illustrations in this user guide are for P8H61-M LE/USB3 only. The layout varies with models. P8H61-M LE/USB3 only 1 2 3 4 20.3cm(8.0in) 1 5 KB_USB56 EPU...P8H61-M LE/USB3 PCIEX1_1 Super I/O PCIEX1_2 asmedia ASM1083 SB_PWR Intel® H61 32Mb BIOS ALC 887 AAFP PCI1 SPDIF_OUT SATA3G_2 SATA3G_1 EATXPWR LPT USB78 USB910 CLRTC SATA3G_4 SATA3G_3 7 PANEL 14 13 12 11 10 9 8 Here labeled USB34 on P8H61-M LE. P8H61-M LE/USB3 only Chapter 1: Product introduction 1-7 1.5.3 Motherboard layout ASUS P8H61-M LE Series motherboards include P8H61-M LE and P8H61-M LE...
User Manual
Page 29
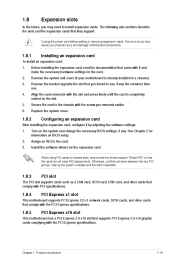
... the slot and press firmly until the card is already installed in a chassis). Remove the system unit cover (if your motherboard is completely seated on BIOS setup. Replace the system cover. 1.8.2 1. 2. 3. This motherboard has a PCI Express 2.0 x16 slot that they support. Align the card connector with the PCI Express... before adding or removing expansion cards. See Chapter 2 for later use . When using PCI cards on the system and change the necessary BIOS settings, if any. Remove the bracket opposite the slot that comply with the PCI Express specifications.
... the slot and press firmly until the card is already installed in a chassis). Remove the system unit cover (if your motherboard is completely seated on BIOS setup. Replace the system cover. 1.8.2 1. 2. 3. This motherboard has a PCI Express 2.0 x16 slot that they support. Align the card connector with the PCI Express... before adding or removing expansion cards. See Chapter 2 for later use . When using PCI cards on the system and change the necessary BIOS settings, if any. Remove the bracket opposite the slot that comply with the PCI Express specifications.
User Manual
Page 30
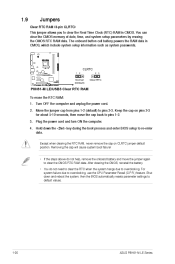
...The onboard button cell battery powers the RAM data in CMOS. Shut down the key during the boot process and enter BIOS setup to overclocking. After clearing the CMOS, reinstall the battery. • You do not help, remove the onboard ...P8H61-M LE/USB3 2 2 3 Normal (Default) Clear RTC P8H61-M LE/USB3 Clear RTC RAM To erase the RTC RAM: 1. Keep the cap on CLRTC jumper default position. Hold down and reboot the system, then the BIOS automatically resets parameter settings to pins 2-3. Move the jumper cap from pins 1-2 (default) to default values. 1-20 ASUS P8H61-M LE...
...The onboard button cell battery powers the RAM data in CMOS. Shut down the key during the boot process and enter BIOS setup to overclocking. After clearing the CMOS, reinstall the battery. • You do not help, remove the onboard ...P8H61-M LE/USB3 2 2 3 Normal (Default) Clear RTC P8H61-M LE/USB3 Clear RTC RAM To erase the RTC RAM: 1. Keep the cap on CLRTC jumper default position. Hold down and reboot the system, then the BIOS automatically resets parameter settings to pins 2-3. Move the jumper cap from pins 1-2 (default) to default values. 1-20 ASUS P8H61-M LE...
User Manual
Page 32
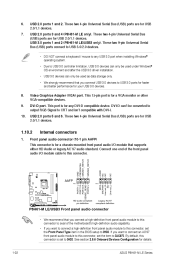
...; If you want to connect a high-definition front panel audio module to this connector, set the Front Panel Type item in the BIOS setup to [HD]. If you want to connect an AC'97 front panel audio module to this connector to avail of the front...6. 7. These two 4-pin Universal Serial Bus (USB) ports are for details. 1-22 MIC2 MICPWR Line out_R NC Line out_L NC ASUS P8H61-M LE Series USB 3.0 ports 1 and 2 (P8H61-M LE/USB3 only). USB 2.0 ports 3 and 4 (P8H61-M LE only). These two 9-pin Universal Serial Bus (USB) ports connect to USB 3.0/2.0 devices. • DO NOT connect a keyboard /...
...; If you want to connect a high-definition front panel audio module to this connector, set the Front Panel Type item in the BIOS setup to [HD]. If you want to connect an AC'97 front panel audio module to this connector to avail of the front...6. 7. These two 4-pin Universal Serial Bus (USB) ports are for details. 1-22 MIC2 MICPWR Line out_R NC Line out_L NC ASUS P8H61-M LE Series USB 3.0 ports 1 and 2 (P8H61-M LE/USB3 only). USB 2.0 ports 3 and 4 (P8H61-M LE only). These two 9-pin Universal Serial Bus (USB) ports connect to USB 3.0/2.0 devices. • DO NOT connect a keyboard /...
User Manual
Page 35
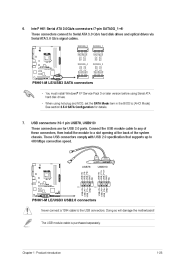
... GND RSATA_RXN3 RSATA_RXP3 GND RSATA_TXN3 RSATA_TXP3 GND P8H61-M LE/USB3 SATA connectors • You must install Windows® XP Service Pack 3 or later version before using Serial ATA hard disk drives. • When using hot-plug and NCQ, set the SATA Mode item in the BIOS to a slot opening at the back of...
... GND RSATA_RXN3 RSATA_RXP3 GND RSATA_TXN3 RSATA_TXP3 GND P8H61-M LE/USB3 SATA connectors • You must install Windows® XP Service Pack 3 or later version before using Serial ATA hard disk drives. • When using hot-plug and NCQ, set the SATA Mode item in the BIOS to a slot opening at the back of...
User Manual
Page 39
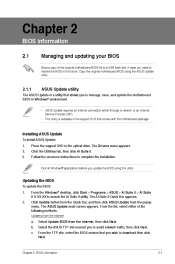
... requires an Internet connection either of the following methods: Updating from the Internet c. Quit all Windows® applications before you update the BIOS using the ASUS Update utility. 2.1.1 The ASUS Update is available in the optical drive. Click the Utilities tab, then click AI Suite II. Click Update button from the Quick Bar...
... requires an Internet connection either of the following methods: Updating from the Internet c. Quit all Windows® applications before you update the BIOS using the ASUS Update utility. 2.1.1 The ASUS Update is available in the optical drive. Click the Utilities tab, then click AI Suite II. Click Update button from the Quick Bar...
User Manual
Page 40
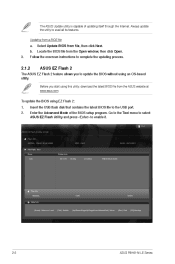
... latest BIOS file from file, then click Next. 2.1.2 The ASUS EZ Flash 2 feature allows you start using EZ Flash 2: 1. 2. File Info MODEL: Help Info VER: DATE [Enter] Select or Load [Tab] Switch [Up/Down/PageUp/PageDown/Home/End] Move [Esc] Exit [F2] Backup 2-2 ASUS P8H61-M LE Series Go... to the Tool menu to select ASUS EZ Flash Utility and press to the USB port. Select Update BIOS from the ASUS website at www...
... latest BIOS file from file, then click Next. 2.1.2 The ASUS EZ Flash 2 feature allows you start using EZ Flash 2: 1. 2. File Info MODEL: Help Info VER: DATE [Enter] Select or Load [Tab] Switch [Up/Down/PageUp/PageDown/Home/End] Move [Esc] Exit [F2] Backup 2-2 ASUS P8H61-M LE Series Go... to the Tool menu to select ASUS EZ Flash Utility and press to the USB port. Select Update BIOS from the ASUS website at www...
User Manual
Page 41
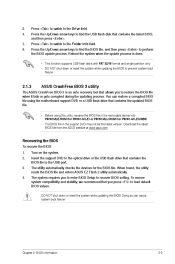
... keys to find the BIOS file, and then press to recover BIOS setting. Press the Up/Down arrow keys to find the USB flash disk that you press to the USB port. ASUS CrashFree BIOS 3 utility • The BIOS file in the removable device into P8H61MLE.ROM (for P8H61-M LE) or P8H61MLU.ROM ...(for the BIOS file. Press to switch to the Folder Info field. • DO NOT shut ...
... keys to find the BIOS file, and then press to recover BIOS setting. Press the Up/Down arrow keys to find the USB flash disk that you press to the USB port. ASUS CrashFree BIOS 3 utility • The BIOS file in the removable device into P8H61MLE.ROM (for P8H61-M LE) or P8H61MLU.ROM ...(for the BIOS file. Press to switch to the Folder Info field. • DO NOT shut ...
User Manual
Page 42
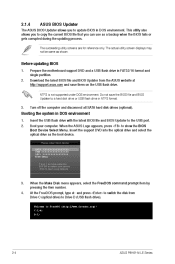
... environment. At the FreeDOS prompt, type d: and press to switch the disk from the ASUS website at http://support.asus.com and save the BIOS file and BIOS Updater to Drive D (USB flash drive). C:\>d: D:\> 2-4 ASUS P8H61-M LE Series Download the latest BIOS file and BIOS Updater from Drive C (optical drive) to a hard disk drive or USB flash drive in...
... environment. At the FreeDOS prompt, type d: and press to switch the disk from the ASUS website at http://support.asus.com and save the BIOS file and BIOS Updater to Drive D (USB flash drive). C:\>d: D:\> 2-4 ASUS P8H61-M LE Series Download the latest BIOS file and BIOS Updater from Drive C (optical drive) to a hard disk drive or USB flash drive in...
User Manual
Page 43
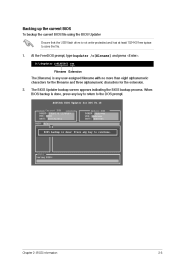
... three alphanumeric characters for DOS V1.18 Current ROM BOARD: P8H61-M LE/USB3 VER: 0302 DATE: 02/18/2011 Update ROM BOARD: Unknown VER: Unknown DATE: Unknown PATH: A:\ BIOS backup is done! Backing up the current BIOS To backup the current BIOS file using the BIOS Updater Ensure that the USB flash drive is not write...
... three alphanumeric characters for DOS V1.18 Current ROM BOARD: P8H61-M LE/USB3 VER: 0302 DATE: 02/18/2011 Update ROM BOARD: Unknown VER: Unknown DATE: Unknown PATH: A:\ BIOS backup is done! Backing up the current BIOS To backup the current BIOS file using the BIOS Updater Ensure that the USB flash drive is not write...
User Manual
Page 44
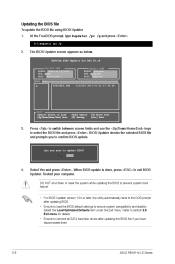
... and press . Refer to the DOS prompt after updating the BIOS file if you have disconnected them. 2-6 ASUS P8H61-M LE Series D:\>bupdater /pc /g 2. Yes No 4. To update the BIOS file using BIOS Updater At the FreeDOS prompt, type bupdater /pc /g and press . Updating the BIOS file 1. Press to switch between screen fields and use the keys to...
... and press . Refer to the DOS prompt after updating the BIOS file if you have disconnected them. 2-6 ASUS P8H61-M LE Series D:\>bupdater /pc /g 2. Yes No 4. To update the BIOS file using BIOS Updater At the FreeDOS prompt, type bupdater /pc /g and press . Updating the BIOS file 1. Press to switch between screen fields and use the keys to...

User Manual
Page 45
...shut down the system properly from a running operating system can cause damage to enter BIOS Setup using the BIOS Setup program. Entering BIOS Setup at startup To enter BIOS Setup at www.asus.com to download the latest BIOS file for this section are for reference purposes only, and may not exactly match... what you see on the system chassis. • Visit the ASUS website at startup: • Press during the Power-On Self Test (POST). Press the reset button on your data or system. The BIOS screens include navigation keys and brief online help to guide you want to...
...shut down the system properly from a running operating system can cause damage to enter BIOS Setup using the BIOS Setup program. Entering BIOS Setup at startup To enter BIOS Setup at www.asus.com to download the latest BIOS file for this section are for reference purposes only, and may not exactly match... what you see on the system chassis. • Visit the ASUS website at startup: • Press during the Power-On Self Test (POST). Press the reset button on your data or system. The BIOS screens include navigation keys and brief online help to guide you want to...

User Manual
Page 46
... only when the boot device is installed to the system. 2-8 ASUS P8H61-M LE Series To access the Advanced Mode, click Exit/Advanced Mode, then select Advanced Mode. EZ Mode P8H61-M LE/USB3 BIOS Version : 0302 Exits the BIOS setup program without saving the changes, saves the changes and resets ...Power Saving mode Normal mode Loads optimized default ASUS Optimal mode Selects the boot device priority Displays the system properties of the basic system information, and allows you enter the BIOS setup program. BIOS menu screen The BIOS setup program can be used under two modes:...
... only when the boot device is installed to the system. 2-8 ASUS P8H61-M LE Series To access the Advanced Mode, click Exit/Advanced Mode, then select Advanced Mode. EZ Mode P8H61-M LE/USB3 BIOS Version : 0302 Exits the BIOS setup program without saving the changes, saves the changes and resets ...Power Saving mode Normal mode Loads optimized default ASUS Optimal mode Selects the boot device priority Displays the system properties of the basic system information, and allows you enter the BIOS setup program. BIOS menu screen The BIOS setup program can be used under two modes:...
User Manual
Page 47
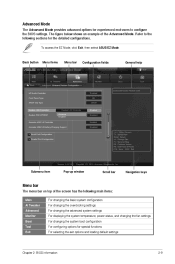
...: Save ESC: Exit Version 2.00.1201. To access the EZ Mode, click Exit, then select ASUS EZ Mode. Back button Menu items Menu bar Configuration fields General help Exit EFI BIOS Utility - Refer to configure the BIOS settings. Copyright (C) 2010 American Megatrends, Inc. Advanced Mode The Advanced Mode provides advanced options for experienced... figure below shows an example of the screen has the following sections for special functions For selecting the exit options and loading default settings Chapter 2: BIOS information 2-9
...: Save ESC: Exit Version 2.00.1201. To access the EZ Mode, click Exit, then select ASUS EZ Mode. Back button Menu items Menu bar Configuration fields General help Exit EFI BIOS Utility - Refer to configure the BIOS settings. Copyright (C) 2010 American Megatrends, Inc. Advanced Mode The Advanced Mode provides advanced options for experienced... figure below shows an example of the screen has the following sections for special functions For selecting the exit options and loading default settings Chapter 2: BIOS information 2-9
User Manual
Page 48
...menu screen means that menu. To display the submenu, select the item and press . Configuration fields These fields show the values for the BIOS setup program. A configurable field is not user-configurable. Press the Up/Down arrow keys or / keys to display a list of ...with the configuration options for that the item has a submenu. Navigation keys General help At the bottom right corner of options. 2-10 ASUS P8H61-M LE Series Menu items The highlighted item on the menu bar have their respective menu items. Back button This button appears when entering a submenu....
...menu screen means that menu. To display the submenu, select the item and press . Configuration fields These fields show the values for the BIOS setup program. A configurable field is not user-configurable. Press the Up/Down arrow keys or / keys to display a list of ...with the configuration options for that the item has a submenu. Navigation keys General help At the bottom right corner of options. 2-10 ASUS P8H61-M LE Series Menu items The highlighted item on the menu bar have their respective menu items. Back button This button appears when entering a submenu....
User Manual
Page 49
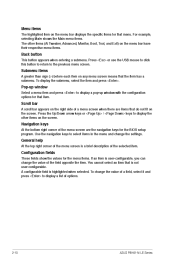
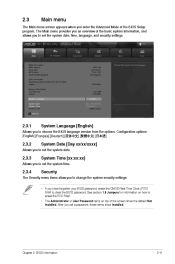
... you to set the system date, time, language, and security settings. Advanced Mode Exit Main Ai Tweaker Advanced Monitor Boot Tool BIOS Information BIOS Version Build Date ME Version South Bridge Stepping CPU Information Intel(R) Core(TM) i5-2400 CPU @ 3.10GHz Speed Memory Information Total... Main menu The Main menu screen appears when you set a password, these items show the default Not Installed. EFI BIOS Utility - Allows you have forgotten your BIOS password, erase the CMOS Real Time Clock (RTC) RAM to erase the RTC RAM. • The Administrator or User...
... you to set the system date, time, language, and security settings. Advanced Mode Exit Main Ai Tweaker Advanced Monitor Boot Tool BIOS Information BIOS Version Build Date ME Version South Bridge Stepping CPU Information Intel(R) Core(TM) i5-2400 CPU @ 3.10GHz Speed Memory Information Total... Main menu The Main menu screen appears when you set a password, these items show the default Not Installed. EFI BIOS Utility - Allows you have forgotten your BIOS password, erase the CMOS Real Time Clock (RTC) RAM to erase the RTC RAM. • The Administrator or User...


