
User Manual
Page 3
Contents Notices...vi Safety information vii About this guide vii P8H61-I specifications summary ix Chapter 1 Product introduction 1.1 Before you proceed 1-1 1.2 Motherboard overview 1-2 1.2.1 Motherboard layout 1-2 1.2.2 ...Software support 1-17 1.8.1 Installing an operating system 1-17 1.8.2 Support DVD information 1-17 1.8.3 ASUS @Vibe 1-18 Chapter 2 BIOS information 2.1 Managing and updating your BIOS 2-1 2.1.1 ASUS Update utility 2-1 2.1.2 ASUS EZ Flash 2 2-2 2.1.3 ASUS CrashFree BIOS 3 utility 2-3 2.1.4 ASUS BIOS Updater 2-4 2.2 BIOS setup program 2-7 2.3 Main menu 2-11 iii
Contents Notices...vi Safety information vii About this guide vii P8H61-I specifications summary ix Chapter 1 Product introduction 1.1 Before you proceed 1-1 1.2 Motherboard overview 1-2 1.2.1 Motherboard layout 1-2 1.2.2 ...Software support 1-17 1.8.1 Installing an operating system 1-17 1.8.2 Support DVD information 1-17 1.8.3 ASUS @Vibe 1-18 Chapter 2 BIOS information 2.1 Managing and updating your BIOS 2-1 2.1.1 ASUS Update utility 2-1 2.1.2 ASUS EZ Flash 2 2-2 2.1.3 ASUS CrashFree BIOS 3 utility 2-3 2.1.4 ASUS BIOS Updater 2-4 2.2 BIOS setup program 2-7 2.3 Main menu 2-11 iii

User Manual
Page 7
... it by yourself. About this guide is organized This guide contains the following parts: • Chapter 1: Product introduction This chapter describes the features of the BIOS parameters are using, contact your local power company. • If the power supply is set to the correct voltage in any damage, contact your retailer.... • Ensure that all cables are correctly connected and the power cables are not damaged. If you detect any area where it supports. • Chapter 2: BIOS information This chapter tells how to change system settings through the...
... it by yourself. About this guide is organized This guide contains the following parts: • Chapter 1: Product introduction This chapter describes the features of the BIOS parameters are using, contact your local power company. • If the power supply is set to the correct voltage in any damage, contact your retailer.... • Ensure that all cables are correctly connected and the power cables are not damaged. If you detect any area where it supports. • Chapter 2: BIOS information This chapter tells how to change system settings through the...

User Manual
Page 10
P8H61-I specifications summary Rear panel ports Internal connectors BIOS features Manageability Accessories Support DVD Form factor 1 x PS/2 Keyboard/Mouse port 1 x HDMI output port 1 x DVI-D output port 1 x D-Sub output port 1 x LAN (RJ-45) port 4 x USB ... connector 1 x 4-pin ATX 12V power connector 1 x S/PDIF out connector 32 Mb Flash ROM, AMI BIOS, PnP, DMI 2.0, WfM 2.0, ACPI 2.0a, SM BIOS 2.5 WOL by PME, PXE 2 x Serial ATA cables 1 x I/O shield 1 x User Manual 1 x Support DVD Drivers ASUS utilities ASUS Update Anti-virus software (OEM version) Mini-ITX form factor: 6.75 in x 6.75 in (17...
P8H61-I specifications summary Rear panel ports Internal connectors BIOS features Manageability Accessories Support DVD Form factor 1 x PS/2 Keyboard/Mouse port 1 x HDMI output port 1 x DVI-D output port 1 x D-Sub output port 1 x LAN (RJ-45) port 4 x USB ... connector 1 x 4-pin ATX 12V power connector 1 x S/PDIF out connector 32 Mb Flash ROM, AMI BIOS, PnP, DMI 2.0, WfM 2.0, ACPI 2.0a, SM BIOS 2.5 WOL by PME, PXE 2 x Serial ATA cables 1 x I/O shield 1 x User Manual 1 x Support DVD Drivers ASUS utilities ASUS Update Anti-virus software (OEM version) Mini-ITX form factor: 6.75 in x 6.75 in (17...

User Manual
Page 12
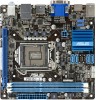
...174; LGA1155 CPU socket 4. Digital audio connector (4-1 pin SPDIF_OUT) 1-13 1-13 11. Front panel audio connector (10-1 pin AAFP) 1-16 1-3 ASUS P8H61-I USB34 ASM 1042 LAN1_USB3_12 AUDIO RTL 8111E AAFP VIA VT1708S SPDIF_OUT LGA1155 EPU PCI1EX16 2 F_PANEL 7 SB_PWR 8 CLRTC 11 10 9 Place four screws into...HDMI IT 8756E USB1112 USB910 23 45 6 17.1cm(6.75in) Intel® H61 SATA1 SATA2 CPU_FAN CHA_FAN SATA3 SATA4 32Mb BIOS Lithium Cell CMOS Power ATX12V EATXPWR 17.1cm(6.75in) DDR3 DIMM_B1 (64bit, 240-pin module) DDR3 DIMM_A1 (64bit, 240-pin module)...
...174; LGA1155 CPU socket 4. Digital audio connector (4-1 pin SPDIF_OUT) 1-13 1-13 11. Front panel audio connector (10-1 pin AAFP) 1-16 1-3 ASUS P8H61-I USB34 ASM 1042 LAN1_USB3_12 AUDIO RTL 8111E AAFP VIA VT1708S SPDIF_OUT LGA1155 EPU PCI1EX16 2 F_PANEL 7 SB_PWR 8 CLRTC 11 10 9 Place four screws into...HDMI IT 8756E USB1112 USB910 23 45 6 17.1cm(6.75in) Intel® H61 SATA1 SATA2 CPU_FAN CHA_FAN SATA3 SATA4 32Mb BIOS Lithium Cell CMOS Power ATX12V EATXPWR 17.1cm(6.75in) DDR3 DIMM_B1 (64bit, 240-pin module) DDR3 DIMM_A1 (64bit, 240-pin module)...

User Manual
Page 18
... card To install an expansion card: 1. When using PCI cards on the system and change the necessary BIOS settings, if any. Before installing the expansion card, read the documentation that supports PCI Express x16 2.0 ... do not need IRQ assignments. Remove the system unit cover (if your motherboard is completely seated on BIOS setup. 2. Replace the system cover. 1.5.2 Configuring an expansion card After installing the expansion card, configure...the card connector with the screw you intend to use . 4. ASUS P8H61-I 1-8 Remove the bracket opposite the slot that they support.
... card To install an expansion card: 1. When using PCI cards on the system and change the necessary BIOS settings, if any. Before installing the expansion card, read the documentation that supports PCI Express x16 2.0 ... do not need IRQ assignments. Remove the system unit cover (if your motherboard is completely seated on BIOS setup. 2. Replace the system cover. 1.5.2 Configuring an expansion card After installing the expansion card, configure...the card connector with the screw you intend to use . 4. ASUS P8H61-I 1-8 Remove the bracket opposite the slot that they support.
User Manual
Page 19
...the jumper again to clear the CMOS RTC RAM data. For system failure due to pins 2-3. Hold down and reboot the system, then the BIOS automatically resets parameter settings to default values. 1-9 Chapter 1: Product introduction You can clear the CMOS memory of date, time, and system setup ...parameters by erasing the CMOS RTC RAM data. CLRTC 12 23 P8H61-I Normal (Default) P8H61-I Clear RTC RAM Clear RTC To erase the RTC RAM: 1. After clearing the CMOS, reinstall the battery. • You do not ...
...the jumper again to clear the CMOS RTC RAM data. For system failure due to pins 2-3. Hold down and reboot the system, then the BIOS automatically resets parameter settings to default values. 1-9 Chapter 1: Product introduction You can clear the CMOS memory of date, time, and system setup ...parameters by erasing the CMOS RTC RAM data. CLRTC 12 23 P8H61-I Normal (Default) P8H61-I Clear RTC RAM Clear RTC To erase the RTC RAM: 1. After clearing the CMOS, reinstall the battery. • You do not ...

User Manual
Page 24
GND RSATA_TXP3 RSATA_TXN3 GND RSATA_RXP3 RSATA_RXN3 GND P8H61-I GND RSATA_TXP4 RSATA_TXN4 GND RSATA_RXP4 RSATA_RXN4 GND ASUS P8H61-I SATA connectors • When using Serial ATA. GND RSATA_RXN1 RSATA_RXP1 GND RSATA_TXN1 RSATA_TXP1 GND GND RSATA_TXP2 RSATA_TXN2 GND RSATA_RXP2 RSATA_RXN2 GND 4. Intel® H61 Serial...details. • Install the Windows® XP Service Pack 3 or later version before using hot-plug and NCQ, set the SATA Mode item in the BIOS to Serial ATA 3.0 Gb/s hard disk drives and optical drives via Serial ATA 3.0 Gb/s signal cables. SATA1 SATA2 SATA3 SATA4...
GND RSATA_TXP3 RSATA_TXN3 GND RSATA_RXP3 RSATA_RXN3 GND P8H61-I GND RSATA_TXP4 RSATA_TXN4 GND RSATA_RXP4 RSATA_RXN4 GND ASUS P8H61-I SATA connectors • When using Serial ATA. GND RSATA_RXN1 RSATA_RXP1 GND RSATA_TXN1 RSATA_TXP1 GND GND RSATA_TXP2 RSATA_TXN2 GND RSATA_RXP2 RSATA_RXN2 GND 4. Intel® H61 Serial...details. • Install the Windows® XP Service Pack 3 or later version before using hot-plug and NCQ, set the SATA Mode item in the BIOS to Serial ATA 3.0 Gb/s hard disk drives and optical drives via Serial ATA 3.0 Gb/s signal cables. SATA1 SATA2 SATA3 SATA4...
User Manual
Page 26
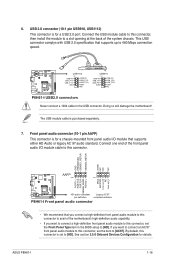
... USB_P11USB_P11+ GND USB+5V USB_P12USB_P12+ GND NC USB910 PIN 1 USB+5V USB_P9USB_P9+ GND USB+5V USB_P10USB_P10+ GND NC P8H61-I P8H61-I /O module that supports up to [AC97]. Connect one end of the system chassis. ASUS P8H61-I /O module cable to the USB connector. If you want to connect an AC'97 front panel audio module to... USB 2.0 specification that supports either HD Audio or legacy AC`97 audio standard. By default, this connector, set the Front Panel Type item in the BIOS setup to a slot opening at the back of the front panel audio I 1-16
... USB_P11USB_P11+ GND USB+5V USB_P12USB_P12+ GND NC USB910 PIN 1 USB+5V USB_P9USB_P9+ GND USB+5V USB_P10USB_P10+ GND NC P8H61-I P8H61-I /O module that supports up to [AC97]. Connect one end of the system chassis. ASUS P8H61-I /O module cable to the USB connector. If you want to connect an AC'97 front panel audio module to... USB 2.0 specification that supports either HD Audio or legacy AC`97 audio standard. By default, this connector, set the Front Panel Type item in the BIOS setup to a slot opening at the back of the front panel audio I 1-16

User Manual
Page 29
... click Next. Click the Utilities tab, then click AI Suite II. 3. Updating the BIOS To update the BIOS: 1. The AI Suite II Quick Bar appears. 2. Select the ASUS FTP site nearest you wish to download then click Next. b. Place the support DVD ... ASUS Update To install ASUS Update: 1. The ASUS Update main screen appears. Select Update BIOS from the popup menu. Chapter 2: BIOS information 2-1 Copy the original motherboard BIOS using the ASUS Update utility. 2.1.1 ASUS Update utility The ASUS Update is a utility that you to restore the BIOS in the optical drive. Chapter 2 BIOS ...
... click Next. Click the Utilities tab, then click AI Suite II. 3. Updating the BIOS To update the BIOS: 1. The AI Suite II Quick Bar appears. 2. Select the ASUS FTP site nearest you wish to download then click Next. b. Place the support DVD ... ASUS Update To install ASUS Update: 1. The ASUS Update main screen appears. Select Update BIOS from the popup menu. Chapter 2: BIOS information 2-1 Copy the original motherboard BIOS using the ASUS Update utility. 2.1.1 ASUS Update utility The ASUS Update is a utility that you to restore the BIOS in the optical drive. Chapter 2 BIOS ...
User Manual
Page 30
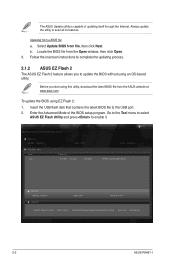
... the updating process. 2.1.2 ASUS EZ Flash 2 The ASUS EZ Flash 2 feature allows you start using EZ Flash 2: 1. Select Update BIOS from a BIOS file a. Insert the USB flash disk that contains the latest BIOS file to enable it. ASUSTek EZ Flash 2 BIOS ROM Utility V00.75 Flash Info MODEL: P8H61-I File Path: fs0:\... Drive fs0:\ VER: 0202 Folder Info 01/18/11 05:40p 4194304 Exit DATE: 12/30/2010 P8H61-I-ASUS-0306.ROM File Info MODEL: P8H67...
... the updating process. 2.1.2 ASUS EZ Flash 2 The ASUS EZ Flash 2 feature allows you start using EZ Flash 2: 1. Select Update BIOS from a BIOS file a. Insert the USB flash disk that contains the latest BIOS file to enable it. ASUSTek EZ Flash 2 BIOS ROM Utility V00.75 Flash Info MODEL: P8H61-I File Path: fs0:\... Drive fs0:\ VER: 0202 Folder Info 01/18/11 05:40p 4194304 Exit DATE: 12/30/2010 P8H61-I-ASUS-0306.ROM File Info MODEL: P8H67...

User Manual
Page 31
... DO NOT shut down or reset the system while updating the BIOS to prevent system boot failure! 2.1.3 ASUS CrashFree BIOS 3 utility The ASUS CrashFree BIOS 3 is an auto recovery tool that contains the BIOS file to perform the BIOS update process. You can cause system boot failure! Press to ...switch to the Drive field. 4. Download the latest BIOS file from the ASUS website at www.asus.com. When found, the utility reads the BIOS file and enters ASUS EZ Flash 2 utility automatically. 4. 3. Press to switch to the Folder Info field. ...
... DO NOT shut down or reset the system while updating the BIOS to prevent system boot failure! 2.1.3 ASUS CrashFree BIOS 3 utility The ASUS CrashFree BIOS 3 is an auto recovery tool that contains the BIOS file to perform the BIOS update process. You can cause system boot failure! Press to ...switch to the Drive field. 4. Download the latest BIOS file from the ASUS website at www.asus.com. When found, the utility reads the BIOS file and enters ASUS EZ Flash 2 utility automatically. 4. 3. Press to switch to the Folder Info field. ...

User Manual
Page 32
... the Make Disk menu appears, select the FreeDOS command prompt item by pressing the item number. 4. Welcome to update BIOS in NTFS format. 3. 2.1.4 ASUS BIOS Updater The ASUS BIOS Updater allows you to FreeDOS (http://www.freedos.org)! Prepare the motherboard support DVD and a USB flash drive in ...select boot device ESC to copy the current BIOS file that you to boot using defaults 3. C:\>d: D:\> 2-4 ASUS P8H61-I This utility also allows you can use as a backup when the BIOS fails or gets corrupted during the updating process. When the ASUS Logo appears, press to a hard disk ...
... the Make Disk menu appears, select the FreeDOS command prompt item by pressing the item number. 4. Welcome to update BIOS in NTFS format. 3. 2.1.4 ASUS BIOS Updater The ASUS BIOS Updater allows you to FreeDOS (http://www.freedos.org)! Prepare the motherboard support DVD and a USB flash drive in ...select boot device ESC to copy the current BIOS file that you to boot using defaults 3. C:\>d: D:\> 2-4 ASUS P8H61-I This utility also allows you can use as a backup when the BIOS fails or gets corrupted during the updating process. When the ASUS Logo appears, press to a hard disk ...

User Manual
Page 33
... to save the file. 1. The BIOS Updater backup screen appears indicating the BIOS backup process. At the FreeDOS prompt, type bupdater /o[filename] and press . Press any key to return to the DOS prompt. ASUSTek BIOS Updater for DOS V1.07 Current ROM BOARD: P8H61-I VER: 0306 DATE: 01/18.../2011 Update ROM BOARD: Unknown VER: Unknown DATE: Unknown PATH: A:\ BIOS backup is any user-assigned filename with no more than eight alphanumeric characters...
... to save the file. 1. The BIOS Updater backup screen appears indicating the BIOS backup process. At the FreeDOS prompt, type bupdater /o[filename] and press . Press any key to return to the DOS prompt. ASUSTek BIOS Updater for DOS V1.07 Current ROM BOARD: P8H61-I VER: 0306 DATE: 01/18.../2011 Update ROM BOARD: Unknown VER: Unknown DATE: Unknown PATH: A:\ BIOS backup is any user-assigned filename with no more than eight alphanumeric characters...

User Manual
Page 34
... version 1.04 or later, the utility automatically exits to the DOS prompt after updating the BIOS file if you have disconnected them. 2-6 ASUS P8H61-I VER: 0306 DATE: 01/18/2011 Update ROM BOARD: Unknown VER: Unknown DATE: Unknown PATH: A:\ A: PH61I.ROM 4194304 2011-01-04 ...DOS V1.07 Current ROM BOARD: P8H61-I BIOS Updater checks the selected BIOS file and prompts you sure to connect all SATA hard disk drives after updating BIOS. • Ensure to load the BIOS default settings to confirm BIOS update. When BIOS update is done, press to select the BIOS file and press . Yes No...
... version 1.04 or later, the utility automatically exits to the DOS prompt after updating the BIOS file if you have disconnected them. 2-6 ASUS P8H61-I VER: 0306 DATE: 01/18/2011 Update ROM BOARD: Unknown VER: Unknown DATE: Unknown PATH: A:\ A: PH61I.ROM 4194304 2011-01-04 ...DOS V1.07 Current ROM BOARD: P8H61-I BIOS Updater checks the selected BIOS file and prompts you sure to connect all SATA hard disk drives after updating BIOS. • Ensure to load the BIOS default settings to confirm BIOS update. When BIOS update is done, press to select the BIOS file and press . Yes No...
User Manual
Page 35
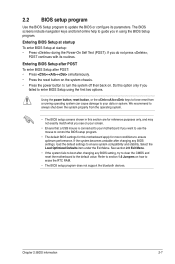
...shown in using the first two options. Refer to section 1.6 Jumpers on how to turn the system off then back on. Chapter 2: BIOS information 2-7 Entering BIOS Setup after POST To enter BIOS Setup after POST: • Press ++ simultaneously. • Press the reset button on your screen. • Ensure that a USB... from a running operating system can cause damage to your motherboard if you want to use the mouse to control the BIOS setup program. • The default BIOS settings for this option only if you in this section are for reference purposes only, and may not exactly match what...
...shown in using the first two options. Refer to section 1.6 Jumpers on how to turn the system off then back on. Chapter 2: BIOS information 2-7 Entering BIOS Setup after POST To enter BIOS Setup after POST: • Press ++ simultaneously. • Press the reset button on your screen. • Ensure that a USB... from a running operating system can cause damage to your motherboard if you want to use the mouse to control the BIOS setup program. • The default BIOS settings for this option only if you in this section are for reference purposes only, and may not exactly match what...

User Manual
Page 36
... appears when you installed to the system. • The Boot Menu(F8) button is available only when the boot device is installed to the system. 2-8 ASUS P8H61-I BIOS Version : 0306 CPU Type : Intel(R) Core (TM) i5-2500 CPU @ 3.30GHz Total Memory : 1024 MB (DDR3 1333MHz) Build Date : 01/18/2011 Speed :... the system properties of the selected mode on the right hand side Normal mode ASUS Optimal mode Selects the boot device priority • The boot device options vary depending on the devices you enter the BIOS setup program. The EZ Mode provides you an overview of output, CPU/chassis ...
... appears when you installed to the system. • The Boot Menu(F8) button is available only when the boot device is installed to the system. 2-8 ASUS P8H61-I BIOS Version : 0306 CPU Type : Intel(R) Core (TM) i5-2500 CPU @ 3.30GHz Total Memory : 1024 MB (DDR3 1333MHz) Build Date : 01/18/2011 Speed :... the system properties of the selected mode on the right hand side Normal mode ASUS Optimal mode Selects the boot device priority • The boot device options vary depending on the devices you enter the BIOS setup program. The EZ Mode provides you an overview of output, CPU/chassis ...

User Manual
Page 37
...fan settings For changing the system boot configuration For configuring options for special functions For selecting the exit options and loading default settings Chapter 2: BIOS information 2-9 Configuration fields Scroll bar Navigation keys Menu bar The menu bar on top of the Advanced Mode. Back button Menu bar Pop...-up window EFI BIOS Utility - To access the EZ Mode, click Exit, then select ASUS EZ Mode. F1: General Help F2: Previous Values F5: Optimized Defaults F10: Save ESC: Exit Menu items Version...
...fan settings For changing the system boot configuration For configuring options for special functions For selecting the exit options and loading default settings Chapter 2: BIOS information 2-9 Configuration fields Scroll bar Navigation keys Menu bar The menu bar on top of the Advanced Mode. Back button Menu bar Pop...-up window EFI BIOS Utility - To access the EZ Mode, click Exit, then select ASUS EZ Mode. F1: General Help F2: Previous Values F5: Optimized Defaults F10: Save ESC: Exit Menu items Version...

User Manual
Page 38
... that menu. Scroll bar A scroll bar appears on the right side of options. 2-10 ASUS P8H61-I Press the Up/Down arrow keys or / keys to display a list of a menu screen when there are the navigation keys for the BIOS setup program. Menu items The highlighted item on it and press or click on...
... that menu. Scroll bar A scroll bar appears on the right side of options. 2-10 ASUS P8H61-I Press the Up/Down arrow keys or / keys to display a list of a menu screen when there are the navigation keys for the BIOS setup program. Menu items The highlighted item on it and press or click on...

User Manual
Page 39
... time. 2.3.4 Security The Security menu items allow you to change the system security settings. • If you enter the Advanced Mode of the BIOS Setup program. See section 1.6 Jumpers for information on how to erase the RTC RAM. • The Administrator or User Password items on top... - The Main menu provides you an overview of the screen show Installed. Advanced Mode Exit Main Ai Tweaker Advanced Monitor BIOS Information BIOS Version Build Date ME Version South Bridge Stepping 0306 x64 01/18/2011 7.0.1.1141 B3 Stepping CPU Information Intel(R) Core(TM) i5-...
... time. 2.3.4 Security The Security menu items allow you to change the system security settings. • If you enter the Advanced Mode of the BIOS Setup program. See section 1.6 Jumpers for information on how to erase the RTC RAM. • The Administrator or User Password items on top... - The Main menu provides you an overview of the screen show Installed. Advanced Mode Exit Main Ai Tweaker Advanced Monitor BIOS Information BIOS Version Build Date ME Version South Bridge Stepping 0306 x64 01/18/2011 7.0.1.1141 B3 Stepping CPU Information Intel(R) Core(TM) i5-...

User Manual
Page 40
.... 2. To change an administrator password: 1. After you clear the password, the Administrator Password item on top of the screen shows Not Installed. 2-12 ASUS P8H61-I To set a user password: 1. From the Create New Password box, key in a new password, then press . 4. After you clear the password,... box, key in the current password, then press . 3. To clear the user password, follow the same steps as in the BIOS setup program. Select the User Password item and press . 2. Select the Administrator Password item and press . 2. Confirm the password when prompted.
.... 2. To change an administrator password: 1. After you clear the password, the Administrator Password item on top of the screen shows Not Installed. 2-12 ASUS P8H61-I To set a user password: 1. From the Create New Password box, key in a new password, then press . 4. After you clear the password,... box, key in the current password, then press . 3. To clear the user password, follow the same steps as in the BIOS setup program. Select the User Password item and press . 2. Select the Administrator Password item and press . 2. Confirm the password when prompted.


