
User Guide
Page 1
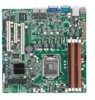
Motherboard P8B-M series
Motherboard P8B-M series
User Guide
Page 3
... find more information ix Conventions used in this guide x Typography x P8B-M series specifications summary xi Chapter 1: Product introduction 1.1 Welcome 1-3 1.2 Package contents 1-3 1.3 Serial number label 1-4 1.4 Special features 1-4 1.4.1 Product highlights 1-4 1.4.2 Innovative ASUS features 1-6 Chapter 2: Hardware information 2.1 Before you proceed 2-3 2.2 Motherboard overview 2-5 2.2.1 Placement direction 2-5 2.2.2 Screw holes 2-5 2.2.3 Motherboard layout 2-6 2.2.4 Motherboard layout 2-7 2.2.5 Layout contents 2-8 2.3 Central Processing Unit (CPU 2-10 2.3.1 Installing...
... find more information ix Conventions used in this guide x Typography x P8B-M series specifications summary xi Chapter 1: Product introduction 1.1 Welcome 1-3 1.2 Package contents 1-3 1.3 Serial number label 1-4 1.4 Special features 1-4 1.4.1 Product highlights 1-4 1.4.2 Innovative ASUS features 1-6 Chapter 2: Hardware information 2.1 Before you proceed 2-3 2.2 Motherboard overview 2-5 2.2.1 Placement direction 2-5 2.2.2 Screw holes 2-5 2.2.3 Motherboard layout 2-6 2.2.4 Motherboard layout 2-7 2.2.5 Layout contents 2-8 2.3 Central Processing Unit (CPU 2-10 2.3.1 Installing...
User Guide
Page 15
...P8B-M P8B-MX P8B-M series SATA 6G cable 2 - - COM port cable 1 - Thank you start installing the motherboard, and hardware devices on it another standout in your package with the list below. 1.2 Package contents Check your retailer. Optional items ASMB5-iKVM Description Remote Management solution provides KVM over IP solution. ASUS P8B...-M series 1-3 Accessories IO shield 1 Plate for buying an ASUS® P8B-M series motherboard! Before you for LGA1155 1 1 1 Application CD Support...
...P8B-M P8B-MX P8B-M series SATA 6G cable 2 - - COM port cable 1 - Thank you start installing the motherboard, and hardware devices on it another standout in your package with the list below. 1.2 Package contents Check your retailer. Optional items ASMB5-iKVM Description Remote Management solution provides KVM over IP solution. ASUS P8B...-M series 1-3 Accessories IO shield 1 Plate for buying an ASUS® P8B-M series motherboard! Before you for LGA1155 1 1 1 Application CD Support...
User Guide
Page 16
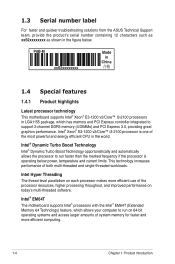
...DIMMs) and PCI Express 3.0, providing great graphics performance. 1.3 Serial number label For faster and quicker troubleshooting solutions from the ASUS Technical Support team, provide the product's serial number containing 12 characters such as xxS2xxxxxxxx as shown in the figure below .... Intel Hyper Threading The thread-level parallelism on today's multi-threaded software. P8B-M xxS2xxxxxxxx Made in China 合格 1.4 Special features 1.4.1 Product highlights Latest processor technology This motherboard supports Intel® Xeon® E3-1200 v2/Core™ i3-2100 ...
...DIMMs) and PCI Express 3.0, providing great graphics performance. 1.3 Serial number label For faster and quicker troubleshooting solutions from the ASUS Technical Support team, provide the product's serial number containing 12 characters such as xxS2xxxxxxxx as shown in the figure below .... Intel Hyper Threading The thread-level parallelism on today's multi-threaded software. P8B-M xxS2xxxxxxxx Made in China 合格 1.4 Special features 1.4.1 Product highlights Latest processor technology This motherboard supports Intel® Xeon® E3-1200 v2/Core™ i3-2100 ...
User Guide
Page 17
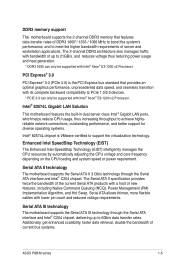
...products with a host of current bus systems. ASUS P8B-M series 1-5 PCI Express® 3.0 PCI Express® 3.0 (PCIe 3.0) is VMware-certified to support the virtualization technology. Intel® 82574L Gigabit LAN Solution This motherboard features the built-in dual server class Intel®... features, including Native Command Queuing (NCQ), Power Management (PM) Implementation Algorithm, and Hot Swap. DDR3 memory support The motherboard supports the 2-channel DDR3 memory that provides an optimal graphics performance, unprecedented data speed, and seamless transition with its complete ...
...products with a host of current bus systems. ASUS P8B-M series 1-5 PCI Express® 3.0 PCI Express® 3.0 (PCIe 3.0) is VMware-certified to support the virtualization technology. Intel® 82574L Gigabit LAN Solution This motherboard features the built-in dual server class Intel®... features, including Native Command Queuing (NCQ), Power Management (PM) Implementation Algorithm, and Hot Swap. DDR3 memory support The motherboard supports the 2-channel DDR3 memory that provides an optimal graphics performance, unprecedented data speed, and seamless transition with its complete ...

User Guide
Page 20
Chapter summary 2 2.1 Before you proceed 2-3 2.2 Motherboard overview 2-5 2.3 Central Processing Unit (CPU 2-10 2.4 System memory 2-16 2.5 Expansion slots 2-18 2.6 Jumpers 2-22 2.7 Connectors 2-27 ASUS P8B-M series
Chapter summary 2 2.1 Before you proceed 2-3 2.2 Motherboard overview 2-5 2.3 Central Processing Unit (CPU 2-10 2.4 System memory 2-16 2.5 Expansion slots 2-18 2.6 Jumpers 2-22 2.7 Connectors 2-27 ASUS P8B-M series
User Guide
Page 21
2.1 Before you proceed Take note of the following precautions before you install motherboard components or change any motherboard settings. • Unplug the power cord from the power supply. Failure to do so may cause severe damage to avoid touching the ICs on them. &#..., such as the power supply case, before handling components to avoid damaging them due to static electricity. • Hold components by the edges to the motherboard, peripherals, and/or components. ASUS P8B-M series 2-3
2.1 Before you proceed Take note of the following precautions before you install motherboard components or change any motherboard settings. • Unplug the power cord from the power supply. Failure to do so may cause severe damage to avoid touching the ICs on them. &#..., such as the power supply case, before handling components to avoid damaging them due to static electricity. • Hold components by the edges to the motherboard, peripherals, and/or components. ASUS P8B-M series 2-3
User Guide
Page 23
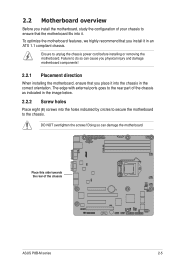
... install it . Ensure to do so can damage the motherboard. Doing so can cause you physical injury and damage motherboard components! 2.2.1 Placement direction When installing the motherboard, ensure that the motherboard fits into the chassis in the correct orientation. Place this...(8) screws into the holes indicated by circles to secure the motherboard to the chassis. DO NOT overtighten the screws! 2.2 Motherboard overview Before you install the motherboard, study the configuration of the chassis ASUS P8B-M series 2-5 Failure to unplug the chassis power cord before installing...
... install it . Ensure to do so can damage the motherboard. Doing so can cause you physical injury and damage motherboard components! 2.2.1 Placement direction When installing the motherboard, ensure that the motherboard fits into the chassis in the correct orientation. Place this...(8) screws into the holes indicated by circles to secure the motherboard to the chassis. DO NOT overtighten the screws! 2.2 Motherboard overview Before you install the motherboard, study the configuration of the chassis ASUS P8B-M series 2-5 Failure to unplug the chassis power cord before installing...
User Guide
Page 24
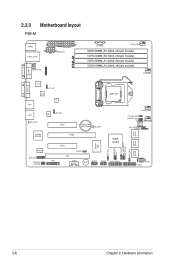
2.2.3 Motherboard layout P8B-M 2-6 Chapter 2: Hardware information
2.2.3 Motherboard layout P8B-M 2-6 Chapter 2: Hardware information
User Guide
Page 25
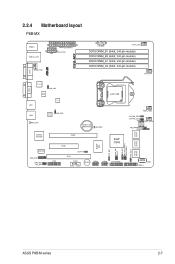
2.2.4 Motherboard layout P8B-MX ASUS P8B-M series 2-7
2.2.4 Motherboard layout P8B-MX ASUS P8B-M series 2-7
User Guide
Page 31
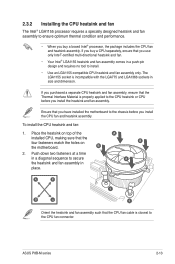
Ensure that you have installed the motherboard to the chassis before you install the heatsink and fan assembly. A B A A B 1 B A 1 Orient the heatsink and fan.... If you buy a boxed Intel® processor, the package includes the CPU fan and heatsink assembly. Place the heatsink on the motherboard. B 2. 2.3.2 Installing the CPU heatsink and fan The Intel® LGA1155 processor requires a specially designed heatsink and fan assembly to ... and requires no tool to install. • Use an LGA1155-compatible CPU heatsink and fan assembly only. ASUS P8B-M series 2-13
Ensure that you have installed the motherboard to the chassis before you install the heatsink and fan assembly. A B A A B 1 B A 1 Orient the heatsink and fan.... If you buy a boxed Intel® processor, the package includes the CPU fan and heatsink assembly. Place the heatsink on the motherboard. B 2. 2.3.2 Installing the CPU heatsink and fan The Intel® LGA1155 processor requires a specially designed heatsink and fan assembly to ... and requires no tool to install. • Use an LGA1155-compatible CPU heatsink and fan assembly only. ASUS P8B-M series 2-13
User Guide
Page 33
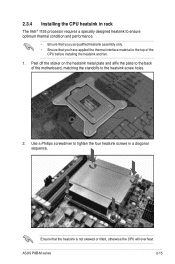
Ensure that you have applied the thermal interface material to the top of the motherboard, matching the standoffs to tighten the four heatsink screws in a diagonal sequence. ASUS P8B-M series 2-15 Use a Phillips screwdriver to the heatsink screw holes. 2. Peel off the sticker on the heatsink metal plate and affix the plate to the...
Ensure that you have applied the thermal interface material to the top of the motherboard, matching the standoffs to tighten the four heatsink screws in a diagonal sequence. ASUS P8B-M series 2-15 Use a Phillips screwdriver to the heatsink screw holes. 2. Peel off the sticker on the heatsink metal plate and affix the plate to the...

User Guide
Page 35
... Unlocked retaining clip A DIMM is keyed with your fingers when pressing the retaining clips. Apply force to the DIMM notch. 2.4.4 Removing a DIMM 1. ASUS P8B-M series 2-17 Failure to do so may cause severe damage to both ends of the DIMM simultaneously until the retaining 3 clips snap back into place...to ensure proper sitting of the DIMM. 3 Locked Retaining Clip Always insert the DIMM into the socket VERTICALLY to prevent damage to both the motherboard and the components. 1. Align a DIMM on the socket such that it flips out with extra force. DO NOT force a DIMM into...
... Unlocked retaining clip A DIMM is keyed with your fingers when pressing the retaining clips. Apply force to the DIMM notch. 2.4.4 Removing a DIMM 1. ASUS P8B-M series 2-17 Failure to do so may cause severe damage to both ends of the DIMM simultaneously until the retaining 3 clips snap back into place...to ensure proper sitting of the DIMM. 3 Locked Retaining Clip Always insert the DIMM into the socket VERTICALLY to prevent damage to both the motherboard and the components. 1. Align a DIMM on the socket such that it flips out with extra force. DO NOT force a DIMM into...
User Guide
Page 38
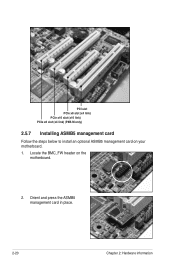
Orient and press the ASMB5 management card in place. 2-20 Chapter 2: Hardware information PCI slot PCIe x8 slot (x4 link) PCIe x16 slot (x16 link) PCIe x8 slot (x4 link) (P8B-M only) 2.5.7 Installing ASMB5 management card Follow the steps below to install an optional ASMB5 management card on the motherboard. 2. Locate the BMC_FW header on your motherboard. 1.
Orient and press the ASMB5 management card in place. 2-20 Chapter 2: Hardware information PCI slot PCIe x8 slot (x4 link) PCIe x16 slot (x16 link) PCIe x8 slot (x4 link) (P8B-M only) 2.5.7 Installing ASMB5 management card Follow the steps below to install an optional ASMB5 management card on the motherboard. 2. Locate the BMC_FW header on your motherboard. 1.
User Guide
Page 39
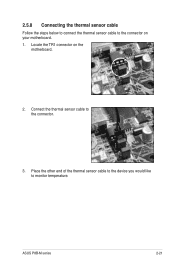
ASUS P8B-M series 2-21 2.5.8 Connecting the thermal sensor cable Follow the steps below to connect the thermal sensor cable to the connector. 3. Locate the TR1 connector on your motherboard. 1. Connect the thermal sensor cable to the connector on the motherboard. 2. Place the other end of the thermal sensor cable to the device you would like to monitor temperature.
ASUS P8B-M series 2-21 2.5.8 Connecting the thermal sensor cable Follow the steps below to connect the thermal sensor cable to the connector. 3. Locate the TR1 connector on your motherboard. 1. Connect the thermal sensor cable to the connector on the motherboard. 2. Place the other end of the thermal sensor cable to the device you would like to monitor temperature.
User Guide
Page 43
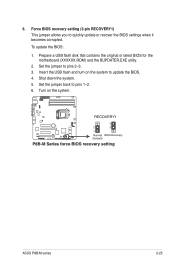
Prepare a USB flash disk that contains the original or latest BIOS for the motherboard (XXXXXX.ROM) and the BUPDATER.EXE utility. 2. ASUS P8B-M series 2-25 To update the BIOS: 1. Set the jumper back to quickly update or recover the BIOS settings when it becomes corrupted. 6. Force BIOS recovery setting (3-pin RECOVERY1) This jumper allows you to pins 1-2. 6. Set the jumper to update the BIOS. 4. Turn on the system to pins 2-3. 3. Insert the USB flash and turn on the system. Shut down the system. 5.
Prepare a USB flash disk that contains the original or latest BIOS for the motherboard (XXXXXX.ROM) and the BUPDATER.EXE utility. 2. ASUS P8B-M series 2-25 To update the BIOS: 1. Set the jumper back to quickly update or recover the BIOS settings when it becomes corrupted. 6. Force BIOS recovery setting (3-pin RECOVERY1) This jumper allows you to pins 1-2. 6. Set the jumper to update the BIOS. 4. Turn on the system to pins 2-3. 3. Insert the USB flash and turn on the system. Shut down the system. 5.

User Guide
Page 61
... or reset the system while recovering the BIOS! Prepare a USB flash drive containing the updated motherboard BIOS before using a USB flash drive that allows you to download the latest BIOS file. ASUS P8B-M series 4-3 4.1 Managing and updating your BIOS The following utilities allow you to restore the... BIOS in the future. Save a copy of the original motherboard BIOS file to a bootable USB flash disk drive in case you...
... or reset the system while recovering the BIOS! Prepare a USB flash drive containing the updated motherboard BIOS before using a USB flash drive that allows you to download the latest BIOS file. ASUS P8B-M series 4-3 4.1 Managing and updating your BIOS The following utilities allow you to restore the... BIOS in the future. Save a copy of the original motherboard BIOS file to a bootable USB flash disk drive in case you...
User Guide
Page 63
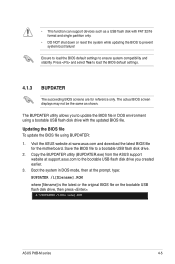
... at support.asus.com to the bootable USB flash disk drive you to ensure system compatibility and stability. Save the BIOS file to load the BIOS default settings. 4.1.3 BUPDATER The succeeding BIOS screens are for the motherboard. Updating the BIOS file To update the BIOS... Press and select Yes to a bootable USB flash disk drive. 2. The BUPDATER utility allows you created earlier. 3. A:\>BUPDATER /i[file name].ROM ASUS P8B-M series 4-5 • This function can support devices such as shown. Boot the system in DOS environment using BUPDATER: 1. Ensure to load the...
... at support.asus.com to the bootable USB flash disk drive you to ensure system compatibility and stability. Save the BIOS file to load the BIOS default settings. 4.1.3 BUPDATER The succeeding BIOS screens are for the motherboard. Updating the BIOS file To update the BIOS... Press and select Yes to a bootable USB flash disk drive. 2. The BUPDATER utility allows you created earlier. 3. A:\>BUPDATER /i[file name].ROM ASUS P8B-M series 4-5 • This function can support devices such as shown. Boot the system in DOS environment using BUPDATER: 1. Ensure to load the...

User Guide
Page 65
...with its test routines. Do this utility. Press and select Yes to load the BIOS default settings. • The BIOS setup screens shown in this motherboard apply for most conditions to "Run Setup." Being a menu-driven program, it as possible. For example, you can update using the navigation keys. ...you are for this program. Even if you are not prompted to use as easy to use the Setup program, you to run this motherboard. ASUS P8B-M series 4-7 If the system becomes unstable after POST, restart the system by pressing , or by turning the system off and then back ...
...with its test routines. Do this utility. Press and select Yes to load the BIOS default settings. • The BIOS setup screens shown in this motherboard apply for most conditions to "Run Setup." Being a menu-driven program, it as possible. For example, you can update using the navigation keys. ...you are for this program. Even if you are not prompted to use as easy to use the Setup program, you to run this motherboard. ASUS P8B-M series 4-7 If the system becomes unstable after POST, restart the system by pressing , or by turning the system off and then back ...
User Guide
Page 83
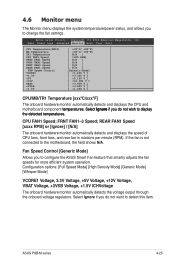
...422 V ] [ +1.496 V ] CPU/MB/TR1 Temperature [xxxºC/xxxºF] The onboard hardware monitor automatically detects and displays the CPU and motherboard component temperatures. ASUS P8B-M series 4-25 Select Ignore if you do not wish to display the detected temperatures. If the fan is not connected to change the fan...Setup Utility - 4.6 Monitor menu The Monitor menu displays the system temperature/power status, and allows you to configure the ASUS Smart Fan feature that smartly adjusts the fan speeds for more efficient system operation. Copyright (C) 2010 American Megatrends, Inc....
...422 V ] [ +1.496 V ] CPU/MB/TR1 Temperature [xxxºC/xxxºF] The onboard hardware monitor automatically detects and displays the CPU and motherboard component temperatures. ASUS P8B-M series 4-25 Select Ignore if you do not wish to display the detected temperatures. If the fan is not connected to change the fan...Setup Utility - 4.6 Monitor menu The Monitor menu displays the system temperature/power status, and allows you to configure the ASUS Smart Fan feature that smartly adjusts the fan speeds for more efficient system operation. Copyright (C) 2010 American Megatrends, Inc....

