
User Manual
Page 33
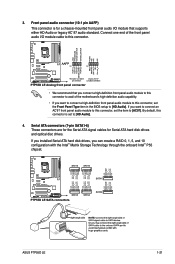
... connector, set the item to [AC97]. 3. Front panel audio connector (10-1 pin AAFP) This connector is set the Front Panel Type item in the BIOS setup to [HD Audio]. 4. If you can create a RAID 0, 1, 5, and 10 configuration with the Intel® Matrix Storage Technology through the onboard Intel® P55 chipset. ASUS P7P55D LE 1-21
... connector, set the item to [AC97]. 3. Front panel audio connector (10-1 pin AAFP) This connector is set the Front Panel Type item in the BIOS setup to [HD Audio]. 4. If you can create a RAID 0, 1, 5, and 10 configuration with the Intel® Matrix Storage Technology through the onboard Intel® P55 chipset. ASUS P7P55D LE 1-21

User Manual
Page 40
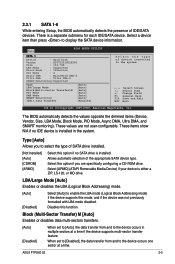
... the Open window, then click Open. 3. Locate the BIOS file from a file, then click Next. ASUSTek EZ Flash 2 BIOS ROM Utility V3.36 FLASH TYPE: WOINBOND W25X80 Current ROM BOARD: P7P55D LE VER: 0212 (H:00 B:06) DATE: 06/11/2009 Update ROM BOARD: Unknown VER: Unknown DATE: Unknown PATH: A:\...onscreen instructions to avail all its features. Updating from the ASUS website at www.asus.com. See section Exit Menu for details. 2.1.2 ASUS EZ Flash 2 The ASUS EZ Flash 2 feature allows you start using EZ Flash 2: 1. b. The ASUS Update utility is found. Press to the USB port, ...
... the Open window, then click Open. 3. Locate the BIOS file from a file, then click Next. ASUSTek EZ Flash 2 BIOS ROM Utility V3.36 FLASH TYPE: WOINBOND W25X80 Current ROM BOARD: P7P55D LE VER: 0212 (H:00 B:06) DATE: 06/11/2009 Update ROM BOARD: Unknown VER: Unknown DATE: Unknown PATH: A:\...onscreen instructions to avail all its features. Updating from the ASUS website at www.asus.com. See section Exit Menu for details. 2.1.2 ASUS EZ Flash 2 The ASUS EZ Flash 2 feature allows you start using EZ Flash 2: 1. b. The ASUS Update utility is found. Press to the USB port, ...
User Manual
Page 43
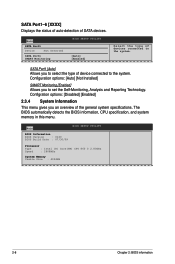
...8593;↓ Select Item +- Main BIOS SETUP UTILITY SATA 1 Device : Hard Disk Vendor : HDT722516DLA380 Size : 164.7GB LBA Mode : Supported Block Mode : 16Sectors PIO Mode : 4 Async DMA : MultiWord DMA-2 Ultra DMA : Ultra DMA-5 SMART Monitoring:Supported Type LBA/Large Mode Block(Multi-Sector... mode. [Auto] [Disabled] Select [Auto] to enable the LBA mode (Logical Block Addressing mode) if the device supports this function. ASUS P7P55D LE 2-5 These items show N/A if no SATA drive is installed in multiple sectors at a time. Block (Multi-Sector Transfer) M [Auto]...
...8593;↓ Select Item +- Main BIOS SETUP UTILITY SATA 1 Device : Hard Disk Vendor : HDT722516DLA380 Size : 164.7GB LBA Mode : Supported Block Mode : 16Sectors PIO Mode : 4 Async DMA : MultiWord DMA-2 Ultra DMA : Ultra DMA-5 SMART Monitoring:Supported Type LBA/Large Mode Block(Multi-Sector... mode. [Auto] [Disabled] Select [Auto] to enable the LBA mode (Logical Block Addressing mode) if the device supports this function. ASUS P7P55D LE 2-5 These items show N/A if no SATA drive is installed in multiple sectors at a time. Block (Multi-Sector Transfer) M [Auto]...
User Manual
Page 46
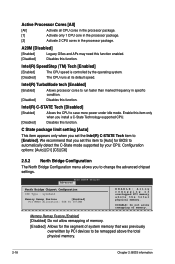
... specification, and system memory in this menu. Main SATA Port1 Device :Not Detected BIOS SETUP UTILITY SATA Port1 [Auto] SMART Monitoring [Enabled] Select the type of SATA devices. Main BIOS Information BIOS Version : 0120 BIOS Build Date : 07/30/09 BIOS SETUP UTILITY Processor Type : Intel (R) Core(TM) CPU 860 @ 2.80GHz Speed : 2808MHz System Memory Usable Size...
... specification, and system memory in this menu. Main SATA Port1 Device :Not Detected BIOS SETUP UTILITY SATA Port1 [Auto] SMART Monitoring [Enabled] Select the type of SATA devices. Main BIOS Information BIOS Version : 0120 BIOS Build Date : 07/30/09 BIOS SETUP UTILITY Processor Type : Intel (R) Core(TM) CPU 860 @ 2.80GHz Speed : 2808MHz System Memory Usable Size...
User Manual
Page 56
... chipset settings. Configuration options: [Auto] [C1] [C3] [C6] 2.5.2 North Bridge Configuration The North Bridge Configuration menu allows you set this function. BIOS SETUP UTILITY Advanced North Bridge Chipset Configuration IMC Type : Lynnfield Memory Remap Feature [Enabled] PCI MMIO Allocation: 4GB To 3072MB ENABLE: Allow remapping of memory. Memory Remap Feature [Enabled] [Disabled...
... chipset settings. Configuration options: [Auto] [C1] [C3] [C6] 2.5.2 North Bridge Configuration The North Bridge Configuration menu allows you set this function. BIOS SETUP UTILITY Advanced North Bridge Chipset Configuration IMC Type : Lynnfield Memory Remap Feature [Enabled] PCI MMIO Allocation: 4GB To 3072MB ENABLE: Allow remapping of memory. Memory Remap Feature [Enabled] [Disabled...
User Manual
Page 57
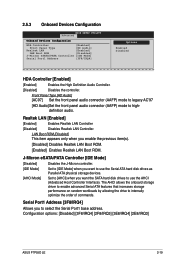
.... [Enabled] Enables Realtek LAN Boot ROM. Configuration options: [Disabled] [3F8/IRQ4] [2F8/IRQ3] [3E8/IRQ4] [2E8/IRQ3] ASUS P7P55D LE 2-19 Front Panel Type [HD Audio] [AC97] Set the front panel audio connector (AAFP) mode to legacy AC'97 [HD Audio]Set the front panel ... to [AHCI] when you want the SATA hard disk drives to highdefinition audio. 2.5.3 Onboard Devices Configuration BIOS SETUP UTILITY Advanced Onboard Devices Configuration HDA Controller [Enabled] Front Panel Type [HD Audio] Realtek LAN [Enabled] LAN Boot ROM [Disabled] J-Micron eSATA/PATA Controller [IDE Mode...
.... [Enabled] Enables Realtek LAN Boot ROM. Configuration options: [Disabled] [3F8/IRQ4] [2F8/IRQ3] [3E8/IRQ4] [2E8/IRQ3] ASUS P7P55D LE 2-19 Front Panel Type [HD Audio] [AC97] Set the front panel audio connector (AAFP) mode to legacy AC'97 [HD Audio]Set the front panel ... to [AHCI] when you want the SATA hard disk drives to highdefinition audio. 2.5.3 Onboard Devices Configuration BIOS SETUP UTILITY Advanced Onboard Devices Configuration HDA Controller [Enabled] Front Panel Type [HD Audio] Realtek LAN [Enabled] LAN Boot ROM [Disabled] J-Micron eSATA/PATA Controller [IDE Mode...

User Manual
Page 64
...letters and/or numbers, then press . 3. Select an item then press to use the ASUS MyLogo 2™ feature. Select the Change Supervisor Password item and press . 2. Hit 'DEL...] [Disabled] Disables this item to [Enabled] to display the configuration options. From the password box, type a password composed of the screen shows the default Not Installed. Full Screen Logo [Enabled] [Disabled] ...ROM messages will be pressed when error occurs. AddOn ROM Display Mode [Force BIOS] [Force BIOS] The third-party ROM messages will be forced to display during POST. 2.7.3 Security The Security...
...letters and/or numbers, then press . 3. Select an item then press to use the ASUS MyLogo 2™ feature. Select the Change Supervisor Password item and press . 2. Hit 'DEL...] [Disabled] Disables this item to [Enabled] to display the configuration options. From the password box, type a password composed of the screen shows the default Not Installed. Full Screen Logo [Enabled] [Disabled] ...ROM messages will be pressed when error occurs. AddOn ROM Display Mode [Force BIOS] [Force BIOS] The third-party ROM messages will be forced to display during POST. 2.7.3 Security The Security...
User Manual
Page 65
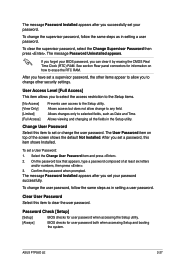
...changing all the fields in the Setup utility. Change User Password Select this item shows Installed. On the password box that appears, type a password composed of the screen shows the default Not Installed. To change to any field. [Limited] Allows changes only to clear...Confirm the password when prompted. Password Check [Setup] [Setup] BIOS checks for user password when accessing the Setup utility. [Always] BIOS checks for information on top of at least six letters and/or numbers, then press . 3. ASUS P7P55D LE 2-27 The message Password Uninstalled appears. After you have set...
...changing all the fields in the Setup utility. Change User Password Select this item shows Installed. On the password box that appears, type a password composed of the screen shows the default Not Installed. To change to any field. [Limited] Allows changes only to clear...Confirm the password when prompted. Password Check [Setup] [Setup] BIOS checks for user password when accessing the Setup utility. [Always] BIOS checks for information on top of at least six letters and/or numbers, then press . 3. ASUS P7P55D LE 2-27 The message Password Uninstalled appears. After you have set...
User Manual
Page 66
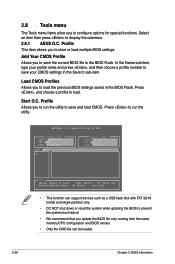
...type your CMOS settings in the BIOS Flash. Load CMOS Profiles Allows you to run the utility. Press to run the utility to save and load CMOS. Start O.C. Profile Allows you to load the previous BIOS... then choose a profile number to save the current BIOS file to the BIOS Flash. Profile Utility V2.00b Current CMOS BOARD: P7P55D LE VER: 0166 DATE: 07/08/2009 Restore CMOS.... 2-28 Chapter 2: BIOS information ASUSTek O.C. Profile This item allows you to configure options for special functions. Press , and choose a profile to display the submenu. 2.8.1 ASUS O.C. 2.8 Tools menu...
...type your CMOS settings in the BIOS Flash. Load CMOS Profiles Allows you to run the utility. Press to run the utility to save and load CMOS. Start O.C. Profile Allows you to load the previous BIOS... then choose a profile number to save the current BIOS file to the BIOS Flash. Profile Utility V2.00b Current CMOS BOARD: P7P55D LE VER: 0166 DATE: 07/08/2009 Restore CMOS.... 2-28 Chapter 2: BIOS information ASUSTek O.C. Profile This item allows you to configure options for special functions. Press , and choose a profile to display the submenu. 2.8.1 ASUS O.C. 2.8 Tools menu...


