User Guide
Page 12
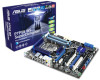
ASUS Noise-Filer VIA VT6308S controller supports 2 ... function ALC1200-GR , 8 channels High Definition Audio CODEC - Jack-Sensing - Front Panel Jack-Retasking - P7P55 WS Supercomputer specifications summary CPU Chipset Memory Expansion Slots Multi-GPU Technology Storage LAN High Definition Audio IEEE 1394 Quad Core ... x16 (@ x8) 1 x PCIe x16 (@ x4) 1 x PCIe x1 (@ x1) 1 x PCI Supports NVIDIA® Geforce 3 way/2 way SLI™ ��te�c�h�n�o�l�o�g�y Supports ATI® CrossFireX™ technology, up to Quad CrossFireX&#...
ASUS Noise-Filer VIA VT6308S controller supports 2 ... function ALC1200-GR , 8 channels High Definition Audio CODEC - Jack-Sensing - Front Panel Jack-Retasking - P7P55 WS Supercomputer specifications summary CPU Chipset Memory Expansion Slots Multi-GPU Technology Storage LAN High Definition Audio IEEE 1394 Quad Core ... x16 (@ x8) 1 x PCIe x16 (@ x4) 1 x PCIe x1 (@ x1) 1 x PCI Supports NVIDIA® Geforce 3 way/2 way SLI™ ��te�c�h�n�o�l�o�g�y Supports ATI® CrossFireX™ technology, up to Quad CrossFireX&#...
User Guide
Page 17
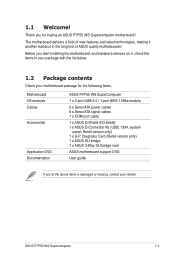
Diagnosis Card (Retail version only) 1 x ASUS SLI bridge 1 x ASUS 3-Way SLI bridge card Application DVD ASUS motherboard support DVD Documentation User guide If any of ASUS quality motherboards! Retail version only) 1 x G.P. ASUS P7P55 WS Supercomputer 1-1 The motherboard delivers a host of new features and latest ...the long line of the above items is damaged or missing, contact your motherboard package for buying an ASUS P7P55 WS Supercomputer motherboard! Thank you start installing the motherboard, and hardware devices on it another standout in your package with...
Diagnosis Card (Retail version only) 1 x ASUS SLI bridge 1 x ASUS 3-Way SLI bridge card Application DVD ASUS motherboard support DVD Documentation User guide If any of ASUS quality motherboards! Retail version only) 1 x G.P. ASUS P7P55 WS Supercomputer 1-1 The motherboard delivers a host of new features and latest ...the long line of the above items is damaged or missing, contact your motherboard package for buying an ASUS P7P55 WS Supercomputer motherboard! Thank you start installing the motherboard, and hardware devices on it another standout in your package with...

User Guide
Page 44
Install a PCIe x1 device to a PCIe x1 slot prior to the motherboard connector labeled CHA_FAN1/2/3 when using multiple graphics cards for 3-way SLI, and the three slots will work at x16 link. • When using NVIDIA® CUDA™ Technology with the PCI Express specifications. ... • We recommend you use the PCIe 2.0 x16_1, PCIe 2.0 x16_2, and PCIe 2.0 x16_4 slots for better thermal environment. See page 2-30 for two-way SLI, and both slots will work at x8, x8 and x16 link respectively; the PCIe 2.0 x16_1, PCIe 2.0 x16_4 slots for details. 2-20 Chapter 2: Hardware ...
Install a PCIe x1 device to a PCIe x1 slot prior to the motherboard connector labeled CHA_FAN1/2/3 when using multiple graphics cards for 3-way SLI, and the three slots will work at x16 link. • When using NVIDIA® CUDA™ Technology with the PCI Express specifications. ... • We recommend you use the PCIe 2.0 x16_1, PCIe 2.0 x16_2, and PCIe 2.0 x16_4 slots for better thermal environment. See page 2-30 for two-way SLI, and both slots will work at x8, x8 and x16 link respectively; the PCIe 2.0 x16_1, PCIe 2.0 x16_4 slots for details. 2-20 Chapter 2: Hardware ...

User Guide
Page 151
... graphics cards 1. Prepare three SLI-ready graphics cards. 2. Ensure that the cards are properly seated on each graphics card. Insert the three graphics card into the PCIEX16 slots. If your ... cards separately. 6. Connect three independent auxiliary power sources from the power supply to Chapter 2 in place. 5. Align and firmly insert the 3-Way SLI bridge connector to the graphics card. 3-Way SLI bridge ASUS P7P55 WS SuperComputer 5-7 Ensure that the connector is firmly in this user manual for the locations of the PCIEX16 slots recommended for multi-graphics card...
... graphics cards 1. Prepare three SLI-ready graphics cards. 2. Ensure that the cards are properly seated on each graphics card. Insert the three graphics card into the PCIEX16 slots. If your ... cards separately. 6. Connect three independent auxiliary power sources from the power supply to Chapter 2 in place. 5. Align and firmly insert the 3-Way SLI bridge connector to the graphics card. 3-Way SLI bridge ASUS P7P55 WS SuperComputer 5-7 Ensure that the connector is firmly in this user manual for the locations of the PCIEX16 slots recommended for multi-graphics card...

User Guide
Page 152
...Panel by Windows® Vista™ only. 5.2.5 Enabling the NVIDIA® SLI™ technology After installing your PCI Express graphics card driver supports the NVIDIA® SLI™ technology. The NVIDIA 3-way SLI technology is supported by the following two methods. The NVIDIA Control Panel window ... the documentation that came with your graphics card package to install the NVIDIA® 3-way SLI driver under the Windows® Vista™ operating system. If you are using a Triple SLI system, ensure to install the device drivers. • Ensure that your graphics cards and...
...Panel by Windows® Vista™ only. 5.2.5 Enabling the NVIDIA® SLI™ technology After installing your PCI Express graphics card driver supports the NVIDIA® SLI™ technology. The NVIDIA 3-way SLI technology is supported by the following two methods. The NVIDIA Control Panel window ... the documentation that came with your graphics card package to install the NVIDIA® 3-way SLI driver under the Windows® Vista™ operating system. If you are using a Triple SLI system, ensure to install the device drivers. • Ensure that your graphics cards and...

User Guide
Page 154
..., click Apply. 2. From the NVIDIA Control Panel window, select Set SLI Configuration, and then click Enable 3-way NVIDIA SLI. Click Enable SLI and set the display for viewing SLI rendered content. Enabling Triple SLI settings 1. Enabling Dual SLI settings From the NVIDIA Control Panel window, select Set SLI Configuration. The NVIDIA Control Panel window appears. When this item...
..., click Apply. 2. From the NVIDIA Control Panel window, select Set SLI Configuration, and then click Enable 3-way NVIDIA SLI. Click Enable SLI and set the display for viewing SLI rendered content. Enabling Triple SLI settings 1. Enabling Dual SLI settings From the NVIDIA Control Panel window, select Set SLI Configuration. The NVIDIA Control Panel window appears. When this item...


