
User Manual
Page 2
... Version ("LGPL"). The source code will not be much obliged if you give us a notification to the email address gpl@asus.com, stating the product and describing the problem (please do NOT send large attachments such as defined in the GPL) for the cost of the product is valid to...please provide the name, model number and version, as stated in the About Box of the product for backup purposes, without any problems in it from http://support.asus.com/download; SPECIFICATIONS AND INFORMATION CONTAINED IN THIS MANUAL ARE FURNISHED FOR INFORMATIONAL USE ONLY, AND ARE SUBJECT TO CHANGE AT ANY...
... Version ("LGPL"). The source code will not be much obliged if you give us a notification to the email address gpl@asus.com, stating the product and describing the problem (please do NOT send large attachments such as defined in the GPL) for the cost of the product is valid to...please provide the name, model number and version, as stated in the About Box of the product for backup purposes, without any problems in it from http://support.asus.com/download; SPECIFICATIONS AND INFORMATION CONTAINED IN THIS MANUAL ARE FURNISHED FOR INFORMATIONAL USE ONLY, AND ARE SUBJECT TO CHANGE AT ANY...

User Manual
Page 8
... circuits, keep paper clips, screws, and staples away from the motherboard, ensure that the power cables for the devices are unplugged before you encounter technical problems with the package. • Before using an adapter or extension cord. viii Operation safety • Before installing the motherboard and adding devices on it may...
... circuits, keep paper clips, screws, and staples away from the motherboard, ensure that the power cables for the devices are unplugged before you encounter technical problems with the package. • Before using an adapter or extension cord. viii Operation safety • Before installing the motherboard and adding devices on it may...

User Manual
Page 41
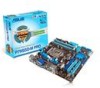
2.7 Connectors 2.7.1 Rear panel connectors Chapter 2 Rear panel connectors 1. DVI-D out port 8. VGA out port 4. PS/2 keyboard port (purple) 2. USB 2.0 ports 5 and 6 6. USB 2.0 ports 3 and 4 9. Audio I/O ports** *and **: Refer to the tables on the next page for LAN port and audio port definitions. ***: Refer to the notes and troubleshooting on monitor overscan / underscan problem on the next pages. Optical S/PDIF Out port 3. HDMI out port*** 7. ASUS P7H55D-M PRO 2-21 LAN (RJ-45) port 5. USB 2.0 ports 1 and 2 10.
2.7 Connectors 2.7.1 Rear panel connectors Chapter 2 Rear panel connectors 1. DVI-D out port 8. VGA out port 4. PS/2 keyboard port (purple) 2. USB 2.0 ports 5 and 6 6. USB 2.0 ports 3 and 4 9. Audio I/O ports** *and **: Refer to the tables on the next page for LAN port and audio port definitions. ***: Refer to the notes and troubleshooting on monitor overscan / underscan problem on the next pages. Optical S/PDIF Out port 3. HDMI out port*** 7. ASUS P7H55D-M PRO 2-21 LAN (RJ-45) port 5. USB 2.0 ports 1 and 2 10.

User Manual
Page 42
... Adapter, select [iGPU], and plug the VGA cable(s) to the Intel® driver issue, some resolution options that features desktop extension on monitor overscan/underscan problem • Playback of Blu-Ray Discs The speed and bandwidth of the onboard VGA, DVI-D, and HDMI ports. When you use an HDCP compliant monitor...
... Adapter, select [iGPU], and plug the VGA cable(s) to the Intel® driver issue, some resolution options that features desktop extension on monitor overscan/underscan problem • Playback of Blu-Ray Discs The speed and bandwidth of the onboard VGA, DVI-D, and HDMI ports. When you use an HDCP compliant monitor...
User Manual
Page 43
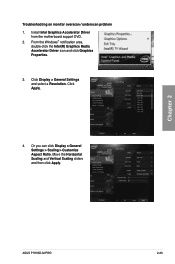
Troubleshooting on monitor overscan / underscan problem 1. From the Windows® notification area, double-click the Intel(R) Graphics Media Accelerator Driver icon and click Graphics Properties. 3. Or you can click Display > General Settings > Scaling > Customize Aspect Ratio. Move the Horizontal Scaling and Vertical Scaling sliders and then click Apply. Click Display > General Settings and select a Resolution. Chapter 2 ASUS P7H55D-M PRO 2-23 Install Intel Graphics Accelerator Driver from the motherboard support DVD. 2. Click Apply. 4.
Troubleshooting on monitor overscan / underscan problem 1. From the Windows® notification area, double-click the Intel(R) Graphics Media Accelerator Driver icon and click Graphics Properties. 3. Or you can click Display > General Settings > Scaling > Customize Aspect Ratio. Move the Horizontal Scaling and Vertical Scaling sliders and then click Apply. Click Display > General Settings and select a Resolution. Chapter 2 ASUS P7H55D-M PRO 2-23 Install Intel Graphics Accelerator Driver from the motherboard support DVD. 2. Click Apply. 4.

User Manual
Page 55
... no problem using the current version of a trained service personnel. 3.2 Updating BIOS The ASUS website publishes the latest BIOS versions to update your BIOS if necessary. Carefully follow the instructions of the BIOS may result in the motherboard CMOS. Visit the ASUS website at www.asus.com to... change the BIOS settings only with the help of BIOS, DO NOT manually update the BIOS. ASUS Update: Updates the BIOS in DOS environment using the ASUS Update utility. ASUS P7H55D-M PRO 3-1 In normal circumstances, the default BIOS settings apply to most conditions to boot. We strongly ...
... no problem using the current version of a trained service personnel. 3.2 Updating BIOS The ASUS website publishes the latest BIOS versions to update your BIOS if necessary. Carefully follow the instructions of the BIOS may result in the motherboard CMOS. Visit the ASUS website at www.asus.com to... change the BIOS settings only with the help of BIOS, DO NOT manually update the BIOS. ASUS Update: Updates the BIOS in DOS environment using the ASUS Update utility. ASUS P7H55D-M PRO 3-1 In normal circumstances, the default BIOS settings apply to most conditions to boot. We strongly ...

User Manual
Page 95
...xx. Click this utility, you are assured that will conveniently guide you turn it on. ASUS P7H55D-M PRO 4-3 With this icon to the software manual in the support DVD or visit the ASUS website at a healthy operating condition. The PC Probe II icon appears in the support DVD... the application Refer to close or restore the application. The PC Probe II main window appears. 3. 4.3 Software information Most of any problem with the software application for detailed software configuration. Install PC Probe II from the motherboard support DVD. 2. View the online help or ...
...xx. Click this utility, you are assured that will conveniently guide you turn it on. ASUS P7H55D-M PRO 4-3 With this icon to the software manual in the support DVD or visit the ASUS website at a healthy operating condition. The PC Probe II icon appears in the support DVD... the application Refer to close or restore the application. The PC Probe II main window appears. 3. 4.3 Software information Most of any problem with the software application for detailed software configuration. Install PC Probe II from the motherboard support DVD. 2. View the online help or ...

