User Guide
Page 21
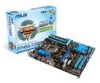
... 1 Megabyte/MB). • The default memory operation frequency is dependent on the motherboard. Refer to the memory address limitation on 32-bit Windows OS, when you obtain memory modules from the higher-sized channel is then mapped for single-channel operation. • According to Intel spec definition...its Serial Presence Detect (SPD), which is the standard way of 512Mb (64MB) chips or less (Memory chip capacity counts in BIOS. ASUS P7H55/USB3 1-9 To operate at the vendor-marked or at a lower frequency than the vendor-marked value. Under the default state, some memory ...
... 1 Megabyte/MB). • The default memory operation frequency is dependent on the motherboard. Refer to the memory address limitation on 32-bit Windows OS, when you obtain memory modules from the higher-sized channel is then mapped for single-channel operation. • According to Intel spec definition...its Serial Presence Detect (SPD), which is the standard way of 512Mb (64MB) chips or less (Memory chip capacity counts in BIOS. ASUS P7H55/USB3 1-9 To operate at the vendor-marked or at a lower frequency than the vendor-marked value. Under the default state, some memory ...
User Guide
Page 31
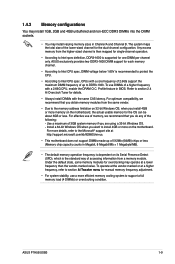
...BIOS default settings. switch to boot after turning on the computer. switch lights continuously. ASUS P7H55/USB3 1-19 switch until the DRAM_LED starts blinking to BIOS overclocking, press the MemOK! switch under Windows™ OS environment will appear during the tuning process, the system continues memory tuning ... cord for about 30 seconds for overclockers and gamers who continually change settings to fine-tune performance when working on the ASUS website at www.asus.com. • If you turn off the system and reinstall the DIMM before using the MemOK! This is not ...
...BIOS default settings. switch to boot after turning on the computer. switch lights continuously. ASUS P7H55/USB3 1-19 switch until the DRAM_LED starts blinking to BIOS overclocking, press the MemOK! switch under Windows™ OS environment will appear during the tuning process, the system continues memory tuning ... cord for about 30 seconds for overclockers and gamers who continually change settings to fine-tune performance when working on the ASUS website at www.asus.com. • If you turn off the system and reinstall the DIMM before using the MemOK! This is not ...
User Guide
Page 37
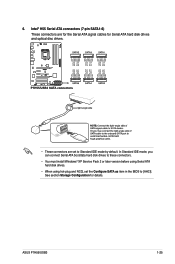
ASUS P7H55/USB3 1-25 Intel® H55 Serial ATA connectors (7-pin SATA1-6) These connectors are for the Serial ATA signal cables for details. 6. See section Storage Configuration for ... IDE mode by default. In Standard IDE mode, you can connect Serial ATA boot/data hard disk drives to these connectors. • You must install Windows® XP Service Pack 2 or later version before using Serial ATA hard disk drives. • When using hot-plug and NCQ, set to [AHCI...
ASUS P7H55/USB3 1-25 Intel® H55 Serial ATA connectors (7-pin SATA1-6) These connectors are for the Serial ATA signal cables for details. 6. See section Storage Configuration for ... IDE mode by default. In Standard IDE mode, you can connect Serial ATA boot/data hard disk drives to these connectors. • You must install Windows® XP Service Pack 2 or later version before using Serial ATA hard disk drives. • When using hot-plug and NCQ, set to [AHCI...
User Guide
Page 40
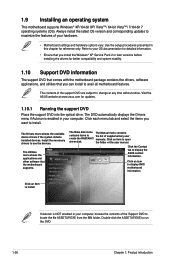
...notice. Install the necessary drivers to display the ASUS contact information. the folder of supplementary user create the RAID/AHCI manuals. Click the Contact tab to use the devices. 1.9 Installing an operating system This motherboard supports Windows® XP/ 64-bit XP/ Vista™/...if the system detects installed devices. The contents of your OS documentation for detailed information. • Ensure that you install the Windows® XP Service Pack 2 or later versions before installing the drivers for better compatibility and system stability. 1.10 Support DVD ...
...notice. Install the necessary drivers to display the ASUS contact information. the folder of supplementary user create the RAID/AHCI manuals. Click the Contact tab to use the devices. 1.9 Installing an operating system This motherboard supports Windows® XP/ 64-bit XP/ Vista™/...if the system detects installed devices. The contents of your OS documentation for detailed information. • Ensure that you install the Windows® XP Service Pack 2 or later versions before installing the drivers for better compatibility and system stability. 1.10 Support DVD ...
User Guide
Page 41
... and then click Next. From the FTP site, select the BIOS version that comes with the motherboard package. ASUS P7H55/USB3 2-1 From the Windows® desktop, click Start > Programs > ASUS > ASUSUpdate > ASUSUpdate to your BIOS Save a copy of the updating process. From the dropdown list, select ...USB flash disk in case you to download, then click Next. Select the ASUS FTP site nearest you wish to manage, save, and update the motherboard BIOS in Windows® environment. • ASUS Update requires an Internet connection either through a network or an Internet Service ...
... and then click Next. From the FTP site, select the BIOS version that comes with the motherboard package. ASUS P7H55/USB3 2-1 From the Windows® desktop, click Start > Programs > ASUS > ASUSUpdate > ASUSUpdate to your BIOS Save a copy of the updating process. From the dropdown list, select ...USB flash disk in case you to download, then click Next. Select the ASUS FTP site nearest you wish to manage, save, and update the motherboard BIOS in Windows® environment. • ASUS Update requires an Internet connection either through a network or an Internet Service ...
User Guide
Page 42
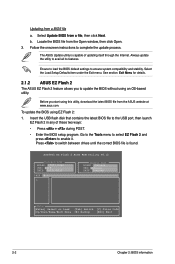
...from a file, then click Next. See section Exit Menu for details. 2.1.2 ASUS EZ Flash 2 The ASUS EZ Flash 2 feature allows you start using this utility, download the latest BIOS file from the Open window, then click Open. 3. Insert the USB flash disk that contains the latest ...BIOS file to update the BIOS without using EZ Flash 2: 1. ASUSTek EZ Flash 2 BIOS ROM Utility V4.12 Current ROM BOARD: P7H55-USB3...
...from a file, then click Next. See section Exit Menu for details. 2.1.2 ASUS EZ Flash 2 The ASUS EZ Flash 2 feature allows you start using this utility, download the latest BIOS file from the Open window, then click Open. 3. Insert the USB flash disk that contains the latest ...BIOS file to update the BIOS without using EZ Flash 2: 1. ASUSTek EZ Flash 2 BIOS ROM Utility V4.12 Current ROM BOARD: P7H55-USB3...
User Guide
Page 66
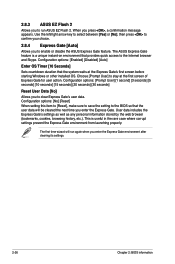
...] [30 seconds] Reset User Data [No] Allows you to enable or disable the ASUS Express Gate feature. Choose [Prompt User] to stay at the Express Gate's first screen before starting Windows or other installed OS. The first time wizard will be cleared the next time you ...enter the Express Gate. Configuration options: [Enabled] [Disabled] [Auto] Enter OS Timer [10 Seconds] Sets countdown duration that the user data will run ASUS EZ Flash 2. Configuration ...
...] [30 seconds] Reset User Data [No] Allows you to enable or disable the ASUS Express Gate feature. Choose [Prompt User] to stay at the Express Gate's first screen before starting Windows or other installed OS. The first time wizard will be cleared the next time you ...enter the Express Gate. Configuration options: [Enabled] [Disabled] [Auto] Enter OS Timer [10 Seconds] Sets countdown duration that the user data will run ASUS EZ Flash 2. Configuration ...
User Guide
Page 67
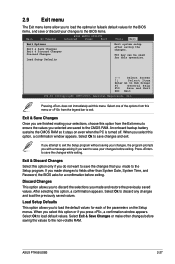
... to discard any changes and load the previously saved values. When you select this option or if you select this option, a confirmation window appears. ASUS P7H55/USB3 2-27 When you press , a confirmation window appears. Pressing does not immediately exit this operation. ←→ Select Screen ↑↓ Select Item Enter Go to Sub Screen F1...
... to discard any changes and load the previously saved values. When you select this option or if you select this option, a confirmation window appears. ASUS P7H55/USB3 2-27 When you press , a confirmation window appears. Pressing does not immediately exit this operation. ←→ Select Screen ↑↓ Select Item Enter Go to Sub Screen F1...


