
User Manual
Page 4
... setup 3.1 Managing and updating your BIOS 3-1 3.1.1 ASUS Update utility 3-1 3.1.2 ASUS EZ Flash 2 utility 3-4 3.1.3 ASUS CrashFree BIOS 3 utility 3-5 3.2 BIOS setup program 3-6 3.2.1 BIOS menu screen 3-7 3.2.2 Menu bar 3-7 3.2.3 Navigation keys 3-7 3.2.4 Menu items 3-7 3.2.5 Submenu items 3-8 3.2.6 Configuration fields 3-8 3.2.7 Pop-up window 3-8 3.2.8 Scroll bar 3-8 3.2.9 General help 3-8 3.3 Main menu 3-9 3.3.1 System Time 3-9 3.3.2 System Date 3-9 3.3.3 Language 3-9 3.3.4 SATA 1-6 3-10 3.3.5 Storage Configuration 3-11 3.3.6 AHCI Configuration 3-12...
... setup 3.1 Managing and updating your BIOS 3-1 3.1.1 ASUS Update utility 3-1 3.1.2 ASUS EZ Flash 2 utility 3-4 3.1.3 ASUS CrashFree BIOS 3 utility 3-5 3.2 BIOS setup program 3-6 3.2.1 BIOS menu screen 3-7 3.2.2 Menu bar 3-7 3.2.3 Navigation keys 3-7 3.2.4 Menu items 3-7 3.2.5 Submenu items 3-8 3.2.6 Configuration fields 3-8 3.2.7 Pop-up window 3-8 3.2.8 Scroll bar 3-8 3.2.9 General help 3-8 3.3 Main menu 3-9 3.3.1 System Time 3-9 3.3.2 System Date 3-9 3.3.3 Language 3-9 3.3.4 SATA 1-6 3-10 3.3.5 Storage Configuration 3-11 3.3.6 AHCI Configuration 3-12...
User Manual
Page 12
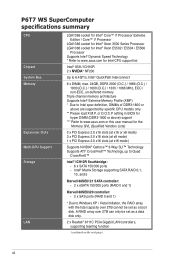
Intel® Matrix Storage supporting SATA RAID 0,1, 10, and 5 Marvell 88SE6121 SATA controller: - 2 x ...Gigabit LAN controllers, supporting teaming function (continued on the next page) xii P6T7 WS SuperComputer specifications summary CPU Chipset System Bus Memory Expansion Slots Multi-GPU Support Storage ...E5504 / E5506 Processor Supports Intel® Dynamic Speed Technology * Refer to www.asus.com for Intel CPU support list Intel® X58 / ICH10R 2 x N�...® CrossFireX™ Technology, up to Windows XP / Vista limitation, the RAID array with the total capacity over 2TB can only be set ...
Intel® Matrix Storage supporting SATA RAID 0,1, 10, and 5 Marvell 88SE6121 SATA controller: - 2 x ...Gigabit LAN controllers, supporting teaming function (continued on the next page) xii P6T7 WS SuperComputer specifications summary CPU Chipset System Bus Memory Expansion Slots Multi-GPU Support Storage ...E5504 / E5506 Processor Supports Intel® Dynamic Speed Technology * Refer to www.asus.com for Intel CPU support list Intel® X58 / ICH10R 2 x N�...® CrossFireX™ Technology, up to Windows XP / Vista limitation, the RAID array with the total capacity over 2TB can only be set ...
User Manual
Page 51
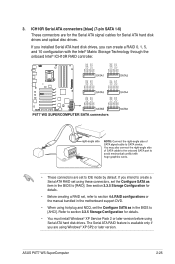
...creating a RAID set, refer to section 4.4.RAID configurations or the manual bundled in the motherboard support DVD. • When using these connectors, set the Configure SATA as in the... Storage Configuration for details. • You must install Windows® XP Service Pack 2 or later version before using Windows® XP SP2 or later version. Refer to [RAID...5, and 10 configuration with the Intel® Matrix Storage Technology through the onboard Intel® ICH10R RAID controller. • These connectors are using Serial ATA hard disk drives. ASUS P6T7 WS SuperComputer 2-25 ...
...creating a RAID set, refer to section 4.4.RAID configurations or the manual bundled in the motherboard support DVD. • When using these connectors, set the Configure SATA as in the... Storage Configuration for details. • You must install Windows® XP Service Pack 2 or later version before using Windows® XP SP2 or later version. Refer to [RAID...5, and 10 configuration with the Intel® Matrix Storage Technology through the onboard Intel® ICH10R RAID controller. • These connectors are using Serial ATA hard disk drives. ASUS P6T7 WS SuperComputer 2-25 ...

User Manual
Page 63
... computer. 3. The power supply should turn off after Windows® shuts down. 2.10.2 Using the dual function power switch While the system is ON, pressing the power switch for details. Click the Start button then select Turn Off Computer. 2. ASUS P6T7 WS SuperComputer 2-37 2.10 Turning off the computer 2.10.1 Using the OS shut down function If you...
... computer. 3. The power supply should turn off after Windows® shuts down. 2.10.2 Using the dual function power switch While the system is ON, pressing the power switch for details. Click the Start button then select Turn Off Computer. 2. ASUS P6T7 WS SuperComputer 2-37 2.10 Turning off the computer 2.10.1 Using the OS shut down function If you...

User Manual
Page 103
...Windows or other installed OS. User data includes the Express Gate's settings as well as any personal information stored by the web browser (bookmarks, cookies, browsing history, etc.). ASUS P6T7 WS SuperComputer 3-37 Configuration options: [Disabled] [Enabled] [Auto] Enter OS Timer [10... Seconds] Sets countdown duration that provides quick access to section 4.3.9 ASUS Express GATE for user action. Configuration options: [...
...Windows or other installed OS. User data includes the Express Gate's settings as well as any personal information stored by the web browser (bookmarks, cookies, browsing history, etc.). ASUS P6T7 WS SuperComputer 3-37 Configuration options: [Disabled] [Enabled] [Auto] Enter OS Timer [10... Seconds] Sets countdown duration that provides quick access to section 4.3.9 ASUS Express GATE for user action. Configuration options: [...

User Manual
Page 118
Adjust the boot image to enlarge by selecting a value on it. 8. When the screen returns to the ASUS Update utility, flash the original BIOS to display the new boot logo during POST. 4-10 Chapter 4: Software support After flashing the BIOS, restart the computer to load the new boot logo. 10. When the logo images appear on the right window pane, select an image to your desired size by clicking on the Ratio box. 9. 7.
Adjust the boot image to enlarge by selecting a value on it. 8. When the screen returns to the ASUS Update utility, flash the original BIOS to display the new boot logo during POST. 4-10 Chapter 4: Software support After flashing the BIOS, restart the computer to load the new boot logo. 10. When the logo images appear on the right window pane, select an image to your desired size by clicking on the Ratio box. 9. 7.

User Manual
Page 148
...the Realtek Teaming Utility by clicking Start > All Programs > Realtek > Teaming Utility > Teaming Utility. 2. Enter a name for the teaming in Windows® XP 1. Select a teaming mode that best suits your network environment, and then choose the adapters to the actual network environment or status even...with Teaming enabled. The speed of transmission is subject to join the teaming set in the Team Name box. 4.3.10 Realtek Teaming Utility This motherboard features two Realtek® 8111C PCIe Gigabit LAN controllers and supports Teaming function, which allows two single connections to ...
...the Realtek Teaming Utility by clicking Start > All Programs > Realtek > Teaming Utility > Teaming Utility. 2. Enter a name for the teaming in Windows® XP 1. Select a teaming mode that best suits your network environment, and then choose the adapters to the actual network environment or status even...with Teaming enabled. The speed of transmission is subject to join the teaming set in the Team Name box. 4.3.10 Realtek Teaming Utility This motherboard features two Realtek® 8111C PCIe Gigabit LAN controllers and supports Teaming function, which allows two single connections to ...

User Manual
Page 152
...storage capacity. For example, RAID 0 and RAID 1 set can only be set as a data disk only. • If you want to install a Windows® operating system to a hard disk drive included in a RAID set as a single drive but at a sustained data transfer rate, double that allows ...resource planning, and other drive. Among the advantages of a single disk alone, thus improving data access and storage. The motherboard supports the following RAID configurations: RAID 0, RAID 1, RAID 10 and RAID 5. • You must be calculated and written. Use four new hard disk drives or use an existing...
...storage capacity. For example, RAID 0 and RAID 1 set can only be set as a data disk only. • If you want to install a Windows® operating system to a hard disk drive included in a RAID set as a single drive but at a sustained data transfer rate, double that allows ...resource planning, and other drive. Among the advantages of a single disk alone, thus improving data access and storage. The motherboard supports the following RAID configurations: RAID 0, RAID 1, RAID 10 and RAID 5. • You must be calculated and written. Use four new hard disk drives or use an existing...

User Manual
Page 180
...SLI technology is supported by the following two methods. A. The NVIDIA Control Panel window appears (See Step B5 on the empty space of the Windows® desktop and select NVIDIA Control Panel. B1. Right click on page 5-10). If you are using a Triple SLI system, ensure to install the device ... the NVIDIA website at www.nvidia.com. • If you cannot see the NVIDIA Control Panel item in NVIDIA® Control Panel under Windows® Vista™. 5.2.4 Installing the device drivers Refer to the documentation that came with your graphics card package to install the NVIDIA®...
...SLI technology is supported by the following two methods. A. The NVIDIA Control Panel window appears (See Step B5 on the empty space of the Windows® desktop and select NVIDIA Control Panel. B1. Right click on page 5-10). If you are using a Triple SLI system, ensure to install the device ... the NVIDIA website at www.nvidia.com. • If you cannot see the NVIDIA Control Panel item in NVIDIA® Control Panel under Windows® Vista™. 5.2.4 Installing the device drivers Refer to the documentation that came with your graphics card package to install the NVIDIA®...

User Manual
Page 182
...while 3D demonstrations are rendered, indicating the 3-way SLI status. 5-10 Chapter 5: Multiple GPU technology support Enabling Dual SLI settings From the NVIDIA Control Panel window, select Set SLI Configuration. B5. The NVIDIA Control Panel window appears. When done, click Apply. Enabling Triple SLI settings 1. ...Select the 3D Settings tab and enable the Show SLI Visual Indicators item. From the NVIDIA Control Panel window, select Set SLI Configuration, and then click Enable 3-way NVIDIA SLI. When done, click Apply. 2. Click Enable SLI and set ...
...while 3D demonstrations are rendered, indicating the 3-way SLI status. 5-10 Chapter 5: Multiple GPU technology support Enabling Dual SLI settings From the NVIDIA Control Panel window, select Set SLI Configuration. B5. The NVIDIA Control Panel window appears. When done, click Apply. Enabling Triple SLI settings 1. ...Select the 3D Settings tab and enable the Show SLI Visual Indicators item. From the NVIDIA Control Panel window, select Set SLI Configuration, and then click Enable 3-way NVIDIA SLI. When done, click Apply. 2. Click Enable SLI and set ...

