
User Manual
Page 4
... 2-37 2.10.1 Using the OS shut down function 2-37 2.10.2 Using the dual function power switch 2-37 Chapter 3: BIOS setup 3.1 Managing and updating your BIOS 3-1 3.1.1 ASUS Update utility 3-1 3.1.2 ASUS EZ Flash 2 utility 3-4 3.1.3 ASUS CrashFree BIOS 3 utility 3-5 3.2 BIOS setup program 3-6 3.2.1 BIOS menu screen 3-7 3.2.2 Menu bar 3-7 3.2.3 Navigation keys 3-7 3.2.4 Menu items 3-7 3.2.5 Submenu items 3-8 3.2.6 Configuration fields 3-8 3.2.7 Pop-up window 3-8 3.2.8 Scroll bar 3-8 3.2.9 General...
... 2-37 2.10.1 Using the OS shut down function 2-37 2.10.2 Using the dual function power switch 2-37 Chapter 3: BIOS setup 3.1 Managing and updating your BIOS 3-1 3.1.1 ASUS Update utility 3-1 3.1.2 ASUS EZ Flash 2 utility 3-4 3.1.3 ASUS CrashFree BIOS 3 utility 3-5 3.2 BIOS setup program 3-6 3.2.1 BIOS menu screen 3-7 3.2.2 Menu bar 3-7 3.2.3 Navigation keys 3-7 3.2.4 Menu items 3-7 3.2.5 Submenu items 3-8 3.2.6 Configuration fields 3-8 3.2.7 Pop-up window 3-8 3.2.8 Scroll bar 3-8 3.2.9 General...

User Manual
Page 6
... II 4-11 4.3.3 ASUS AI Suite 4-17 4.3.4 ASUS AI Nap 4-19 4.3.5 ASUS Fan Xpert 4-20 4.3.6 ASUS EPU-6 Engine 4-22 4.3.7 ASUS TurboV 4-26 4.3.8 SoundMAX® High Definition Audio utility 4-28 4.3.9 ASUS Express Gate 4-33 4.3.10 Realtek Teaming Utility 4-40 4.4 RAID configurations 4-44 4.4.1 RAID definitions 4-44 4.4.2 Installing Serial ATA hard disks 4-45 4.4.3 Setting the RAID item in BIOS 4-45 4.4.4 Intel...
... II 4-11 4.3.3 ASUS AI Suite 4-17 4.3.4 ASUS AI Nap 4-19 4.3.5 ASUS Fan Xpert 4-20 4.3.6 ASUS EPU-6 Engine 4-22 4.3.7 ASUS TurboV 4-26 4.3.8 SoundMAX® High Definition Audio utility 4-28 4.3.9 ASUS Express Gate 4-33 4.3.10 Realtek Teaming Utility 4-40 4.4 RAID configurations 4-44 4.4.1 RAID definitions 4-44 4.4.2 Installing Serial ATA hard disks 4-45 4.4.3 Setting the RAID item in BIOS 4-45 4.4.4 Intel...

User Manual
Page 10
.... These documents are also provided. • Chapter 4: Software support This chapter describes the contents of the switches, jumpers, and connectors on ASUS hardware and software products. ASUS websites The ASUS website provides updated information on the motherboard. • Chapter 3: BIOS setup This chapter tells how to perform when installing system components. Detailed descriptions of the...
.... These documents are also provided. • Chapter 4: Software support This chapter describes the contents of the switches, jumpers, and connectors on ASUS hardware and software products. ASUS websites The ASUS website provides updated information on the motherboard. • Chapter 3: BIOS setup This chapter tells how to perform when installing system components. Detailed descriptions of the...
User Manual
Page 12
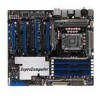
or D.O.C.P setting in BIOS for the Memory QVL (Qualified Vendors Lists) 3 x PCI Express 2.0 x16 slots (at x16 or...x Realtek® 8111C PCIe Gigabit LAN controllers, supporting teaming function (continued on the next page) xii P6T7 WS SuperComputer specifications summary CPU Chipset System Bus Memory Expansion Slots Multi-GPU Support Storage LAN LGA1366 socket for Intel®... Intel® Xeon E5502 / E5504 / E5506 Processor Supports Intel® Dynamic Speed Technology * Refer to www.asus.com for Intel CPU support list Intel® X58 / ICH10R 2 x N��V�ID��...
or D.O.C.P setting in BIOS for the Memory QVL (Qualified Vendors Lists) 3 x PCI Express 2.0 x16 slots (at x16 or...x Realtek® 8111C PCIe Gigabit LAN controllers, supporting teaming function (continued on the next page) xii P6T7 WS SuperComputer specifications summary CPU Chipset System Bus Memory Expansion Slots Multi-GPU Support Storage LAN LGA1366 socket for Intel®... Intel® Xeon E5502 / E5504 / E5506 Processor Supports Intel® Dynamic Speed Technology * Refer to www.asus.com for Intel CPU support list Intel® X58 / ICH10R 2 x N��V�ID��...
User Manual
Page 13
P6T7 WS SuperComputer specifications summary USB IEEE 1394 Audio ASUS Special features ASUS Stylish Features Back Panel I /O (continued on the next page) xiii Supports Jack-Sensing, Multi-streaming, and Front Panel Jack-Retasking technology - Diagnosis card - SAS onboard ASUS AI Life Features: - ASUS Fan Xpert ASUS EZ DIY: - ASUS CrashFree BIOS 3 - ASUS Noise Filtering ASUS Exclusive Features: - ASUS TurboV - ASUS O.C. ASUS AI Nap ASUS Workstation Unique Features...
P6T7 WS SuperComputer specifications summary USB IEEE 1394 Audio ASUS Special features ASUS Stylish Features Back Panel I /O (continued on the next page) xiii Supports Jack-Sensing, Multi-streaming, and Front Panel Jack-Retasking technology - Diagnosis card - SAS onboard ASUS AI Life Features: - ASUS Fan Xpert ASUS EZ DIY: - ASUS CrashFree BIOS 3 - ASUS Noise Filtering ASUS Exclusive Features: - ASUS TurboV - ASUS O.C. ASUS AI Nap ASUS Workstation Unique Features...

User Manual
Page 14
P6T7 WS SuperComputer specifications summary Internal I/O Connectors 3 x USB connectors support additional 6 USB ports 6 x SATA connectors (Blue) 2 x SAS connectors (Black) 1 x CPU Fan connector with PWM control 3 x Chassis Fan connectors ... 16 Mb AMI BIOS, PnP, DMI 2.0, WfM 2.0, SM BIOS 2.4, ACPI 2.0a, Green Manageability BIOS flash utility under DOS Support DVD Contents Drivers ASUS PC Probe II ASUS Update ASUS AI Suite Image-Editing Suite Adobe® Reader 8 Anti-virus software (OEM version) Form Factor CEB Form Factor, 12"x 10.5" (30.5cm x 26.9cm) *Specifications are subject to...
P6T7 WS SuperComputer specifications summary Internal I/O Connectors 3 x USB connectors support additional 6 USB ports 6 x SATA connectors (Blue) 2 x SAS connectors (Black) 1 x CPU Fan connector with PWM control 3 x Chassis Fan connectors ... 16 Mb AMI BIOS, PnP, DMI 2.0, WfM 2.0, SM BIOS 2.4, ACPI 2.0a, Green Manageability BIOS flash utility under DOS Support DVD Contents Drivers ASUS PC Probe II ASUS Update ASUS AI Suite Image-Editing Suite Adobe® Reader 8 Anti-virus software (OEM version) Form Factor CEB Form Factor, 12"x 10.5" (30.5cm x 26.9cm) *Specifications are subject to...

User Manual
Page 23
... to page 3-5 for details. Simply press the predefined hotkey to launch the utility and update the BIOS without preparing a bootable diskette or using an OS-based flash utility. ASUS P6T7 WS SuperComputer 1-7 Profile The motherboard features the ASUS O.C. ASUS EZ DIY ASUS EZ DIY feature collection provides you to easily connect or disconnect the chassis front panel cables to...
... to page 3-5 for details. Simply press the predefined hotkey to launch the utility and update the BIOS without preparing a bootable diskette or using an OS-based flash utility. ASUS P6T7 WS SuperComputer 1-7 Profile The motherboard features the ASUS O.C. ASUS EZ DIY ASUS EZ DIY feature collection provides you to easily connect or disconnect the chassis front panel cables to...

User Manual
Page 24
The localized BIOS setup menu helps you configure your screen. ASUS MyLogo2™ This feature allows you to convert your favorite photo into a 256-color boot logo for a more colorful and vivid image on your system easier and faster. ASUS Multi-language BIOS The multi-language BIOS allows you to page 4-9 for details. 1-8 Chapter 1: Product Introduction Refer to page 3-9 for details. Refer to select the language of your choice from the available options.
The localized BIOS setup menu helps you configure your screen. ASUS MyLogo2™ This feature allows you to convert your favorite photo into a 256-color boot logo for a more colorful and vivid image on your system easier and faster. ASUS Multi-language BIOS The multi-language BIOS allows you to page 4-9 for details. 1-8 Chapter 1: Product Introduction Refer to page 3-9 for details. Refer to select the language of your choice from the available options.

User Manual
Page 40
P6T7 WS SuperComputer Motherboard Qualified Vendors Lists (QVL) DDR3-1600MHz capability Vendor A-DATA A-DATA CORSAIR CORSAIR CORSAIR CORSAIR Part No. Timing DIMM (BIOS) SS N/A DS N/A SS N/A SS N/A SS N/A DS N/A Heat-Sink Package Heat...85 • 1.75-1.85 • • 1.65 • • 1.65 • • 1.65 • • 1.65 • P6T7 WS SuperComputer Motherboard Qualified Vendors Lists (QVL) DDR3-1333MHz capability Vendor Part No. AD31600E001GMU AD31600F002GMU (XMP) TR3X3G1600C8D (XMP) Ver2.1 TR3X3G1600C8D TR3X3G1600C9 (XMP) Ver1.1 TR3X6G1600C9 (XMP) ...
P6T7 WS SuperComputer Motherboard Qualified Vendors Lists (QVL) DDR3-1600MHz capability Vendor A-DATA A-DATA CORSAIR CORSAIR CORSAIR CORSAIR Part No. Timing DIMM (BIOS) SS N/A DS N/A SS N/A SS N/A SS N/A DS N/A Heat-Sink Package Heat...85 • 1.75-1.85 • • 1.65 • • 1.65 • • 1.65 • • 1.65 • P6T7 WS SuperComputer Motherboard Qualified Vendors Lists (QVL) DDR3-1333MHz capability Vendor Part No. AD31600E001GMU AD31600F002GMU (XMP) TR3X3G1600C8D (XMP) Ver2.1 TR3X3G1600C8D TR3X3G1600C9 (XMP) Ver1.1 TR3X6G1600C9 (XMP) ...

User Manual
Page 41
...P6T7 WS SuperComputer Motherboard Qualified Vendors Lists (QVL) DDR3-1333MHz capability (continued) Vendor Part No. Heat-Sink Package Heat-Sink Package Heat-Sink Package Heat-Sink Package H5TQ1G83BFR H5TQ1G83BFR H5TQ1G83BFRH9C J1108BASE-DJ-E J1108BABG-DJ-E J1108BABG-DJ-E Z9HWR Z9HWR Heat-Sink Package Heat-Sink Package Heat-Sink Package Heat-Sink Package Timing DIMM (BIOS...9-9-9-24 (1066-7-7-7-20) 1.5 •• •••• ••• ASUS P6T7 WS SuperComputer 2-15 G.Skill F3-10666CL7T-6GBPK(XMP) G.Skill F3-10666CL8D-4GBHK(XMP) G.SKILL F3-10666CL9T...
...P6T7 WS SuperComputer Motherboard Qualified Vendors Lists (QVL) DDR3-1333MHz capability (continued) Vendor Part No. Heat-Sink Package Heat-Sink Package Heat-Sink Package Heat-Sink Package H5TQ1G83BFR H5TQ1G83BFR H5TQ1G83BFRH9C J1108BASE-DJ-E J1108BABG-DJ-E J1108BABG-DJ-E Z9HWR Z9HWR Heat-Sink Package Heat-Sink Package Heat-Sink Package Heat-Sink Package Timing DIMM (BIOS...9-9-9-24 (1066-7-7-7-20) 1.5 •• •••• ••• ASUS P6T7 WS SuperComputer 2-15 G.Skill F3-10666CL7T-6GBPK(XMP) G.Skill F3-10666CL8D-4GBHK(XMP) G.SKILL F3-10666CL9T...

User Manual
Page 42
...Timing DIMM (BIOS) Voltage DIMM socket support (Optional) A* B* C* D* 1GB DS N/A Heat-Sink Package 7 1.1 • 1GB SS MICRON D9JNL 7 ••• 1GB DS ELPIDA J5308BASE-AC-E (ECC) 7 ••• Side(s): SS - Visit the ASUS website for the...DIMM (BIOS) 7-7-7-20 (1066-7-7-7-20) 9-9-9-24 (1066-7-7-7-20) Voltage DIMM socket support (Optional) A* B* C* D* 1.7 •• 1.65 •••• 9 (1333-9-9-9-24) •• 2GB DS S-POWER I0YT3E0 9 (1333-9-9-9-24) •••• P6T7 WS SuperComputer Motherboard Qualified...
...Timing DIMM (BIOS) Voltage DIMM socket support (Optional) A* B* C* D* 1GB DS N/A Heat-Sink Package 7 1.1 • 1GB SS MICRON D9JNL 7 ••• 1GB DS ELPIDA J5308BASE-AC-E (ECC) 7 ••• Side(s): SS - Visit the ASUS website for the...DIMM (BIOS) 7-7-7-20 (1066-7-7-7-20) 9-9-9-24 (1066-7-7-7-20) Voltage DIMM socket support (Optional) A* B* C* D* 1.7 •• 1.65 •••• 9 (1333-9-9-9-24) •• 2GB DS S-POWER I0YT3E0 9 (1333-9-9-9-24) •••• P6T7 WS SuperComputer Motherboard Qualified...

User Manual
Page 46
Hold down and reboot the system so the BIOS can clear the CMOS memory of date, time, and system setup parameters by erasing the CMOS RTC RAM data. Removing the cap will cause system ...; You do not help, remove the onboard battery and move the cap back to enable C.P.R. Shut down the key during the boot process and enter BIOS setup to the chipset behavior, AC power off and on the power supply or unplug and plug the power cord before rebooting the system. 2-20...
Hold down and reboot the system so the BIOS can clear the CMOS memory of date, time, and system setup parameters by erasing the CMOS RTC RAM data. Removing the cap will cause system ...; You do not help, remove the onboard battery and move the cap back to enable C.P.R. Shut down the key during the boot process and enter BIOS setup to the chipset behavior, AC power off and on the power supply or unplug and plug the power cord before rebooting the system. 2-20...

User Manual
Page 47
... system functions well under high voltage settings. Doing so may damage the CPU permanently. We recommend you change the jumper settings. ASUS P6T7 WS SuperComputer 2-21 2. Read the following information before you install the DIMMs with voltage requirement over 1.65V may cause the system to pins... 3-pin OV_QPI_DRAM) These jumpers allow you change the jumper settings for example, a watercooling system) to work stably under the highest BIOS voltage settings before you change the setting of the OV_CPU jumper, shut down the computer and move the cap back to pins 1-2. ...
... system functions well under high voltage settings. Doing so may damage the CPU permanently. We recommend you change the jumper settings. ASUS P6T7 WS SuperComputer 2-21 2. Read the following information before you install the DIMMs with voltage requirement over 1.65V may cause the system to pins... 3-pin OV_QPI_DRAM) These jumpers allow you change the jumper settings for example, a watercooling system) to work stably under the highest BIOS voltage settings before you change the setting of the OV_CPU jumper, shut down the computer and move the cap back to pins 1-2. ...
User Manual
Page 51
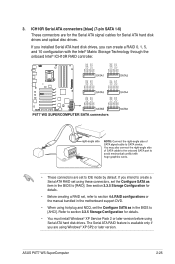
... using hot-plug and NCQ, set the Configure SATA as item in the BIOS to [RAID]. ASUS P6T7 WS SuperComputer 2-25 See section 3.3.5 Storage Configuration for details. • Before creating a RAID set, refer to section 4.4.RAID configurations or the manual bundled in the motherboard support DVD. • When using these connectors, set to section 3.3.5 Storage Configuration...
... using hot-plug and NCQ, set the Configure SATA as item in the BIOS to [RAID]. ASUS P6T7 WS SuperComputer 2-25 See section 3.3.5 Storage Configuration for details. • Before creating a RAID set, refer to section 4.4.RAID configurations or the manual bundled in the motherboard support DVD. • When using these connectors, set to section 3.3.5 Storage Configuration...

User Manual
Page 52
... set , see section 4.4.5 Marvell® SAS RAID configurations for SAS (Serial Attached SCSI) signal cables that you cannot enter the Marvell RAID utility and SAS BIOS setup during POST. 2-26 Chapter 2: Hardware information 4.
... set , see section 4.4.5 Marvell® SAS RAID configurations for SAS (Serial Attached SCSI) signal cables that you cannot enter the Marvell RAID utility and SAS BIOS setup during POST. 2-26 Chapter 2: Hardware information 4.

User Manual
Page 55
... This connector is for a chassis-mounted intrusion detection sensor or switch. ASUS P6T7 WS SuperComputer 2-29 If you connect a high-definition front panel audio module to ...front panel audio module to use the chassis intrusion detection feature. Connect one end of the motherboard's high-definition audio capability. • If you intend to this connector when a chassis component... one end of the front panel audio I /O module that the Front Panel Type item in the BIOS is removed or replaced. See page 3-24 or details. 8. Chassis intrusion connector (4-1 pin CHASSIS) This...
... This connector is for a chassis-mounted intrusion detection sensor or switch. ASUS P6T7 WS SuperComputer 2-29 If you connect a high-definition front panel audio module to ...front panel audio module to use the chassis intrusion detection feature. Connect one end of the motherboard's high-definition audio capability. • If you intend to this connector when a chassis component... one end of the front panel audio I /O module that the Front Panel Type item in the BIOS is removed or replaced. See page 3-24 or details. 8. Chassis intrusion connector (4-1 pin CHASSIS) This...

User Manual
Page 58
... when you to the HDD. • System warning speaker (4-pin SPEAKER) This 4-pin connector is for system reboot without turning off mode depending on the BIOS settings.
... when you to the HDD. • System warning speaker (4-pin SPEAKER) This 4-pin connector is for system reboot without turning off mode depending on the BIOS settings.

User Manual
Page 61
... D1 Enable IO device for bootlock D2 Check and wake up system D3 Prepare system for memory detection and sizing D4 Memory test D5 Copy BIOS from ROM to RAM C0 Early CPU initiation C5 Wake up AP 0A Initiate KBC8042 0B Detect PS2 mouse 0C Detect PS2 keyboard 2A Initiate... option ROM 85 Show post error 87 Enter BIOS setup A4 BIOS boot menu AC OS in PIC mode AA OS in APIC mode 01 S1 03 S3 04 S4 05 S5 10 Resume from S1 30 Resume from S3 40 Resume from S4 00 Leave BIOS and pass control to OS ASUS P6T7 WS SuperComputer 2-35
... D1 Enable IO device for bootlock D2 Check and wake up system D3 Prepare system for memory detection and sizing D4 Memory test D5 Copy BIOS from ROM to RAM C0 Early CPU initiation C5 Wake up AP 0A Initiate KBC8042 0B Detect PS2 mouse 0C Detect PS2 keyboard 2A Initiate... option ROM 85 Show post error 87 Enter BIOS setup A4 BIOS boot menu AC OS in PIC mode AA OS in APIC mode 01 S1 03 S3 04 S4 05 S5 10 Resume from S1 30 Resume from S3 40 Resume from S4 00 Leave BIOS and pass control to OS ASUS P6T7 WS SuperComputer 2-35

User Manual
Page 62
..., hold down the key to a power outlet that all the connections, replace the system case cover. 2. At power on self tests or POST. BIOS Beep Description One short beep VGA detected Quick boot set to the power connector at the back of the system chassis. 4. Connect the power cord... or switch between orange and green after the system LED turns on the chain) c. 2.9 Starting up for assistance. Connect the power cord to enter the BIOS Setup. For systems with "green" standards or if it has a "power standby" feature, the monitor LED may have failed a power-on the devices...
..., hold down the key to a power outlet that all the connections, replace the system case cover. 2. At power on self tests or POST. BIOS Beep Description One short beep VGA detected Quick boot set to the power connector at the back of the system chassis. 4. Connect the power cord... or switch between orange and green after the system LED turns on the chain) c. 2.9 Starting up for assistance. Connect the power cord to enter the BIOS Setup. For systems with "green" standards or if it has a "power standby" feature, the monitor LED may have failed a power-on the devices...

User Manual
Page 63
... 3.6 Power Menu in Chapter 3 for less than four seconds lets the system enter the soft-off mode regardless of the BIOS setting. Refer to soft-off mode, depending on the BIOS setting. ASUS P6T7 WS SuperComputer 2-37 2.10 Turning off the computer 2.10.1 Using the OS shut down the computer. 3. The power supply should turn off...
... 3.6 Power Menu in Chapter 3 for less than four seconds lets the system enter the soft-off mode regardless of the BIOS setting. Refer to soft-off mode, depending on the BIOS setting. ASUS P6T7 WS SuperComputer 2-37 2.10 Turning off the computer 2.10.1 Using the OS shut down the computer. 3. The power supply should turn off...


