P5QLD PRO user's manual
Page 4
... utility 4-1 4.1.2 Creating a bootable floppy disk 4-4 4.1.3 ASUS EZ Flash 2 utility 4-5 4.1.4 AFUDOS utility 4-6 4.1.5 ASUS CrashFree BIOS 3 utility 4-8 4.2 BIOS setup program 4-10 4.2.1 BIOS menu screen 4-11 4.2.2 Menu bar 4-11 4.2.3 Navigation keys 4-11 4.2.4 Menu items 4-12 4.2.5 Sub-menu items 4-12 4.2.6 Configuration fields 4-12 4.2.7 Pop-up window 4-12 4.2.8 Scroll bar 4-12 4.2.9 General help 4-12 4.3 Main menu 4-13 4.3.1 System Time...
... utility 4-1 4.1.2 Creating a bootable floppy disk 4-4 4.1.3 ASUS EZ Flash 2 utility 4-5 4.1.4 AFUDOS utility 4-6 4.1.5 ASUS CrashFree BIOS 3 utility 4-8 4.2 BIOS setup program 4-10 4.2.1 BIOS menu screen 4-11 4.2.2 Menu bar 4-11 4.2.3 Navigation keys 4-11 4.2.4 Menu items 4-12 4.2.5 Sub-menu items 4-12 4.2.6 Configuration fields 4-12 4.2.7 Pop-up window 4-12 4.2.8 Scroll bar 4-12 4.2.9 General help 4-12 4.3 Main menu 4-13 4.3.1 System Time...
P5QLD PRO user's manual
Page 20
... for details. feature of booting the BIOS. 1.3.3 ASUS Stylish features ASUS MyLogo2™ This feature allows you to overclocking failure, C.P.R. See page 5-10 for details. 1.3.4 ASUS Intelligent Overclocking features AI Booster The ASUS AI Booster allows you to fine tune the CPU/...memory voltage and gradually increase the memory Front Side Bus (FSB) and PCI Express frequency at 1MHz increment to open the system chassis and clear the RTC data. Precision Tweaker This feature allows you to overclock the CPU speed in Windows...
... for details. feature of booting the BIOS. 1.3.3 ASUS Stylish features ASUS MyLogo2™ This feature allows you to overclocking failure, C.P.R. See page 5-10 for details. 1.3.4 ASUS Intelligent Overclocking features AI Booster The ASUS AI Booster allows you to fine tune the CPU/...memory voltage and gradually increase the memory Front Side Bus (FSB) and PCI Express frequency at 1MHz increment to open the system chassis and clear the RTC data. Precision Tweaker This feature allows you to overclock the CPU speed in Windows...
P5QLD PRO user's manual
Page 77
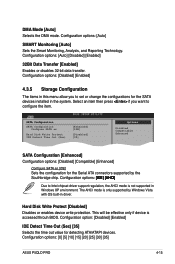
...[0] [5] [10] [15] [20] [25] [30] [35] ASUS P5QLD PRO 4-15 Configuration options: [Auto] [Disabled] [Enabled] 32Bit Data Transfer [Enabled] Enables or disables 32-bit data transfer. Configuration options: [IDE] [AHCI] Due to set or change the configurations for the SATA devices installed in Windows XP environment...[Disabled] [Enabled] IDE Detect Time Out (Sec) [35] Selects the time out value for the Serial ATA connectors supported by Windows Vista with OS built-in driver. Configuration options: [Auto] SMART Monitoring [Auto] Sets the Smart Monitoring, Analysis, and Reporting Technology....
...[0] [5] [10] [15] [20] [25] [30] [35] ASUS P5QLD PRO 4-15 Configuration options: [Auto] [Disabled] [Enabled] 32Bit Data Transfer [Enabled] Enables or disables 32-bit data transfer. Configuration options: [IDE] [AHCI] Due to set or change the configurations for the SATA devices installed in Windows XP environment...[Disabled] [Enabled] IDE Detect Time Out (Sec) [35] Selects the time out value for the Serial ATA connectors supported by Windows Vista with OS built-in driver. Configuration options: [Auto] SMART Monitoring [Auto] Sets the Smart Monitoring, Analysis, and Reporting Technology....
P5QLD PRO user's manual
Page 99
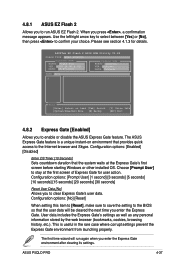
...at the Express Gate's first screen before starting Windows or other installed OS. This is a unique instant-on environment that provides quick access to the Internet browser and Skype. ASUS P5QLD PRO 4-37 When you to enable or disable the ASUS Express Gate feature. User data includes the ...clearing its settings. Please see section 4.1.3 for user action. Configuration options: [Enabled] [Disabled] Enter OS Timer [10 Seconds] Sets countdown duration that the user data will run ASUS EZ Flash 2. Configuration options: [No] [Reset] When setting this item to [Reset], make sure to save...
...at the Express Gate's first screen before starting Windows or other installed OS. This is a unique instant-on environment that provides quick access to the Internet browser and Skype. ASUS P5QLD PRO 4-37 When you to enable or disable the ASUS Express Gate feature. User data includes the ...clearing its settings. Please see section 4.1.3 for user action. Configuration options: [Enabled] [Disabled] Enter OS Timer [10 Seconds] Sets countdown duration that the user data will run ASUS EZ Flash 2. Configuration options: [No] [Reset] When setting this item to [Reset], make sure to save...
P5QLD PRO user's manual
Page 114
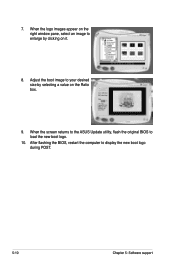
7. Adjust the boot image to enlarge by selecting a value on it. 8. When the logo images appear on the right window pane, select an image to your desired size by clicking on the Ratio box. 9. After flashing the BIOS, restart the computer to load the new boot logo. 10. When the screen returns to the ASUS Update utility, flash the original BIOS to display the new boot logo during POST. 5-10 Chapter 5: Software support
7. Adjust the boot image to enlarge by selecting a value on it. 8. When the logo images appear on the right window pane, select an image to your desired size by clicking on the Ratio box. 9. After flashing the BIOS, restart the computer to load the new boot logo. 10. When the screen returns to the ASUS Update utility, flash the original BIOS to display the new boot logo during POST. 5-10 Chapter 5: Software support

P5QLD PRO user's manual
Page 146
Set the Intel(R) SpeedStep Technology item to open the Power Options Properties window. 8. After the computer restarts, right click on a blank space on the operating system. On the Power schemes section, click , then select any option except ...internal frequency slightly decreases when the CPU loading is low. Click Apply, then click OK. 10. See page 4-24 for details. 4. When the Display Properties window appears, click the Screen Saver tab. 7. Close the Display Properties window. The screen displays and procedures may vary depending on the desktop, then select Properties from the...
Set the Intel(R) SpeedStep Technology item to open the Power Options Properties window. 8. After the computer restarts, right click on a blank space on the operating system. On the Power schemes section, click , then select any option except ...internal frequency slightly decreases when the CPU loading is low. Click Apply, then click OK. 10. See page 4-24 for details. 4. When the Display Properties window appears, click the Screen Saver tab. 7. Close the Display Properties window. The screen displays and procedures may vary depending on the desktop, then select Properties from the...

