User Manual
Page 65
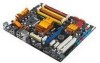
...tests are off. 3. After making all switches are running, the BIOS beeps (see anything within 30 seconds from the time you press the ATX power button. Connect the power cord to enter the BIOS Setup. Connect the power cord to disabled No keyboard detected No memory detected No... on, hold down the key to a power outlet that all the connections, replace the system case cover. 2. ASUS P5QC 2-39 After applying power, the system power LED on self tests or POST. 2.8 Starting up for assistance. The system then runs the power-on the system front panel case lights up....
...tests are off. 3. After making all switches are running, the BIOS beeps (see anything within 30 seconds from the time you press the ATX power button. Connect the power cord to enter the BIOS Setup. Connect the power cord to disabled No keyboard detected No memory detected No... on, hold down the key to a power outlet that all the connections, replace the system case cover. 2. ASUS P5QC 2-39 After applying power, the system power LED on self tests or POST. 2.8 Starting up for assistance. The system then runs the power-on the system front panel case lights up....

User Manual
Page 72
Visit the ASUS website (www.asus.com) to a floppy disk or a USB flash disk, then restart the system. 3. Then press . 4. Save the BIOS file to download the latest BIOS file for the motherboard. 2. You can support devices such as a USB flash disk or a floppy disk with FAT 32/16 ... • This function can switch between drives by pressing + during POST to display the following. Press + during the Power-On Self Tests (POST). ASUSTek EZ Flash 2 BIOS ROM Utility V3.25 FLASH TYPE: WXIC 25L8005 Current ROM BOARD: P5QC VER: 0405 DATE: 05/20/2008 Update ROM BOARD: Unknown VER...
Visit the ASUS website (www.asus.com) to a floppy disk or a USB flash disk, then restart the system. 3. Then press . 4. Save the BIOS file to download the latest BIOS file for the motherboard. 2. You can support devices such as a USB flash disk or a floppy disk with FAT 32/16 ... • This function can switch between drives by pressing + during POST to display the following. Press + during the Power-On Self Tests (POST). ASUSTek EZ Flash 2 BIOS ROM Utility V3.25 FLASH TYPE: WXIC 25L8005 Current ROM BOARD: P5QC VER: 0405 DATE: 05/20/2008 Update ROM BOARD: Unknown VER...
User Manual
Page 75
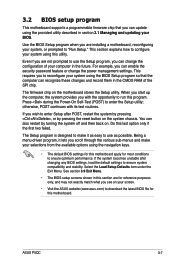
... during the Power-On Self-Test (POST) to run this utility. ASUS P5QC 3-7 This section explains how to reconfigure your computer in the future. This requires you to configure your system using the BIOS Setup program so that you can change the power management settings. Do this motherboard apply for most conditions to use...
... during the Power-On Self-Test (POST) to run this utility. ASUS P5QC 3-7 This section explains how to reconfigure your computer in the future. This requires you to configure your system using the BIOS Setup program so that you can change the power management settings. Do this motherboard apply for most conditions to use...
User Manual
Page 96
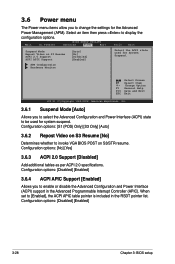
... Megatrends, Inc. 3.6.1 Suspend Mode [Auto] Allows you to be used for System Suspend. 3.6 Power menu The Power menu items allow you to invoke VGA BIOS POST on S3/STR resume. Configuration options: [S1 (POS) Only] [S3 Only] [Auto] 3.6.2 Repost Video on S3 Resume ACPI 2.0 Support ACPI APIC Support [Auto] [No] [Disabled...
... Megatrends, Inc. 3.6.1 Suspend Mode [Auto] Allows you to be used for System Suspend. 3.6 Power menu The Power menu items allow you to invoke VGA BIOS POST on S3/STR resume. Configuration options: [S1 (POS) Only] [S3 Only] [Auto] 3.6.2 Repost Video on S3 Resume ACPI 2.0 Support ACPI APIC Support [Auto] [No] [Disabled...
User Manual
Page 101
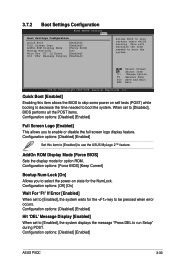
... to [Disabled], BIOS performs all the POST items. Configuration options: [Disabled] [Enabled] Full Screen Logo [Enabled] This allows you to skip certain tests while booting. AddOn ROM Display Mode [Force BIOS] Sets the display mode for the key to boot the system. Configuration options: [Disabled] [Enabled] ASUS P5QC 3-33 3.7.2 Boot Settings Configuration BIOS...
... to [Disabled], BIOS performs all the POST items. Configuration options: [Disabled] [Enabled] Full Screen Logo [Enabled] This allows you to skip certain tests while booting. AddOn ROM Display Mode [Force BIOS] Sets the display mode for the key to boot the system. Configuration options: [Disabled] [Enabled] ASUS P5QC 3-33 3.7.2 Boot Settings Configuration BIOS...
User Manual
Page 108
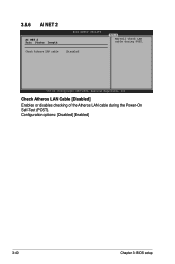
Check Atheros LAN cable [Disabled] v02.61 (C)Copyright 1985-2008, American Megatrends, Inc. Check Atheros LAN Cable [Disabled] Enables or disables checking of the Atheros LAN cable during POST. Configuration options: [Disabled] [Enabled] 3-40 Chapter 3: BIOS setup 3.8.6 AI NET 2 AI NET 2 Pair Status Length BIOS SETUP UTILITY Tools Marvell Check LAN cable during the Power-On Self‑Test (POST).
Check Atheros LAN cable [Disabled] v02.61 (C)Copyright 1985-2008, American Megatrends, Inc. Check Atheros LAN Cable [Disabled] Enables or disables checking of the Atheros LAN cable during POST. Configuration options: [Disabled] [Enabled] 3-40 Chapter 3: BIOS setup 3.8.6 AI NET 2 AI NET 2 Pair Status Length BIOS SETUP UTILITY Tools Marvell Check LAN cable during the Power-On Self‑Test (POST).
User Manual
Page 121
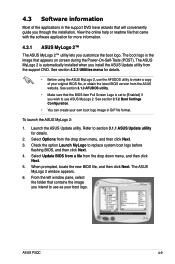
... section 3.1.1 ASUS Update utility for details. • Before using the ASUS MyLogo 2, ...image you install the ASUS Update utility from the ASUS website. Select Update ...POST). The boot logo is automatically installed when you intend to replace system boot logo before flashing BIOS, and then click Next. 4. Launch the ASUS...ASUS MyLogo 2. 4.3 Software information Most of your original BIOS file, or obtain the latest BIOS version from the support DVD. The ASUS... MyLogo 2 is the image that came with the software application for more information. 4.3.1 ASUS MyLogo 2™ The ASUS...
... section 3.1.1 ASUS Update utility for details. • Before using the ASUS MyLogo 2, ...image you install the ASUS Update utility from the ASUS website. Select Update ...POST). The boot logo is automatically installed when you intend to replace system boot logo before flashing BIOS, and then click Next. 4. Launch the ASUS...ASUS MyLogo 2. 4.3 Software information Most of your original BIOS file, or obtain the latest BIOS version from the support DVD. The ASUS... MyLogo 2 is the image that came with the software application for more information. 4.3.1 ASUS MyLogo 2™ The ASUS...
User Manual
Page 122
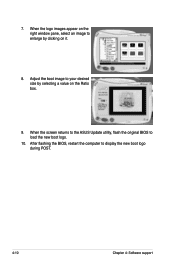
When the screen returns to the ASUS Update utility, flash the original BIOS to enlarge by selecting a value on the Ratio box. 9. When the logo images appear on it. 8. 7. Adjust the boot image to display the new boot logo during POST. 4-10 Chapter 4: Software support After flashing the BIOS, restart the computer to your desired size by clicking on the right window pane, select an image to load the new boot logo. 10.
When the screen returns to the ASUS Update utility, flash the original BIOS to enlarge by selecting a value on the Ratio box. 9. When the logo images appear on it. 8. 7. Adjust the boot image to display the new boot logo during POST. 4-10 Chapter 4: Software support After flashing the BIOS, restart the computer to your desired size by clicking on the right window pane, select an image to load the new boot logo. 10.
User Manual
Page 123
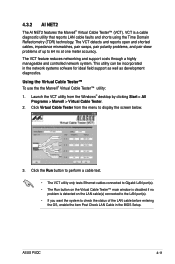
... and shorted cables, impedance mismatches, pair swaps, pair polarity problems, and pair skew problems of the LAN cable before entering the OS, enable the item Post Check LAN Cable in the network systems sofware for ideal field support as well as development diagnostics. Using the Virtual Cable Tester™ To use... the LAN cable(s) connected to the LAN port(s). • If you want the system to check the status of up to display the screen below. 3. ASUS P5QC 4-11 4.3.2 AI NET2 The AI NET2 features the Marvell® Virtual Cable Tester™ (VCT).
... and shorted cables, impedance mismatches, pair swaps, pair polarity problems, and pair skew problems of the LAN cable before entering the OS, enable the item Post Check LAN Cable in the network systems sofware for ideal field support as well as development diagnostics. Using the Virtual Cable Tester™ To use... the LAN cable(s) connected to the LAN port(s). • If you want the system to check the status of up to display the screen below. 3. ASUS P5QC 4-11 4.3.2 AI NET2 The AI NET2 features the Marvell® Virtual Cable Tester™ (VCT).
User Manual
Page 172
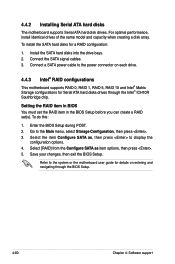
...Go to display the configuration options. 4. Save your changes, then exit the BIOS Setup. 4.4.2 Installing Serial ATA hard disks The motherboard supports Serial ATA hard disk drives. To install the SATA hard disks for Serial ATA hard disks drives through the BIOS Setup. 4-... This motherboard supports RAID 0, RAID 1, RAID 5, RAID 10 and Intel® Matrix Storage configurations for a RAID configuration: 1. Select [RAID] from the Configure SATA as , then press to the Main menu, select Storage Configuration, then press . 3. To do this: 1. Enter the BIOS Setup during POST. 2....
...Go to display the configuration options. 4. Save your changes, then exit the BIOS Setup. 4.4.2 Installing Serial ATA hard disks The motherboard supports Serial ATA hard disk drives. To install the SATA hard disks for Serial ATA hard disks drives through the BIOS Setup. 4-... This motherboard supports RAID 0, RAID 1, RAID 5, RAID 10 and Intel® Matrix Storage configurations for a RAID configuration: 1. Select [RAID] from the Configure SATA as , then press to the Main menu, select Storage Configuration, then press . 3. To do this: 1. Enter the BIOS Setup during POST. 2....
User Manual
Page 173
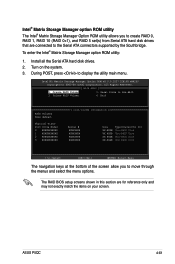
During POST, press to Non-RAID 4. ASUS P5QC 4-61 Delete RAID Volume 3. All Rights Reserved. [ MAIN MENU ] 1. The RAID BIOS setup screens shown in this section are connected to the Serial ATA connectors ...
During POST, press to Non-RAID 4. ASUS P5QC 4-61 Delete RAID Volume 3. All Rights Reserved. [ MAIN MENU ] 1. The RAID BIOS setup screens shown in this section are connected to the Serial ATA connectors ...
User Manual
Page 180
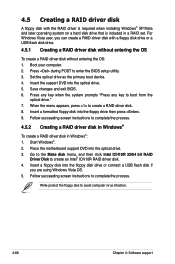
...flash disk drive. 4.5.1 Creating a RAID driver disk without entering the OS To create a RAID driver disk without entering the OS: 1. Place the motherboard support DVD into the optical drive. 5. When the menu appears, press to complete the process. 4.5.2 Creating a RAID driver disk in Windows®... To create a RAID driver disk in a RAID set. Follow succeeding screen instructions to create a RAID driver disk. 8. Press during POST to complete the process. Save changes and exit BIOS. 6. Follow succeeding screen instructions to enter the BIOS setup utility. 3. Press any key ...
...flash disk drive. 4.5.1 Creating a RAID driver disk without entering the OS To create a RAID driver disk without entering the OS: 1. Place the motherboard support DVD into the optical drive. 5. When the menu appears, press to complete the process. 4.5.2 Creating a RAID driver disk in Windows®... To create a RAID driver disk in a RAID set. Follow succeeding screen instructions to create a RAID driver disk. 8. Press during POST to complete the process. Save changes and exit BIOS. 6. Follow succeeding screen instructions to enter the BIOS setup utility. 3. Press any key ...


