User Manual
Page 7
Contents 4.3.12 ASUS Express Gate 4-49 4.4 RAID configurations 4-59 4.4.1 RAID definitions 4-59 4.4.2 Installing Serial ATA hard disks 4-60 4.4.3 Intel® RAID configurations 4-60 4.5 Creating a RAID driver disk 4-68 4.5.1 Creating a RAID driver disk without entering the OS.... 4-68 4.5.2 Creating a RAID driver disk in Windows 4-68 Appendix: CPU features A.1 Intel® EM64T A-1 Using the Intel® EM64T feature...
Contents 4.3.12 ASUS Express Gate 4-49 4.4 RAID configurations 4-59 4.4.1 RAID definitions 4-59 4.4.2 Installing Serial ATA hard disks 4-60 4.4.3 Intel® RAID configurations 4-60 4.5 Creating a RAID driver disk 4-68 4.5.1 Creating a RAID driver disk without entering the OS.... 4-68 4.5.2 Creating a RAID driver disk in Windows 4-68 Appendix: CPU features A.1 Intel® EM64T A-1 Using the Intel® EM64T feature...
User Manual
Page 69
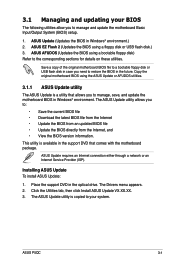
... the Internet, and • View the BIOS version information. Installing ASUS Update To install ASUS Update: 1. Place the support DVD in Windows® environment. The Drivers menu appears. 2. ASUS P5QC 3-1 ASUS Update requires an Internet connection either through a network or an Internet Service Provider (ISP). Copy the original motherboard BIOS using a floppy disk or USB flash disk.) 3. The...
... the Internet, and • View the BIOS version information. Installing ASUS Update To install ASUS Update: 1. Place the support DVD in Windows® environment. The Drivers menu appears. 2. ASUS P5QC 3-1 ASUS Update requires an Internet connection either through a network or an Internet Service Provider (ISP). Copy the original motherboard BIOS using a floppy disk or USB flash disk.) 3. The...
User Manual
Page 113
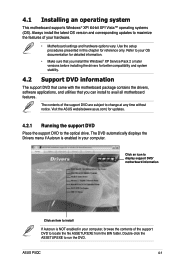
..., and utilities that you can install to the optical drive. Refer to your hardware. • Motherboard settings and hardware options vary. ASUS P5QC 4-1 The DVD automatically displays the Drivers menu if Autorun is NOT enabled in your computer. Double-click the ASSETUP.EXE to install If ... the file ASSETUP.EXE from the BIN folder. Click an icon to display support DVD/ motherboard information Click an item to run the DVD. 4.1 Installing an operating system This motherboard supports Windows® XP/ 64-bit XP/ Vista™ operating systems (OS). Use the setup ...
..., and utilities that you can install to the optical drive. Refer to your hardware. • Motherboard settings and hardware options vary. ASUS P5QC 4-1 The DVD automatically displays the Drivers menu if Autorun is NOT enabled in your computer. Double-click the ASSETUP.EXE to install If ... the file ASSETUP.EXE from the BIN folder. Click an icon to display support DVD/ motherboard information Click an item to run the DVD. 4.1 Installing an operating system This motherboard supports Windows® XP/ 64-bit XP/ Vista™ operating systems (OS). Use the setup ...

User Manual
Page 116
... in Windows® environment. CyberLink PowerBackup Installs CyberLink PowerBackup to back up and restore your computer from viruses that enhances computer graphics and sound. Anti-Virus Utility The anti-virus application detects and protects your data easily. Drive Xpert Installs the ASUS Drive ... driver. Ulead Burn.Now Installs the Ulead Burn.Now application for Audio DVD, CD and data disc creation. This utility requires an Internet connection either through a network or an Internet Service Provider (ISP). ASUS Update The ASUS Update utility allows you to update the motherboard ...
... in Windows® environment. CyberLink PowerBackup Installs CyberLink PowerBackup to back up and restore your computer from viruses that enhances computer graphics and sound. Anti-Virus Utility The anti-virus application detects and protects your data easily. Drive Xpert Installs the ASUS Drive ... driver. Ulead Burn.Now Installs the Ulead Burn.Now application for Audio DVD, CD and data disc creation. This utility requires an Internet connection either through a network or an Internet Service Provider (ISP). ASUS Update The ASUS Update utility allows you to update the motherboard ...
User Manual
Page 124
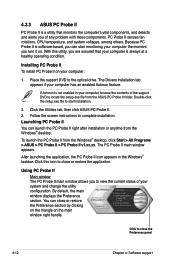
...to close or restore the Preference section by clicking on the triangle on the main window right handle. If Autorun is always at a healthy operating condition. The PC Probe II main window appears. 4.3.3 ASUS PC Probe II PC Probe II is software-based, you can start installation. ...2. Follow the screen instructions to the optical drive. By default, the main window displays the Preference section. The Drivers installation tab appears if your system and...
...to close or restore the Preference section by clicking on the triangle on the main window right handle. If Autorun is always at a healthy operating condition. The PC Probe II main window appears. 4.3.3 ASUS PC Probe II PC Probe II is software-based, you can start installation. ...2. Follow the screen instructions to the optical drive. By default, the main window displays the Preference section. The Drivers installation tab appears if your system and...
User Manual
Page 130
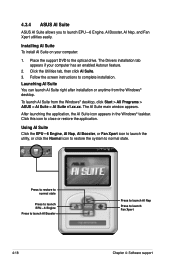
... click AI Suite. 3. The AI Suite main window appears. The Drivers installation tab appears if your computer: 1. Follow the screen instructions to close or restore the application. Click this icon to complete installation. To launch AI Suite from the Windows® desktop. After launching the application, the AI... AI Nap Press to normal state. Launching AI Suite You can launch AI Suite right after installation or anytime from the Windows® desktop, click Start > All Programs > ASUS > AI Suite > AI Suite v1.xx.xx. Using AI Suite Click the EPU-6 Engine, AI Nap, AI Booster...
... click AI Suite. 3. The AI Suite main window appears. The Drivers installation tab appears if your computer: 1. Follow the screen instructions to close or restore the application. Click this icon to complete installation. To launch AI Suite from the Windows® desktop. After launching the application, the AI... AI Nap Press to normal state. Launching AI Suite You can launch AI Suite right after installation or anytime from the Windows® desktop, click Start > All Programs > ASUS > AI Suite > AI Suite v1.xx.xx. Using AI Suite Click the EPU-6 Engine, AI Nap, AI Booster...
User Manual
Page 136
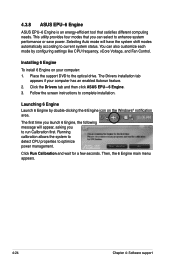
.... Running calibration allows the system to detect CPU properties to the optical drive. Installing 6 Engine To install 6 Engine on the Windows® notification area. The first time you launch 6 Engine, the following message will have the system shift modes automatically according to... and wait for a few seconds. This utility provides four modes that satisfies different computing needs. Click the Drivers tab and then click ASUS EPU-6 Engine. 3. The Drivers installation tab appears if your computer: 1. Selecting Auto mode will appear, asking you can also customize each ...
.... Running calibration allows the system to detect CPU properties to the optical drive. Installing 6 Engine To install 6 Engine on the Windows® notification area. The first time you launch 6 Engine, the following message will have the system shift modes automatically according to... and wait for a few seconds. This utility provides four modes that satisfies different computing needs. Click the Drivers tab and then click ASUS EPU-6 Engine. 3. The Drivers installation tab appears if your computer: 1. Selecting Auto mode will appear, asking you can also customize each ...
User Manual
Page 142
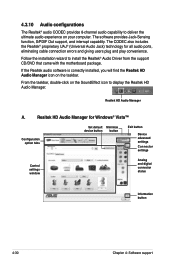
...10 Audio configurations The Realtek® audio CODEC provides 8-channel audio capability to install the Realtek® Audio Driver from the support CD/DVD that came with the motherboard package. Realtek HD Audio Manager A. The software provides Jack-Sensing function, S/PDIF Out support, and interrupt ... the taskbar. The CODEC also includes the Realtek® proprietary UAJ® (Universal Audio Jack) technology for Windows® Vista™ Configuration option tabs Set default Minimize device button button Exit button Device advanced settings Connector settings Control settings...
...10 Audio configurations The Realtek® audio CODEC provides 8-channel audio capability to install the Realtek® Audio Driver from the support CD/DVD that came with the motherboard package. Realtek HD Audio Manager A. The software provides Jack-Sensing function, S/PDIF Out support, and interrupt ... the taskbar. The CODEC also includes the Realtek® proprietary UAJ® (Universal Audio Jack) technology for Windows® Vista™ Configuration option tabs Set default Minimize device button button Exit button Device advanced settings Connector settings Control settings...
User Manual
Page 143
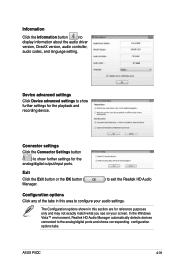
... Click the Connector Settings button ( ) to show further settings for the playback and recording device. ASUS P5QC 4-31 In the Windows Vista™ environment, Realtek HD Audio Manager automatically detects devices connected to display information about the audio driver version, DirectX version, audio controller, audio codec, and language setting. Exit Click the Exit button...
... Click the Connector Settings button ( ) to show further settings for the playback and recording device. ASUS P5QC 4-31 In the Windows Vista™ environment, Realtek HD Audio Manager automatically detects devices connected to display information about the audio driver version, DirectX version, audio controller, audio codec, and language setting. Exit Click the Exit button...
User Manual
Page 146
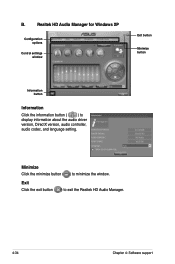
Realtek HD Audio Manager for Windows XP Configuration options Control settings window Exit button Minimize button Information button Information Click the information button ( ) to minimize the window. Minimize Click the minimize button ( ) to display information about the audio driver version, DirectX version, audio controller, audio codec, and language setting. Exit Click the exit button ( ) to exit the Realtek HD Audio Manager. 4-34 Chapter 4: Software support B.
Realtek HD Audio Manager for Windows XP Configuration options Control settings window Exit button Minimize button Information button Information Click the information button ( ) to minimize the window. Minimize Click the minimize button ( ) to display information about the audio driver version, DirectX version, audio controller, audio codec, and language setting. Exit Click the exit button ( ) to exit the Realtek HD Audio Manager. 4-34 Chapter 4: Software support B.
User Manual
Page 150
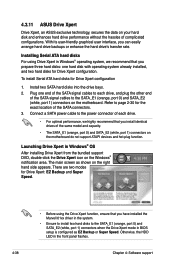
... capacity. • The SATA_E1 (orange, port 0) and SATA_E2 (white, port 1) connectors on the motherboard do not support ATAPI devices and hot-plug function. Refer to the SATA_E1 (orange, port 0) and ...and Super Speed. • Before using Drive Xpert in Windows® operating system, we highly recommend that you have installed the Marvell 61xx driver in the system. • Ensure to install two ...hard disks to page 2-30 for Drive Xpert configuration 1. 4.3.11 ASUS Drive Xpert Drive Xpert, an ASUS exclusive technology, ...
... capacity. • The SATA_E1 (orange, port 0) and SATA_E2 (white, port 1) connectors on the motherboard do not support ATAPI devices and hot-plug function. Refer to the SATA_E1 (orange, port 0) and ...and Super Speed. • Before using Drive Xpert in Windows® operating system, we highly recommend that you have installed the Marvell 61xx driver in the system. • Ensure to install two ...hard disks to page 2-30 for Drive Xpert configuration 1. 4.3.11 ASUS Drive Xpert Drive Xpert, an ASUS exclusive technology, ...
User Manual
Page 180
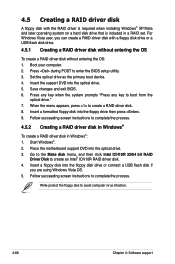
... disk into the optical drive. 5. Press during POST to create a RAID driver disk. 8. Place the motherboard support DVD into the floppy disk drive or connect a USB flash disk if you can create a RAID driver disk with the RAID driver is required when installing Windows® XP/Vista and later operating system on a hard disk drive...
... disk into the optical drive. 5. Press during POST to create a RAID driver disk. 8. Place the motherboard support DVD into the floppy disk drive or connect a USB flash disk if you can create a RAID driver disk with the RAID driver is required when installing Windows® XP/Vista and later operating system on a hard disk drive...
User Manual
Page 181
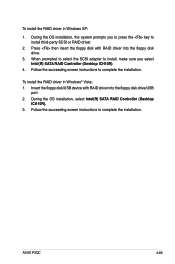
.... Follow the succeeding screen instructions to install third-party SCSI or RAID driver. 2. ASUS P5QC 4-69 Insert the floppy disk/USB device with RAID driver into the floppy disk drive/USB port. 2. To install the RAID driver in Windows XP: 1. To install the RAID driver in Windows® Vista: 1. During the OS installation, the system prompts you select...
.... Follow the succeeding screen instructions to install third-party SCSI or RAID driver. 2. ASUS P5QC 4-69 Insert the floppy disk/USB device with RAID driver into the floppy disk drive/USB port. 2. To install the RAID driver in Windows XP: 1. To install the RAID driver in Windows® Vista: 1. During the OS installation, the system prompts you select...
User Manual
Page 185
... support • BIOS file with EIST support • Operating system with EIST support (Windows® Vista, Windows® XP SP2 / Linux 2.6 kernel or later versions) ASUS P5QC A-1 Install the 64-bit drivers for the motherboard components and devices from the ASUS website (www.asus.com/ support/download/) if you need to the expansion card or add-on devices...
... support • BIOS file with EIST support • Operating system with EIST support (Windows® Vista, Windows® XP SP2 / Linux 2.6 kernel or later versions) ASUS P5QC A-1 Install the 64-bit drivers for the motherboard components and devices from the ASUS website (www.asus.com/ support/download/) if you need to the expansion card or add-on devices...


