
User Manual
Page 1
P5Q SE Plus Motherboard
P5Q SE Plus Motherboard

User Manual
Page 3
Contents Contents...iii Notices...vii Safety information viii About this guide ix P5Q SE Plus specifications summary xi Chapter 1: Product introduction 1.1 Welcome 1-2 1.2 Package contents 1-2 1.3 Special features 1-3 1.3.1 Product highlights 1-3 1.3.2 ASUS unique features 1-4 1.3.3 ASUS Stylish features 1-6 1.3.4 ASUS Intelligent Overclocking features 1-6 1.4 Before you proceed 1-7 1.5 Motherboard overview 1-8 1.5.1 Placement direction 1-8 1.5.2 Screw holes 1-8 1.5.3 Motherboard layout 1-9 1.6 Central Processing Unit (CPU 1-10 1.6.1 Installing the CPU 1-11 1.6.2 Installing...
Contents Contents...iii Notices...vii Safety information viii About this guide ix P5Q SE Plus specifications summary xi Chapter 1: Product introduction 1.1 Welcome 1-2 1.2 Package contents 1-2 1.3 Special features 1-3 1.3.1 Product highlights 1-3 1.3.2 ASUS unique features 1-4 1.3.3 ASUS Stylish features 1-6 1.3.4 ASUS Intelligent Overclocking features 1-6 1.4 Before you proceed 1-7 1.5 Motherboard overview 1-8 1.5.1 Placement direction 1-8 1.5.2 Screw holes 1-8 1.5.3 Motherboard layout 1-9 1.6 Central Processing Unit (CPU 1-10 1.6.1 Installing the CPU 1-11 1.6.2 Installing...

User Manual
Page 11
... unbuffered non-ECC DDR2 1200 / 1066 / 800 / 667 MHz memory modules - Optical S/PDIF out port at back I/O - ASUS Express Gate ASUS Quiet Thermal Solution: - P5Q SE Plus specifications summary CPU Chipset System Bus Memory Expansion Slots Storage ASUS Unique Features Other Features LAN Audio LGA775 socket for up to 16GB system memory • Refer to www...
... unbuffered non-ECC DDR2 1200 / 1066 / 800 / 667 MHz memory modules - Optical S/PDIF out port at back I/O - ASUS Express Gate ASUS Quiet Thermal Solution: - P5Q SE Plus specifications summary CPU Chipset System Bus Memory Expansion Slots Storage ASUS Unique Features Other Features LAN Audio LGA775 socket for up to 16GB system memory • Refer to www...

User Manual
Page 12
...COM connector 1 x S/PDIF Out header 1 x Chassis intrusion connector 1 x Front panel audio connector 1 x CD audio in connector 1 x 24-pin ATX power connector 1 x 4-pin ATX 12V power connector System panel connector (Q-Connector) WfM 2.0, DMI 2.0, WOL by PME, WOR by PME, PXE BIOS Features 8Mb Flash ROM, AMI BIOS, ... DRAM voltage control SFS (Stepless Frequency Selection): - Memory tuning from 667MHz up to change without notice. P5Q SE Plus specifications summary USB 12 x USB 2.0 ports (6 ports at mid-board, 6 ports at 6.25mV increment - ASUS AI Booster utility Precision Tweaker: -
...COM connector 1 x S/PDIF Out header 1 x Chassis intrusion connector 1 x Front panel audio connector 1 x CD audio in connector 1 x 24-pin ATX power connector 1 x 4-pin ATX 12V power connector System panel connector (Q-Connector) WfM 2.0, DMI 2.0, WOL by PME, WOR by PME, PXE BIOS Features 8Mb Flash ROM, AMI BIOS, ... DRAM voltage control SFS (Stepless Frequency Selection): - Memory tuning from 667MHz up to change without notice. P5Q SE Plus specifications summary USB 12 x USB 2.0 ports (6 ports at mid-board, 6 ports at 6.25mV increment - ASUS AI Booster utility Precision Tweaker: -
User Manual
Page 14
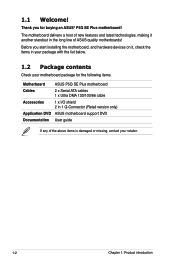
... DVD Documentation User guide If any of the above items is damaged or missing, contact your motherboard package for buying an ASUS® P5Q SE Plus motherboard! Before you for the following items. Motherboard ASUS P5Q SE Plus motherboard Cables 2 x Serial ATA cables 1 x Ultra DMA 133/100/66 cable Accessories 1 x I/O shield 2 in the long line of new features and latest technologies, making...
... DVD Documentation User guide If any of the above items is damaged or missing, contact your motherboard package for buying an ASUS® P5Q SE Plus motherboard! Before you for the following items. Motherboard ASUS P5Q SE Plus motherboard Cables 2 x Serial ATA cables 1 x Ultra DMA 133/100/66 cable Accessories 1 x I/O shield 2 in the long line of new features and latest technologies, making...

User Manual
Page 15
... multi-core processors. ASUS P5Q SE Plus 1-3 Intel® C��o�r�e™�2��E��x�tr�e�m��e��/�C�o��re�™�2��Q��u�a�d��/ Core™2 Duo CPU support� This motherboard supports the latest Intel...
... multi-core processors. ASUS P5Q SE Plus 1-3 Intel® C��o�r�e™�2��E��x�tr�e�m��e��/�C�o��re�™�2��Q��u�a�d��/ Core™2 Duo CPU support� This motherboard supports the latest Intel...

User Manual
Page 17
... wrong cable connections. See page 2-39 for details. ASUS P5Q SE Plus 1-5 ASUS Q-Connector ASUS Q-Connector allows you easy ways to install computer components, update the BIOS or back up your favorite settings. ASUS O.C. Fan Xpert ASUS Fan Xpert intelligently allows users to adjust both the CPU...settings. This unique module eliminates the trouble of fan speed to achieve a quiet and cool environment. Profile The motherboard features the ASUS O.C. Profile that allows users to different ambient temperature, which is caused by different climate conditions in different geographic ...
... wrong cable connections. See page 2-39 for details. ASUS P5Q SE Plus 1-5 ASUS Q-Connector ASUS Q-Connector allows you easy ways to install computer components, update the BIOS or back up your favorite settings. ASUS O.C. Fan Xpert ASUS Fan Xpert intelligently allows users to adjust both the CPU...settings. This unique module eliminates the trouble of fan speed to achieve a quiet and cool environment. Profile The motherboard features the ASUS O.C. Profile that allows users to different ambient temperature, which is caused by different climate conditions in different geographic ...

User Manual
Page 19
...or in any component, ensure that the ATX power supply is switched off or the power cord is a reminder that you should shut down the system and unplug the power cable before removing or plugging in soft-off mode. ASUS P5Q SE Plus 1-7 This is detached from the wall ...socket before touching any component. • Use a grounded wrist strap or touch a safely grounded object or a metal object, such as the power supply case, before you install motherboard components or change any motherboard settings. • Unplug...
...or in any component, ensure that the ATX power supply is switched off or the power cord is a reminder that you should shut down the system and unplug the power cable before removing or plugging in soft-off mode. ASUS P5Q SE Plus 1-7 This is detached from the wall ...socket before touching any component. • Use a grounded wrist strap or touch a safely grounded object or a metal object, such as the power supply case, before you install motherboard components or change any motherboard settings. • Unplug...

User Manual
Page 21
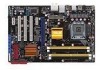
ASUS P5Q SE Plus 1-9 1.5.3 Motherboard layout Refer to 1.10 Connectors for more information about rear panel connectors and internal connectors.
ASUS P5Q SE Plus 1-9 1.5.3 Motherboard layout Refer to 1.10 Connectors for more information about rear panel connectors and internal connectors.

User Manual
Page 23
... . 2. Press the load lever with your left (B) until it is on the motherboard. To prevent damage to a 135º angle. 1.6.1 Installing the CPU To install a CPU: 1. Locate the CPU socket on your thumb 4B and forefinger to remove (4B). 3 ASUS P5Q SE Plus 1-11 Before installing the CPU, ensure that the socket box is facing...
... . 2. Press the load lever with your left (B) until it is on the motherboard. To prevent damage to a 135º angle. 1.6.1 Installing the CPU To install a CPU: 1. Locate the CPU socket on your thumb 4B and forefinger to remove (4B). 3 ASUS P5Q SE Plus 1-11 Before installing the CPU, ensure that the socket box is facing...

User Manual
Page 25
Close the load plate (A), then push the load lever (B) until it snaps into A the retention tab. B ASUS P5Q SE Plus 1-13 7.
Close the load plate (A), then push the load lever (B) until it snaps into A the retention tab. B ASUS P5Q SE Plus 1-13 7.

User Manual
Page 27
Hardware monitoring errors can occur if you fail to the connector on the motherboard. 2. Rotate each fastener counterclockwise. Connect the CPU fan cable to plug this connector. 1.6.3 Uninstalling the CPU heatsink and fan To uninstall the CPU heatsink and ... two fasteners at a time in a diagonal sequence to connect the CPU fan connector! B 3. 3. Carefully remove the heatsink and fan assembly from the connector on the motherboard labeled CPU_FAN. ASUS P5Q SE Plus 1-15 Do not forget to disengage the heatsink and fan assembly from the...
Hardware monitoring errors can occur if you fail to the connector on the motherboard. 2. Rotate each fastener counterclockwise. Connect the CPU fan cable to plug this connector. 1.6.3 Uninstalling the CPU heatsink and fan To uninstall the CPU heatsink and ... two fasteners at a time in a diagonal sequence to connect the CPU fan connector! B 3. 3. Carefully remove the heatsink and fan assembly from the connector on the motherboard labeled CPU_FAN. ASUS P5Q SE Plus 1-15 Do not forget to disengage the heatsink and fan assembly from the...

User Manual
Page 29
... cooling system to the memory address limitation on 32-bit Windows OS, when you install 4GB or more memory installed on the motherboard. • This motherboard does not support memory modules made up of the lower-sized channel for the dual-channel configuration. The system maps the total ... single-channel operation. • It is recommended that you install a 64-bit Windows OS when having 4GB or more memory on its SPD. ASUS P5Q SE Plus 1-17 For optimum compatibility, it is recommended to install the memory modules from the same vendor. • Due to work stably under full loading...
... cooling system to the memory address limitation on 32-bit Windows OS, when you install 4GB or more memory installed on the motherboard. • This motherboard does not support memory modules made up of the lower-sized channel for the dual-channel configuration. The system maps the total ... single-channel operation. • It is recommended that you install a 64-bit Windows OS when having 4GB or more memory on its SPD. ASUS P5Q SE Plus 1-17 For optimum compatibility, it is recommended to install the memory modules from the same vendor. • Due to work stably under full loading...

User Manual
Page 30
...; •• • •• • •• • •• • •• • •• • •• • 1-18 Chapter 1: Product introduction P5Q SE Plus Motherboard Qualified Vendors Lists (QVL) DDR2-1066 MHz capability Size 1G 1G 512MB 512MB 512MB 1G 1G 1G 1G 1G 2G(kit of 2) 1G 1G 1G...
...; •• • •• • •• • •• • •• • •• • •• • 1-18 Chapter 1: Product introduction P5Q SE Plus Motherboard Qualified Vendors Lists (QVL) DDR2-1066 MHz capability Size 1G 1G 512MB 512MB 512MB 1G 1G 1G 1G 1G 2G(kit of 2) 1G 1G 1G...

User Manual
Page 31
... support A* B* C ••• ••• ••• ••• ••• ••• ••• ••• ASUS P5Q SE Plus 1-19 DDR2-800 MHz capability Size Vendor Chip No.
... support A* B* C ••• ••• ••• ••• ••• ••• ••• ••• ASUS P5Q SE Plus 1-19 DDR2-800 MHz capability Size Vendor Chip No.

User Manual
Page 33
...; • • SS AL6E8E63J-6E1 ••• DS AL7E8E63J-6E1 ••• SS AL7E8F73C-6E1 ••• (continued on the next page) ASUS P5Q SE Plus 1-21 DDR2-800 MHz capability Size Vendor Chip No.
...; • • SS AL6E8E63J-6E1 ••• DS AL7E8E63J-6E1 ••• SS AL7E8F73C-6E1 ••• (continued on the next page) ASUS P5Q SE Plus 1-21 DDR2-800 MHz capability Size Vendor Chip No.

User Manual
Page 35
...socket such that it fits in place and the DIMM is keyed with extra force. Simultaneously press the retaining clips outward to both the motherboard and the components. 1. 1.7.3 Installing a DIMM Unplug the power supply before adding or removing DIMMs or other system components. Failure to do...1 A DDR2 DIMM is properly seated. 1.7.4 Removing a DIMM To remove a DIMM: 1. Firmly insert the DIMM into a socket to avoid damaging the DIMM. 3. ASUS P5Q SE Plus 1 1-23 Locked retaining clip 2 Support the DIMM lightly with your fingers when pressing the retaining 1 clips.
...socket such that it fits in place and the DIMM is keyed with extra force. Simultaneously press the retaining clips outward to both the motherboard and the components. 1. 1.7.3 Installing a DIMM Unplug the power supply before adding or removing DIMMs or other system components. Failure to do...1 A DDR2 DIMM is properly seated. 1.7.4 Removing a DIMM To remove a DIMM: 1. Firmly insert the DIMM into a socket to avoid damaging the DIMM. 3. ASUS P5Q SE Plus 1 1-23 Locked retaining clip 2 Support the DIMM lightly with your fingers when pressing the retaining 1 clips.
User Manual
Page 37
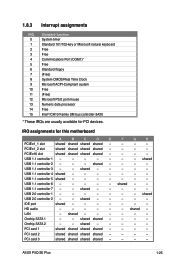
... Family SM bus controller-3A30 * These IRQs are usually available for this motherboard A B C D E F G H PCIEx1_1 slot shared shared shared shared - - - - IRQ assignments for PCI devices. PCIEx1_2 slot shared shared shared shared - - - - shared - - - - USB 1.1 controller 5 shared - - - - - - - USB 1.1 controller 6 - - - - - USB 1.1 controller 7 - - IDE port shared - - - - - - - HD audio - - - - - - shared - PCI card 2 shared shared shared shared - - - - ASUS P5Q SE Plus 1-25
... Family SM bus controller-3A30 * These IRQs are usually available for this motherboard A B C D E F G H PCIEx1_1 slot shared shared shared shared - - - - IRQ assignments for PCI devices. PCIEx1_2 slot shared shared shared shared - - - - shared - - - - USB 1.1 controller 5 shared - - - - - - - USB 1.1 controller 6 - - - - - USB 1.1 controller 7 - - IDE port shared - - - - - - - HD audio - - - - - - shared - PCI card 2 shared shared shared shared - - - - ASUS P5Q SE Plus 1-25

User Manual
Page 39
... above do not need to clear the RTC when the system hangs due to pins 2-3. function. 1.9 Jumpers 1. Keep the cap on CLRTC jumper default position. ASUS P5Q SE Plus 1-27 Hold down and reboot the system so the BIOS can clear the CMOS memory of date, time, and system setup parameters by erasing the...
... above do not need to clear the RTC when the system hangs due to pins 2-3. function. 1.9 Jumpers 1. Keep the cap on CLRTC jumper default position. ASUS P5Q SE Plus 1-27 Hold down and reboot the system so the BIOS can clear the CMOS memory of date, time, and system setup parameters by erasing the...

User Manual
Page 41
... the center/subwoofer speakers. 4. In 4-channel, 6-channel, and 8-channel configuration, the function of the audio ports in 2, 4, 6, or 8-channel configuration. Side Speaker Out port (gray). ASUS P5Q SE Plus 1-29 This port connects the tape, CD, DVD player, or other audio sources. 6. Microphone port (pink). Line In port (light blue). Refer to a Local Area...
... the center/subwoofer speakers. 4. In 4-channel, 6-channel, and 8-channel configuration, the function of the audio ports in 2, 4, 6, or 8-channel configuration. Side Speaker Out port (gray). ASUS P5Q SE Plus 1-29 This port connects the tape, CD, DVD player, or other audio sources. 6. Microphone port (pink). Line In port (light blue). Refer to a Local Area...


