
User Manual
Page 3
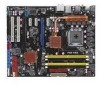
Contents Contents...iii Notices...vii Safety information viii About this guide ix P5Q PRO specifications summary xi Chapter 1: Product introduction 1.1 Welcome 1-1 1.2 Package contents 1-1 1.3 Special features 1-2 1.3.1 Product highlights 1-2 1.3.2 ASUS unique features 1-4 1.3.3 ASUS Exclusive Overclocking Features 1-7 Chapter 2: Hardware information 2.1 Before you proceed 2-1 2.2 Motherboard overview 2-2 2.2.1 Motherboard layout 2-2 2.2.2 Layout contents 2-3 2.2.3 Placement direction 2-4 2.2.4 Screw holes 2-4 2.3 Central Processing Unit (CPU 2-5 2.3.1 Installing the CPU 2-5 ...
Contents Contents...iii Notices...vii Safety information viii About this guide ix P5Q PRO specifications summary xi Chapter 1: Product introduction 1.1 Welcome 1-1 1.2 Package contents 1-1 1.3 Special features 1-2 1.3.1 Product highlights 1-2 1.3.2 ASUS unique features 1-4 1.3.3 ASUS Exclusive Overclocking Features 1-7 Chapter 2: Hardware information 2.1 Before you proceed 2-1 2.2 Motherboard overview 2-2 2.2.1 Motherboard layout 2-2 2.2.2 Layout contents 2-3 2.2.3 Placement direction 2-4 2.2.4 Screw holes 2-4 2.3 Central Processing Unit (CPU 2-5 2.3.1 Installing the CPU 2-5 ...
User Manual
Page 4
...2.9.2 Using the dual function power switch 2-38 Chapter 3: BIOS setup 3.1 Managing and updating your BIOS 3-1 3.1.1 ASUS Update utility 3-1 3.1.2 ASUS EZ Flash 2 utility 3-4 3.1.3 AFUDOS utility 3-5 3.1.4 ASUS CrashFree BIOS 3 utility 3-7 3.2 BIOS setup program 3-8 3.2.1 BIOS menu screen 3-9 3.2.2 Menu bar 3-9 3.2.3 Navigation... Storage Configuration 3-13 3.3.7 AHCI Configuration 3-14 3.3.8 System Information 3-15 3.4 Ai Tweaker menu 3-16 3.4.1 Ai Overclock Tuner [Auto 3-16 3.4.2 CPU Ratio Setting [Auto 3-17 3.4.3 FSB Strap to North Bridge [Auto 3-17 3.4.4 DRAM Frequency [Auto 3-17...
...2.9.2 Using the dual function power switch 2-38 Chapter 3: BIOS setup 3.1 Managing and updating your BIOS 3-1 3.1.1 ASUS Update utility 3-1 3.1.2 ASUS EZ Flash 2 utility 3-4 3.1.3 AFUDOS utility 3-5 3.1.4 ASUS CrashFree BIOS 3 utility 3-7 3.2 BIOS setup program 3-8 3.2.1 BIOS menu screen 3-9 3.2.2 Menu bar 3-9 3.2.3 Navigation... Storage Configuration 3-13 3.3.7 AHCI Configuration 3-14 3.3.8 System Information 3-15 3.4 Ai Tweaker menu 3-16 3.4.1 Ai Overclock Tuner [Auto 3-16 3.4.2 CPU Ratio Setting [Auto 3-17 3.4.3 FSB Strap to North Bridge [Auto 3-17 3.4.4 DRAM Frequency [Auto 3-17...

User Manual
Page 12
... - ASUS EPU-6 Engine - ASUS AI Direct Llink ASUS Quiet Thermal Solution: - ASUS EZ Flash 2 ASUS MyLogo2™ ASUS AI Booster utility Precision Tweaker 2: - ASUS O.C. ASUS CrashFree BIOS 3 - vCore: Adjustable CPU voltage at 1MHz increment Overclocking Protection: - FSB tuning from 100MHz up to 180MHz at 6.25mV increment - P5Q PRO specifications summary ASUS Unique Features ASUS Stylish Features ASUS Exclusive Overclocking Features ASUS Power Saving Solution: - ASUS AI Nap ASUS...
... - ASUS EPU-6 Engine - ASUS AI Direct Llink ASUS Quiet Thermal Solution: - ASUS EZ Flash 2 ASUS MyLogo2™ ASUS AI Booster utility Precision Tweaker 2: - ASUS O.C. ASUS CrashFree BIOS 3 - vCore: Adjustable CPU voltage at 1MHz increment Overclocking Protection: - FSB tuning from 100MHz up to 180MHz at 6.25mV increment - P5Q PRO specifications summary ASUS Unique Features ASUS Stylish Features ASUS Exclusive Overclocking Features ASUS Power Saving Solution: - ASUS AI Nap ASUS...

User Manual
Page 20
... fan), the EPU automatically provides the most appropriate power usage via intelligent acceleration and overclocking - ASUS EPU-6 Engine The new ASUS EPU - 100% Japan-made conductive polymer capacitors This motherboard uses all Japan-made conductive polymer capacitors for components (which provides total system power savings... engine, has been upgraded to the OS environment, simply click the mouse or press a key. Green ASUS This motherboard and its packaging comply with the ASUS vision of Hazardous Substances (RoHS). AI Nap With AI Nap, the system can continue running at minimum ...
... fan), the EPU automatically provides the most appropriate power usage via intelligent acceleration and overclocking - ASUS EPU-6 Engine The new ASUS EPU - 100% Japan-made conductive polymer capacitors This motherboard uses all Japan-made conductive polymer capacitors for components (which provides total system power savings... engine, has been upgraded to the OS environment, simply click the mouse or press a key. Green ASUS This motherboard and its packaging comply with the ASUS vision of Hazardous Substances (RoHS). AI Nap With AI Nap, the system can continue running at minimum ...

User Manual
Page 23
...Simply shut down and reboot the system, and the BIOS automatically restores the CPU default setting for the ultimate customized overclocking configuration. ASUS P5Q PRO 1-7 Precision Tweaker 2 Allows the user to achieve the most precise setting for each parameter. feature of booting the BIOS...ASUS Exclusive Overclocking Features AI Booster The ASUS AI Booster allows you to overclock the CPU speed in 0.02v steps to finetune voltages to adjust the NB Voltage, FSB termination Voltage, CPU PLL Voltage and the DRAM Voltage in Windows environment without the hassle of the motherboard...
...Simply shut down and reboot the system, and the BIOS automatically restores the CPU default setting for the ultimate customized overclocking configuration. ASUS P5Q PRO 1-7 Precision Tweaker 2 Allows the user to achieve the most precise setting for each parameter. feature of booting the BIOS...ASUS Exclusive Overclocking Features AI Booster The ASUS AI Booster allows you to overclock the CPU speed in 0.02v steps to finetune voltages to adjust the NB Voltage, FSB termination Voltage, CPU PLL Voltage and the DRAM Voltage in Windows environment without the hassle of the motherboard...

User Manual
Page 37
... the dual-channel configuration. Hence, a total installed memory of 256 Mb chips. • Due to chipset limitation, this motherboard can only support up to work stably under full loading (4 DIMMs) or overclocking setting. ASUS P5Q PRO 2-11 For optimum compatibility, it is then mapped for single-channel operation. • It recommended that you obtain memory...
... the dual-channel configuration. Hence, a total installed memory of 256 Mb chips. • Due to chipset limitation, this motherboard can only support up to work stably under full loading (4 DIMMs) or overclocking setting. ASUS P5Q PRO 2-11 For optimum compatibility, it is then mapped for single-channel operation. • It recommended that you obtain memory...

User Manual
Page 46
..., AC power off and on CLRTC jumper default position. You must turn ON the computer. 4. Clear RTC RAM (3-pin CLRTC) This jumper allows you to overclocking, use the C.P.R. (CPU Parameter Recall) feature. Removing the cap will cause system boot failure! For system failure due to clear the Real Time Clock (RTC... due to pins 1-2. 3. After the CMOS clearance, reinstall the battery. • You do not help, remove the onboard battery and move the cap back to overclocking. Shut down the key during the boot process and enter BIOS setup to pins 2-3.
..., AC power off and on CLRTC jumper default position. You must turn ON the computer. 4. Clear RTC RAM (3-pin CLRTC) This jumper allows you to overclocking, use the C.P.R. (CPU Parameter Recall) feature. Removing the cap will cause system boot failure! For system failure due to clear the Real Time Clock (RTC... due to pins 1-2. 3. After the CMOS clearance, reinstall the battery. • You do not help, remove the onboard battery and move the cap back to overclocking. Shut down the key during the boot process and enter BIOS setup to pins 2-3.

User Manual
Page 75
...65533;o�r�m�a�t�i�o�n� Use [ENTER], [TAB] or [SHIFT-TAB] to configure the System Time. ASUS P5Q PRO 3-9 Change Field Tab Select Field F1 General Help F10 Save and Exit ESC Exit v02.61 (C)Copyright 1985-2008, American Megatrends, ... following main items: Main Ai Tweaker Advanced Power Boot Tools Exit For changing the basic system configuration For changing the overclocking settings For changing the advanced system settings For changing the advanced power management (APM) configuration For changing the system boot...
...65533;o�r�m�a�t�i�o�n� Use [ENTER], [TAB] or [SHIFT-TAB] to configure the System Time. ASUS P5Q PRO 3-9 Change Field Tab Select Field F1 General Help F10 Save and Exit ESC Exit v02.61 (C)Copyright 1985-2008, American Megatrends, ... following main items: Main Ai Tweaker Advanced Power Boot Tools Exit For changing the basic system configuration For changing the overclocking settings For changing the advanced system settings For changing the advanced power management (APM) configuration For changing the system boot...

User Manual
Page 82
...Scroll down to display the following items vary depending on the motherboard. Ai Overclock Tuner [Auto] Allows selection of the preset overclocking configuration options: Manual Auto Allows you to individually set overclocking parameters. Loads the optimal settings for the system. 3-16 ...-Line Calibration [Auto] CPU Spread Spectrum [Auto] PCIE Spread Spectrum [Auto] Select Screen Select Item +- Select either one of CPU overclocking options to North Bridge [Auto] DRAM Frequency [Auto] DRAM Timing Control [Auto] 1st Information : 4-4-4-15-3-36-5-3 2nd Information : ...
...Scroll down to display the following items vary depending on the motherboard. Ai Overclock Tuner [Auto] Allows selection of the preset overclocking configuration options: Manual Auto Allows you to individually set overclocking parameters. Loads the optimal settings for the system. 3-16 ...-Line Calibration [Auto] CPU Spread Spectrum [Auto] PCIE Spread Spectrum [Auto] Select Screen Select Item +- Select either one of CPU overclocking options to North Bridge [Auto] DRAM Frequency [Auto] DRAM Timing Control [Auto] 1st Information : 4-4-4-15-3-36-5-3 2nd Information : ...

User Manual
Page 83
... settings. Selecting a very high DRAM frequency may cause the system to the table below for the correct Front Side Bus and CPU External Frequency settings. ASUS P5Q PRO 3-17 3.4.2 CPU Ratio Setting [Auto] Allows you to set the PCI Express frequency. Configuration options: [Auto] [06.0] [07.0] [08.0] [09.0] ...the value. Congifuration options: [Auto] [200 MHz] [266 MHz] [333 MHz] [400 MHz] 3.4.4 DRAM Frequency [Auto] Allows you set the Ai Overclock Tuner item to set to the default setting. If this item is auto-detected by the clock generator to the system bus and PCI bus.
... settings. Selecting a very high DRAM frequency may cause the system to the table below for the correct Front Side Bus and CPU External Frequency settings. ASUS P5Q PRO 3-17 3.4.2 CPU Ratio Setting [Auto] Allows you to set the PCI Express frequency. Configuration options: [Auto] [06.0] [07.0] [08.0] [09.0] ...the value. Congifuration options: [Auto] [200 MHz] [266 MHz] [333 MHz] [400 MHz] 3.4.4 DRAM Frequency [Auto] Allows you set the Ai Overclock Tuner item to set to the default setting. If this item is auto-detected by the clock generator to the system bus and PCI bus.

User Manual
Page 85
Configuration options: [Auto] [Disabled] [Enabled] ASUS P5Q PRO 3-19 2nd Information: 8-3-5-4-6-4-6 The values vary depending on your settings of the following sub-items: READ to WRITE Delay(S/D) [Auto] Configuration options: [Auto] [1 DRAM Clocks] - [...] ALL PRE to REF Delay [Auto] Configuration options: [Auto] [1 DRAM Clocks] - [15 DRAM Clocks] 3.4.6 DRAM Static Read Control [Auto] Adjusting this item might enhance DRAM overclocking ability.
Configuration options: [Auto] [Disabled] [Enabled] ASUS P5Q PRO 3-19 2nd Information: 8-3-5-4-6-4-6 The values vary depending on your settings of the following sub-items: READ to WRITE Delay(S/D) [Auto] Configuration options: [Auto] [1 DRAM Clocks] - [...] ALL PRE to REF Delay [Auto] Configuration options: [Auto] [1 DRAM Clocks] - [15 DRAM Clocks] 3.4.6 DRAM Static Read Control [Auto] Adjusting this item might enhance DRAM overclocking ability.

User Manual
Page 86
...3.4.8 MEM. Setting this item to accelerate DRAM performance. Set this item to set the Ai Transaction Booster item to enable or disable the memory overclocking charger feature. Configuration options: [Auto] [Lighter] [Light] [Moderate] [Strong] [Stronger] 3.4.10 Ai Transaction Booster [Auto] Allows you ...item to [Light] or [Lighter] to enhance DRAM compatibility, or [Strong] or [Stronger] to [Enabled] may help enhance DRAM overclock ability. Configuration options: [Disabled] [Enabled] The following two sub-items appear only when you set the system performance. OC Charger Allows ...
...3.4.8 MEM. Setting this item to accelerate DRAM performance. Set this item to set the Ai Transaction Booster item to enable or disable the memory overclocking charger feature. Configuration options: [Auto] [Lighter] [Light] [Moderate] [Strong] [Stronger] 3.4.10 Ai Transaction Booster [Auto] Allows you ...item to [Light] or [Lighter] to enhance DRAM compatibility, or [Strong] or [Stronger] to [Enabled] may help enhance DRAM overclock ability. Configuration options: [Disabled] [Enabled] The following two sub-items appear only when you set the system performance. OC Charger Allows ...

User Manual
Page 88
...; Setting the CPU PLL Voltage, FSB Termination Voltage, DRAM Voltage and NB Voltage items to a high level may need better cooling system to enhance FSB overclocking ability or [Auto] for EMI control. Configuration options: [Auto] [Disabled] 3.4.20 PCIE Spread Spectrum [Auto] Set to [Disabled] to select the CPU Load-...~1.40V Purple 2.02V~2.20V N/A 2.22V~2.40V 1.42V~1.58V Red 2.22V~2.78V N/A 2.42V~3.08V 1.60V~2.20V 3.4.16 SB Voltage [Auto] Allows you to enhance PCIE overclocking ability or [Auto] for EMI control. See 2. The values range from 1.10V to set the South Bridge voltage.
...; Setting the CPU PLL Voltage, FSB Termination Voltage, DRAM Voltage and NB Voltage items to a high level may need better cooling system to enhance FSB overclocking ability or [Auto] for EMI control. Configuration options: [Auto] [Disabled] 3.4.20 PCIE Spread Spectrum [Auto] Set to [Disabled] to select the CPU Load-...~1.40V Purple 2.02V~2.20V N/A 2.22V~2.40V 1.42V~1.58V Red 2.22V~2.78V N/A 2.42V~3.08V 1.60V~2.20V 3.4.16 SB Voltage [Auto] Allows you to enhance PCIE overclocking ability or [Auto] for EMI control. See 2. The values range from 1.10V to set the South Bridge voltage.

User Manual
Page 116
...driver. Corel MediaOne Starter Installs the Corel MediaOne Starter application to enjoy large-sized data exchange of you computer so you to do overclocking, fan control, power saving and quiet thermal control. Visit the Microsoft website (www.microsoft.com) for Audio DVD, CD and... 4: Software support DirectX® improves the multimedia features of files such as movies, music, etc ASUS Express Gate Installs the ASUS Express Gate update application. ASUS AI Suite The ASUS AI Suite is an innovative application to open, view, and print documents in your multimedia data.
...driver. Corel MediaOne Starter Installs the Corel MediaOne Starter application to enjoy large-sized data exchange of you computer so you to do overclocking, fan control, power saving and quiet thermal control. Visit the Microsoft website (www.microsoft.com) for Audio DVD, CD and... 4: Software support DirectX® improves the multimedia features of files such as movies, music, etc ASUS Express Gate Installs the ASUS Express Gate update application. ASUS AI Suite The ASUS AI Suite is an innovative application to open, view, and print documents in your multimedia data.

User Manual
Page 135
The options on the AI Suite main window. 4.3.7 ASUS AI Booster The ASUS AI Booster application allows you to overclock the CPU speed in WIndows® environment without the hassle of booting the BIOS. ASUS P5Q PRO 4-23 After installing AI Suite from the bundled support DVD, you can launch the utility by double-clicking the AI Suite icon on the Windows® OS taskbar and click the AI Booster button on the taskbar allow you to use the default settings, adjust CPU/ Memory/PCI-E frequency manually, or create and apply your personal overclocking configurations.
The options on the AI Suite main window. 4.3.7 ASUS AI Booster The ASUS AI Booster application allows you to overclock the CPU speed in WIndows® environment without the hassle of booting the BIOS. ASUS P5Q PRO 4-23 After installing AI Suite from the bundled support DVD, you can launch the utility by double-clicking the AI Suite icon on the Windows® OS taskbar and click the AI Booster button on the taskbar allow you to use the default settings, adjust CPU/ Memory/PCI-E frequency manually, or create and apply your personal overclocking configurations.

User Manual
Page 139
Configuration Turbo Mode options C P U Overclocking Frequency +1% to +30% vCore Voltage N/A Downgrade C h i p s e t N/A Voltage Downgrade T u r n O f f Never/After 3 hard disks mins-After 5 hours CPU Loadline N/A Fan Control N/A A I N a p Never/After 3 Idle Time mins-.../Slow Never/After 3 mins-After 5 hours Never/After 3 mins-After 5 hours Light/Medium/ Heavy Keep Bios Setting/Quiet Never/After 3 mins-After 5 hours ASUS P5Q PRO 4-27 • Fan Control: Adjusts fan speeds to reduce noise and save system power. • Quiet: Lowers CPU fan speed and shuts off two chassis...
Configuration Turbo Mode options C P U Overclocking Frequency +1% to +30% vCore Voltage N/A Downgrade C h i p s e t N/A Voltage Downgrade T u r n O f f Never/After 3 hard disks mins-After 5 hours CPU Loadline N/A Fan Control N/A A I N a p Never/After 3 Idle Time mins-.../Slow Never/After 3 mins-After 5 hours Never/After 3 mins-After 5 hours Light/Medium/ Heavy Keep Bios Setting/Quiet Never/After 3 mins-After 5 hours ASUS P5Q PRO 4-27 • Fan Control: Adjusts fan speeds to reduce noise and save system power. • Quiet: Lowers CPU fan speed and shuts off two chassis...

User Manual
Page 3
Contents Contents...iii Notices...vii Safety information viii About this guide ix P5Q PRO specifications summary xi Chapter 1: Product introduction 1.1 Welcome 1-1 1.2 Package contents 1-1 1.3 Special features 1-2 1.3.1 Product highlights 1-2 1.3.2 ASUS unique features 1-4 1.3.3 ASUS Exclusive Overclocking Features 1-7 Chapter 2: Hardware information 2.1 Before you proceed 2-1 2.2 Motherboard overview 2-2 2.2.1 Motherboard layout 2-2 2.2.2 Layout contents 2-3 2.2.3 Placement direction 2-4 2.2.4 Screw holes 2-4 2.3 Central Processing Unit (CPU 2-5 2.3.1 Installing the CPU 2-5 ...
Contents Contents...iii Notices...vii Safety information viii About this guide ix P5Q PRO specifications summary xi Chapter 1: Product introduction 1.1 Welcome 1-1 1.2 Package contents 1-1 1.3 Special features 1-2 1.3.1 Product highlights 1-2 1.3.2 ASUS unique features 1-4 1.3.3 ASUS Exclusive Overclocking Features 1-7 Chapter 2: Hardware information 2.1 Before you proceed 2-1 2.2 Motherboard overview 2-2 2.2.1 Motherboard layout 2-2 2.2.2 Layout contents 2-3 2.2.3 Placement direction 2-4 2.2.4 Screw holes 2-4 2.3 Central Processing Unit (CPU 2-5 2.3.1 Installing the CPU 2-5 ...

User Manual
Page 4
...2.9.2 Using the dual function power switch 2-38 Chapter 3: BIOS setup 3.1 Managing and updating your BIOS 3-1 3.1.1 ASUS Update utility 3-1 3.1.2 ASUS EZ Flash 2 utility 3-4 3.1.3 AFUDOS utility 3-5 3.1.4 ASUS CrashFree BIOS 3 utility 3-7 3.2 BIOS setup program 3-8 3.2.1 BIOS menu screen 3-9 3.2.2 Menu bar 3-9 3.2.3 Navigation... Storage Configuration 3-13 3.3.7 AHCI Configuration 3-14 3.3.8 System Information 3-15 3.4 Ai Tweaker menu 3-16 3.4.1 Ai Overclock Tuner [Auto 3-16 3.4.2 CPU Ratio Setting [Auto 3-17 3.4.3 FSB Strap to North Bridge [Auto 3-17 3.4.4 DRAM Frequency [Auto 3-17...
...2.9.2 Using the dual function power switch 2-38 Chapter 3: BIOS setup 3.1 Managing and updating your BIOS 3-1 3.1.1 ASUS Update utility 3-1 3.1.2 ASUS EZ Flash 2 utility 3-4 3.1.3 AFUDOS utility 3-5 3.1.4 ASUS CrashFree BIOS 3 utility 3-7 3.2 BIOS setup program 3-8 3.2.1 BIOS menu screen 3-9 3.2.2 Menu bar 3-9 3.2.3 Navigation... Storage Configuration 3-13 3.3.7 AHCI Configuration 3-14 3.3.8 System Information 3-15 3.4 Ai Tweaker menu 3-16 3.4.1 Ai Overclock Tuner [Auto 3-16 3.4.2 CPU Ratio Setting [Auto 3-17 3.4.3 FSB Strap to North Bridge [Auto 3-17 3.4.4 DRAM Frequency [Auto 3-17...

User Manual
Page 12
... to 180MHz at 1MHz increment Overclocking Protection: - PCI Express frequency tuning from 200MHz up to 800MHz at 6.25mV increment - ASUS Q-Connector - ASUS EPU-6 Engine - ASUS AI Direct Llink ASUS Quiet Thermal Solution: - vDIMM: 64-step DRAM voltage control - P5Q PRO specifications summary ASUS Unique Features ASUS Stylish Features ASUS Exclusive Overclocking Features ASUS Power Saving Solution: - ASUS Q-Shield - ASUS O.C. ASUS CrashFree BIOS 3 - ASUS 8-phase Power Design -
... to 180MHz at 1MHz increment Overclocking Protection: - PCI Express frequency tuning from 200MHz up to 800MHz at 6.25mV increment - ASUS Q-Connector - ASUS EPU-6 Engine - ASUS AI Direct Llink ASUS Quiet Thermal Solution: - vDIMM: 64-step DRAM voltage control - P5Q PRO specifications summary ASUS Unique Features ASUS Stylish Features ASUS Exclusive Overclocking Features ASUS Power Saving Solution: - ASUS Q-Shield - ASUS O.C. ASUS CrashFree BIOS 3 - ASUS 8-phase Power Design -

User Manual
Page 20
... improved lifespan and enhanced thermal capacity. ASUS Quiet Thermal Solution ASUS Quiet Thermal solution makes system more stable and enhances the overclocking capability. 1-4 Chapter 1: Product Introduction 100% Japan-made conductive polymer capacitors This motherboard uses all Japan-made conductive polymer capacitors... acceleration and overclocking - ASUS EPU-6 Engine The new ASUS EPU - the world's first power saving engine, has been upgraded to the OS environment, simply click the mouse or press a key. Green ASUS This motherboard and its packaging comply with the ASUS vision of...
... improved lifespan and enhanced thermal capacity. ASUS Quiet Thermal Solution ASUS Quiet Thermal solution makes system more stable and enhances the overclocking capability. 1-4 Chapter 1: Product Introduction 100% Japan-made conductive polymer capacitors This motherboard uses all Japan-made conductive polymer capacitors... acceleration and overclocking - ASUS EPU-6 Engine The new ASUS EPU - the world's first power saving engine, has been upgraded to the OS environment, simply click the mouse or press a key. Green ASUS This motherboard and its packaging comply with the ASUS vision of...


