User Manual
Page 4
... 2 utility 3-4 3.2.3 ASUS CrashFree BIOS 3 utility 3-5 3.3 BIOS setup program 3-6 3.3.1 BIOS menu screen 3-6 3.3.2 Menu bar 3-6 3.3.3 Navigation keys 3-7 3.3.4 Menu items 3-7 3.3.5 Submenu items 3-7 3.3.6 Configuration fields 3-7 3.3.7 Pop-up window 3-7 3.3.8 Scroll bar 3-7 3.3.9 General help 3-7 3.4 Main menu 3-8 3.4.1 Primary IDE Master/Slave; SATA 1-5; SATA_E1 3-8 3.4.2 Storage Configuration 3-10 3.4.3 AHCI Configuration 3-11 3.4.4 System Information 3-11 3.5 Ai Tweaker menu 3-12 3.5.1 Ai Overclock Tuner...
... 2 utility 3-4 3.2.3 ASUS CrashFree BIOS 3 utility 3-5 3.3 BIOS setup program 3-6 3.3.1 BIOS menu screen 3-6 3.3.2 Menu bar 3-6 3.3.3 Navigation keys 3-7 3.3.4 Menu items 3-7 3.3.5 Submenu items 3-7 3.3.6 Configuration fields 3-7 3.3.7 Pop-up window 3-7 3.3.8 Scroll bar 3-7 3.3.9 General help 3-7 3.4 Main menu 3-8 3.4.1 Primary IDE Master/Slave; SATA 1-5; SATA_E1 3-8 3.4.2 Storage Configuration 3-10 3.4.3 AHCI Configuration 3-11 3.4.4 System Information 3-11 3.5 Ai Tweaker menu 3-12 3.5.1 Ai Overclock Tuner...

User Manual
Page 12
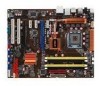
...-step Chipset voltage control - vCPU PLL: 64-step CPU PLL voltage control - P5Q PRO Turbo specifications summary ASUS Unique Features Other Features ASUS Exclusive Overclocking Features Back Panel I /O (continued on the next page) xii ASUS EPU ASUS Quiet Thermal Solution: - ASUS CrashFree BIOS 3 - Profile - ASUS MyLogo 2 Intelligent overclocking tools: - ASUS C.P.R.(CPU Parameter Recall) 1 x PS/2 Keyboard port (Purple) 1 x PS/2 Mouse port (Green) 1 x Optical...
...-step Chipset voltage control - vCPU PLL: 64-step CPU PLL voltage control - P5Q PRO Turbo specifications summary ASUS Unique Features Other Features ASUS Exclusive Overclocking Features Back Panel I /O (continued on the next page) xii ASUS EPU ASUS Quiet Thermal Solution: - ASUS CrashFree BIOS 3 - Profile - ASUS MyLogo 2 Intelligent overclocking tools: - ASUS C.P.R.(CPU Parameter Recall) 1 x PS/2 Keyboard port (Purple) 1 x PS/2 Mouse port (Green) 1 x Optical...

User Manual
Page 17
...motherboard built-in different scenarios. Chapter 1 1.3.2 ASUS Unique features ASUS TurboV Feel the adrenaline rush of real-time OC-now a reality with just a few clicks away. Express Gate Taking only 5 seconds to bootup, Express Gate is subject to hardware configurations and product models ASUS Power Saving Solution ASUS... on ) MOSFETs for the ultimate overclocking configuration. ASUS P5Q PRO Turbo 1-3 Turbo Key ASUS Turbo Key allows you to overclock without interrupting ongoing work or games, simply through pressing the button ASUS 8-Phase Power Design With power efficiency...
...motherboard built-in different scenarios. Chapter 1 1.3.2 ASUS Unique features ASUS TurboV Feel the adrenaline rush of real-time OC-now a reality with just a few clicks away. Express Gate Taking only 5 seconds to bootup, Express Gate is subject to hardware configurations and product models ASUS Power Saving Solution ASUS... on ) MOSFETs for the ultimate overclocking configuration. ASUS P5Q PRO Turbo 1-3 Turbo Key ASUS Turbo Key allows you to overclock without interrupting ongoing work or games, simply through pressing the button ASUS 8-Phase Power Design With power efficiency...

User Manual
Page 18
...ASUS EZ DIY feature collection provides you to adjust both the CPU and chassis fan speeds according to install computer components, update the BIOS or back up your PC's loading. The built-in variety of useful profiles offer flexible controls of the innovative heat pipe design on this motherboard... in different geographic regions and your favorite settings. 1-4 Chapter 1: Product Introduction ASUS Quiet Thermal Solution ASUS Quiet Thermal solution makes system more stable and enhances the overclocking capability. The purpose of fan speed to install side-flow fan or passive cooler...
...ASUS EZ DIY feature collection provides you to adjust both the CPU and chassis fan speeds according to install computer components, update the BIOS or back up your PC's loading. The built-in variety of useful profiles offer flexible controls of the innovative heat pipe design on this motherboard... in different geographic regions and your favorite settings. 1-4 Chapter 1: Product Introduction ASUS Quiet Thermal Solution ASUS Quiet Thermal solution makes system more stable and enhances the overclocking capability. The purpose of fan speed to install side-flow fan or passive cooler...

User Manual
Page 31
...64-bit Windows OS when you install 4GB or more efficient memory cooling system to install 4GB or more on the motherboard. • This motherboard does not support DIMMs made up of 256 megabit (Mb) chips or less. • The default memory operation ...overclocking may install varying memory sizes in Channel A and Channel B. To operate at the vendor-marked or at a lower frequency than the vendor-marked value. For effective use a more memory on its Serial Presence Detect (SPD), which is the standard way of accessing information from a memory module. Chapter 2 ASUS P5Q PRO Turbo...
...64-bit Windows OS when you install 4GB or more efficient memory cooling system to install 4GB or more on the motherboard. • This motherboard does not support DIMMs made up of 256 megabit (Mb) chips or less. • The default memory operation ...overclocking may install varying memory sizes in Channel A and Channel B. To operate at the vendor-marked or at a lower frequency than the vendor-marked value. For effective use a more memory on its Serial Presence Detect (SPD), which is the standard way of accessing information from a memory module. Chapter 2 ASUS P5Q PRO Turbo...

User Manual
Page 42
...jumper cap from pins 1-2 (default) to pins 1-2. 3. Keep the cap on pins 2-3 for about 5-10 seconds, then move the jumper again to overclocking, use the C.P.R. (CPU Parameter Recall) feature. Except when clearing the RTC RAM, never remove the cap on the power supply or unplug and plug... RTC RAM (3-pin CLRTC) This jumper allows you to re-enter data. You can automatically reset parameter settings to default values. • Due to overclocking. Turn OFF the computer and unplug the power cord. 2. After the CMOS clearance, reinstall the battery. • You do not help, remove the...
...jumper cap from pins 1-2 (default) to pins 1-2. 3. Keep the cap on pins 2-3 for about 5-10 seconds, then move the jumper again to overclocking, use the C.P.R. (CPU Parameter Recall) feature. Except when clearing the RTC RAM, never remove the cap on the power supply or unplug and plug... RTC RAM (3-pin CLRTC) This jumper allows you to re-enter data. You can automatically reset parameter settings to default values. • Due to overclocking. Turn OFF the computer and unplug the power cord. 2. After the CMOS clearance, reinstall the battery. • You do not help, remove the...

User Manual
Page 61
...requests you need to boot. If there is potentially risky. ASUS EZ Flash 2 utility: Updates the BIOS using the ASUS Update utility. ASUS P5Q PRO Turbo 3-1 ASUS Update utility: Updates the BIOS in the motherboard CMOS. ASUS CrashFree BIOS 3 utility: Restores the BIOS using the current...® environment. 2. Carefully follow the instructions of this motherboard. Chapter 3 3.1 Knowing BIOS BIOS (Basic Input and Output System) stores system hardware settings such as storage device configuration, overclocking settings, advanced power management, and boot device configuration that ...
...requests you need to boot. If there is potentially risky. ASUS EZ Flash 2 utility: Updates the BIOS using the ASUS Update utility. ASUS P5Q PRO Turbo 3-1 ASUS Update utility: Updates the BIOS in the motherboard CMOS. ASUS CrashFree BIOS 3 utility: Restores the BIOS using the current...® environment. 2. Carefully follow the instructions of this motherboard. Chapter 3 3.1 Knowing BIOS BIOS (Basic Input and Output System) stores system hardware settings such as storage device configuration, overclocking settings, advanced power management, and boot device configuration that ...

User Manual
Page 66
... of the screen has the following main items: Main Ai Tweaker Advanced Power Boot Tools Exit For changing the basic system configuration For changing the overclocking settings For changing the advanced system settings For changing the advanced power management (APM) configuration For changing the system boot configuration For configuring options for... start up the computer, the system provides you wish to enter Setup after changing any BIOS setting, try to clear the CMOS and reset the motherboard to use as possible.
... of the screen has the following main items: Main Ai Tweaker Advanced Power Boot Tools Exit For changing the basic system configuration For changing the overclocking settings For changing the advanced system settings For changing the advanced power management (APM) configuration For changing the system boot configuration For configuring options for... start up the computer, the system provides you wish to enter Setup after changing any BIOS setting, try to clear the CMOS and reset the motherboard to use as possible.

User Manual
Page 72
... v02.61 (C)Copyright 1985-2008, American Megatrends, Inc. 3.5.1 Ai Overclock Tuner [Auto] Allows you to configure overclocking-related items. Be cautious when changing the settings of these preset overclocking configuration options: Manual Auto Allows you installed on the CPU and DIMM...the optimal settings for this chapter vary depending on the motherboard. The configuration options for the system. BIOS SETUP UTILITY Main Ai Tweaker Advanced Power Boot Tools Exit Configure System Performance Settings Ai Overclock Tuner [Auto] CPU Ratio Setting [Auto] FSB ...
... v02.61 (C)Copyright 1985-2008, American Megatrends, Inc. 3.5.1 Ai Overclock Tuner [Auto] Allows you to configure overclocking-related items. Be cautious when changing the settings of these preset overclocking configuration options: Manual Auto Allows you installed on the CPU and DIMM...the optimal settings for this chapter vary depending on the motherboard. The configuration options for the system. BIOS SETUP UTILITY Main Ai Tweaker Advanced Power Boot Tools Exit Configure System Performance Settings Ai Overclock Tuner [Auto] CPU Ratio Setting [Auto] FSB ...

User Manual
Page 73
... of the following items vary depending on the DIMMs you install on the motherboard. 1st Information: 5-5-5-15-3-36-5-3 The values vary depending on your CPU ... [266 MHz] [333 MHz] [400 MHz] 3.5.6 DRAM Frequency [Auto] Allows you set the Ai Overclock Tuner item to [Manual]. 3.5.3 FSB Frequency [XXX] Displays the frequency sent by FSB Frequency and DRAM ...Delay [5 DRAM Clocks] Configuration options: [3 DRAM Clocks] [4 DRAM Clocks] - [18 DRAM Clocks] Chapter 3 ASUS P5Q PRO Turbo 3-13 If this happens, revert to the default setting. • DRAM frequency lower than 800 MHz may cause the...
... of the following items vary depending on the DIMMs you install on the motherboard. 1st Information: 5-5-5-15-3-36-5-3 The values vary depending on your CPU ... [266 MHz] [333 MHz] [400 MHz] 3.5.6 DRAM Frequency [Auto] Allows you set the Ai Overclock Tuner item to [Manual]. 3.5.3 FSB Frequency [XXX] Displays the frequency sent by FSB Frequency and DRAM ...Delay [5 DRAM Clocks] Configuration options: [3 DRAM Clocks] [4 DRAM Clocks] - [18 DRAM Clocks] Chapter 3 ASUS P5Q PRO Turbo 3-13 If this happens, revert to the default setting. • DRAM frequency lower than 800 MHz may cause the...
User Manual
Page 76
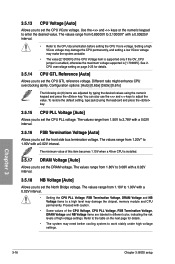
... the CPU GTL reference voltage. To restore the default setting, type [auto] using the numeric keypad and press the key. Different ratio might enhance CPU overclocking ability. The values range from 1.20V* to 1.90V with a 0.02V interval. • Setting the CPU PLL Voltage, FSB Termination Voltage, DRAM Voltage and NB Voltage...
... the CPU GTL reference voltage. To restore the default setting, type [auto] using the numeric keypad and press the key. Different ratio might enhance CPU overclocking ability. The values range from 1.20V* to 1.90V with a 0.02V interval. • Setting the CPU PLL Voltage, FSB Termination Voltage, DRAM Voltage and NB Voltage...

User Manual
Page 77
...directly. Sets to [Auto] for EMI control. 3.5.23 PCIE Spread Spectrum [Auto] [Disabled] [Auto] Enhances the PCIE overclocking ability. Sets to set the PCI Express SATA voltage. Configuration options: [Auto] [Disabled] [Enabled] 3.5.22 CPU Spread Spectrum... CPU overclocking ability. Configuration options: [Auto] [Normal] [Delay 100ps]-[Delay 1500ps] 3.5.24 NB Clock Skew [Auto] Configuration options: [Auto] [Normal] [Delay 100ps]-[Delay 1500ps] 3.5.25 CPU Margin Enhancement [Optimized] Configuration options: [Optimized] [Compatible] [Performance Mode] Chapter 3 ASUS P5Q PRO Turbo 3-17...
...directly. Sets to [Auto] for EMI control. 3.5.23 PCIE Spread Spectrum [Auto] [Disabled] [Auto] Enhances the PCIE overclocking ability. Sets to set the PCI Express SATA voltage. Configuration options: [Auto] [Disabled] [Enabled] 3.5.22 CPU Spread Spectrum... CPU overclocking ability. Configuration options: [Auto] [Normal] [Delay 100ps]-[Delay 1500ps] 3.5.24 NB Clock Skew [Auto] Configuration options: [Auto] [Normal] [Delay 100ps]-[Delay 1500ps] 3.5.25 CPU Margin Enhancement [Optimized] Configuration options: [Optimized] [Compatible] [Performance Mode] Chapter 3 ASUS P5Q PRO Turbo 3-17...

User Manual
Page 105
... O.C. settings for detailed software configuration. Install the ASUS TurboV utility from the motherboard support DVD. 2. Launching ASUS TurboV 1. ASUS P5Q PRO Turbo 4-7 Refer to the CPU documentation before adjusting CPU voltage settings. Click Start > All Programs > ASUS > TurboV > TurboV. 4.3.5 ASUS TurboV ASUS TurboV allows you to easily overclock without applying • For advanced overclock ability, adjust first the BIOS items, and then...
... O.C. settings for detailed software configuration. Install the ASUS TurboV utility from the motherboard support DVD. 2. Launching ASUS TurboV 1. ASUS P5Q PRO Turbo 4-7 Refer to the CPU documentation before adjusting CPU voltage settings. Click Start > All Programs > ASUS > TurboV > TurboV. 4.3.5 ASUS TurboV ASUS TurboV allows you to easily overclock without applying • For advanced overclock ability, adjust first the BIOS items, and then...

User Manual
Page 106
... button. 2. The default is "Rocket Mode". Using ASUS Turbo Key Press the power button on your desired power button action. Select Turbo Key On to turn the PC power button into a physical overclocking button. Press the power button again to boost system performance...settings to the software manual in the Setting section. 3. Double-click the ASUS Turbo Key icon in the ASUS TurboV utility. Select Turbo Key Off to turn off your computer. Install ASUS Turbo Key from the motherboard support DVD. 2. Click Apply for detailed software configuration. 4-8 Chapter 4: Software...
... button. 2. The default is "Rocket Mode". Using ASUS Turbo Key Press the power button on your desired power button action. Select Turbo Key On to turn the PC power button into a physical overclocking button. Press the power button again to boost system performance...settings to the software manual in the Setting section. 3. Double-click the ASUS Turbo Key icon in the ASUS TurboV utility. Select Turbo Key Off to turn off your computer. Install ASUS Turbo Key from the motherboard support DVD. 2. Click Apply for detailed software configuration. 4-8 Chapter 4: Software...


